Welcome to Fabric
Hyperledger Fabric is a platform for distributed ledger solutions, underpinned by a modular architecture delivering high degrees of confidentiality, resiliency, flexibility and scalability. It is designed to support pluggable implementations of different components, and accommodate the complexity and intricacies that exist across the economic ecosystem.
Hyperledger Fabric delivers a uniquely elastic and extensible architecture, distinguishing it from alternative blockchain solutions. Planning for the future of enterprise blockchain requires building on top of a fully-vetted, open source architecture; Hyperledger Fabric is your starting point.
It’s recommended for first-time users to begin by going through the Getting Started section in order to gain familiarity with the Fabric components and the basic transaction flow. Once comfortable, continue exploring the library for demos, technical specifications, APIs, etc.
Before diving in, watch how Fabric is Building a Blockchain for Business .
Note
This build of the docs is from the “master” branch
Prerequisites
Install cURL
Download the cURL tool if not already installed.
Note
If you’re on Windows please see the specific note on Windows extras below.
Docker and Docker Compose
You will need the following installed on the platform on which you will be operating, or developing on (or for), Hyperledger Fabric:
- MacOSX, *nix, or Windows 10: Docker v1.12 or greater is required.
- Older versions of Windows: Docker Toolbox - again, Docker version v1.12 or greater is required.
You can check the version of Docker you have installed with the following command from a terminal prompt:
docker --version
Note
Installing Docker for Mac or Windows, or Docker Toolbox will also install Docker Compose. If you already had Docker installed, you should check that you have Docker Compose version 1.8 or greater installed. If not, we recommend that you install a more recent version of Docker.
You can check the version of Docker Compose you have installed with the following command from a terminal prompt:
docker-compose --version
Go Programming Language
Hyperledger Fabric uses the Go programming language 1.7.x for many of its components.
Node.js Runtime and NPM
If you will be developing applications for Hyperledger Fabric leveraging the Fabric SDK for Node.js, you will need to have version 6.9.x of Node.js installed.
Note
Installing Node.js will also install NPM, however it is recommended
that you update the default version of NPM installed. You can upgrade
the npm tool with the following command:
npm install npm@latest -g
Windows extras
If you are developing on Windows, you may also need the following which provides a better alternative to the built-in Windows tools:
Note
On older versions of Windows, such as Windows 7, you
typically get this as part of installing Docker
Toolbox. However experience has shown this to be a poor
development environment with limited functionality. It is
suitable to run docker based scenarios, such as
Getting Started, but you may not be able to find a
suitable make command.
Note
The curl command that comes with Git and Docker Toolbox
is old and does not handle properly the redirect used in
Getting Started. Make sure you install and use a
newer version from the cURL downloads page
Getting Started
Note
These instructions have been verified to work against the version “1.0.0-beta” tagged docker images and the pre-compiled setup utilities within the supplied tar file. If you run these commands with images or tools from the current master branch, it is possible that you will see configuration and panic errors.
The getting started scenario provisions a sample Fabric network consisting of two organizations, each maintaining two peer nodes, and a “solo” ordering service.
Install prerequisites
Before we begin, if you haven’t already done so, you may wish to check that you have all the Prerequisites installed on the platform(s) on which you’ll be developing blockchain applications and/or operating Hyperledger Fabric.
Download the artifacts and binaries & pull the docker images
Note
If you are running on Windows you will want to make use of the Git
Bash shell extension for the upcoming terminal commands. Visit the
Prerequisites if you haven’t previously installed
it.
Determine a location on your machine where you want to place the artifacts and binaries.
mkdir fabric-sample
cd fabric-sample
Next, execute the following command:
curl -sSL https://goo.gl/LQkuoh | bash
This command downloads and executes a bash script that will
extract all of the necessary artifacts to set up your network and place them
into a folder named release.
It also retrieves the two platform-specific binaries - cryptogen,
configtxgen and configtxlator - which we’ll use later. Finally, the
script will download the Hyperledger Fabric docker images from
DockerHub into
your local Docker registry.
The script lists out the docker images installed upon conclusion.
Look at the names for each image; these are the components that will ultimately comprise our Fabric network. You will also notice that you have two instances of the same image ID - one tagged as “x86_64-1.0.0-beta” and one tagged as “latest”. (Note that on different architectures, the x86_64 would be replaced with the string identifying your architecture).
Want to run it now?
We provide a script that leverages these docker images to quickly bootstrap a Fabric network, join peers to a channel, and drive transactions. If you’re already familiar with Fabric or just want to see it in action, we have provided a script that runs an end-to-end sample application.
This script literally does it all. It calls generateArtifacts.sh to exercise
the cryptogen and configtxgen tools, followed by script.sh which
launches the network, joins peers to a generated channel and then drives
transactions. If you choose not to supply a channel ID, then the
script will use a default name of mychannel. The cli timeout parameter
is an optional value; if you choose not to set it, then your cli container
will exit upon conclusion of the script.
Change to the release subdirectory corresponding to your architecture
that was created in the first step, such as release/windows-amd64,
then execute one of the following commands:
./network_setup.sh up
OR
./network_setup.sh up <channel-ID> <timeout-value>
Once the demo has completed execution, run it again to clean up...
The following will kill your containers, remove the crypto material and four artifacts, and remove our the created chaincode images:
./network_setup.sh down
If you’d like to learn more about the underlying tooling and bootstrap mechanics, continue reading. In these next sections we’ll walk through the various steps and requirements to build a fully-functional Fabric.
Crypto Generator
We will use the cryptogen tool to generate the cryptographic material
(x509 certs) for our various network entities. The certificates are based on
a standard PKI implementation where validation is achieved by reaching a
common trust anchor.
How does it work?
Cryptogen consumes a file - crypto-config.yaml - that contains the network
topology and allows us to generate a library of certificates for both the
Organizations and the components that belong to those Organizations. Each
Organization is provisioned a unique root certificate (ca-cert), that binds
specific components (peers and orderers) to that Org. Transactions and communications
within Fabric are signed by an entity’s private key (keystore), and then verified
by means of a public key (signcerts). You will notice a “count” variable within
this file. We use this to specify the number of peers per Organization; in our
case it’s two peers per Org. The rest of this template is extremely
self-explanatory.
After we run the tool, the certs will be parked in a folder titled crypto-config.
Configuration Transaction Generator
The configtxgen tool is used to create four configuration artifacts: orderer bootstrap block, fabric channel configuration transaction, and two anchor peer transactions - one for each Peer Org.
The orderer block is the genesis block for the ordering service, and the channel transaction file is broadcast to the orderer at channel creation time. The anchor peer transactions, as the name might suggest, specify each Org’s anchor peer on this channel.
How does it work?
Configtxgen consumes a file - configtx.yaml - that contains the definitions
for the sample network. There are three members - one Orderer Org (OrdererOrg)
and two Peer Orgs (Org1 & Org2) each managing and maintaining two peer nodes.
This file also specifies a consortium - SampleConsortium - consisting of our
two Peer Orgs. Pay specific attention to the “Profiles” section at the top of
this file. You will notice that we have two unique headers. One for the orderer genesis
block - TwoOrgsOrdererGenesis - and one for our channel - TwoOrgsChannel.
These headers are important, as we will pass them in as arguments when we create
our artifacts. This file also contains two additional specifications that are worth
noting. Firstly, we specify the anchor peers for each Peer Org
(peer0.org1.example.com & peer0.org2.example.com). Secondly, we point to
the location of the MSP directory for each member, in turn allowing us to store the
root certificates for each Org in the orderer genesis block. This is a critical
concept. Now any network entity communicating with the ordering service can have
its digital signature verified.
For ease of use, a script - generateArtifacts.sh - is provided. The
script will generate the crypto material and our four configuration artifacts, and
subsequently output these files into the channel-artifacts folder.
Run the tools
We offer two approaches here. You can manually generate the certificates/keys and the various configuration artifacts using the commands exposed below. Alternatively, we provide a script which will generate everything in just a few seconds. It’s recommended to run through the manual approach initially, as it will better familiarize you with the tools and command syntax. However, if you just want to spin up your network, jump down to the Run the shell script section.
Manually generate the artifacts
You can refer to the generateArtifacts.sh script for the commands, however
for the sake of convenience we will also provide them here.
First let’s run the cryptogen tool. Our binary is in the bin
directory, so we need to provide the relative path to where the tool resides.
Make sure you are in the directory correlated to your platform. For example,
OSX users would be in release/darwin-amd64 when running the following commands:
./bin/cryptogen generate --config=./crypto-config.yaml
You will likely see the following warning. It’s innocuous, ignore it:
[bccsp] GetDefault -> WARN 001 Before using BCCSP, please call InitFactories(). Falling back to bootBCCSP.
Next, we need to tell the configtxgen tool where to look for the
configtx.yaml file that it needs to ingest. We will tell it look in our
present working directory:
export FABRIC_CFG_PATH=$PWD
Create the orderer genesis block:
./bin/configtxgen -profile TwoOrgsOrdererGenesis -outputBlock ./channel-artifacts/genesis.block
You can ignore the logs regarding intermediate certs, we are not using them in this crypto implementation.
Create the channel transaction artifact:
# make sure to set the <channel-ID> parm

./bin/configtxgen -profile TwoOrgsChannel -outputCreateChannelTx ./channel-artifacts/channel.tx -channelID <channel-ID>
Define the anchor peer for Org1 on the channel:
# make sure to set the <channel-ID> parm

./bin/configtxgen -profile TwoOrgsChannel -outputAnchorPeersUpdate ./channel-artifacts/Org1MSPanchors.tx -channelID <channel-ID> -asOrg Org1MSP
Define the anchor peer for Org2 on the channel:
# make sure to set the <channel-ID> parm

./bin/configtxgen -profile TwoOrgsChannel -outputAnchorPeersUpdate ./channel-artifacts/Org2MSPanchors.tx -channelID <channel-ID> -asOrg Org2MSP
Run the shell script
You can skip this step if you just manually generated the crypto and artifacts. However, if you want to see this script in action, delete your crypto material and channel artifacts with the following command:
./network_setup.sh down
Now proceed...
Make sure you are in the <your_platform> directory where the script resides.
Decide upon a unique name for your channel and replace the <channel-ID> parm
with a name of your choice. The script will fail if you do not supply a name.
./generateArtifacts.sh <channel-ID>
The output of the script is somewhat verbose, as it generates the crypto libraries and multiple artifacts. However, you will notice five distinct and self-explanatory messages in your terminal. They are as follows:
##########################################################
##### Generate certificates using cryptogen tool #########
##########################################################

##########################################################
#########  Generating Orderer Genesis block ##############
##########################################################

#################################################################
### Generating channel configuration transaction 'channel.tx' ###
#################################################################

#################################################################
#######    Generating anchor peer update for Org0MSP   ##########
#################################################################

#################################################################
#######    Generating anchor peer update for Org1MSP   ##########
#################################################################
These configuration transactions will bundle the crypto material for the participating members and their network components and output an orderer genesis block and three channel transaction artifacts. These artifacts are required to successfully bootstrap a Fabric network and create a channel to transact upon.
Start the network
We will leverage a docker-compose script to spin up our network. The docker-compose
points to the images that we have already downloaded, and bootstraps the orderer
with our previously generated orderer.block. Before launching the network, open
the docker-compose-cli.yaml file and comment out the script.sh in the CLI
container. Your docker-compose should look like this:
working_dir: /opt/gopath/src/github.com/hyperledger/fabric/peer
# command: /bin/bash -c './scripts/script.sh ${CHANNEL_NAME}; sleep $TIMEOUT'
volumes
If left uncommented, the script will exercise all of the CLI commands when the network is started. However, we want to go through the commands manually in order to expose the syntax and functionality of each call.
Pass in a moderately high value for the TIMEOUT variable (specified in seconds);
otherwise the CLI container, by default, will exit after 60 seconds.
Start your network:
# make sure you are in the <your_platform> directory where your docker-compose script resides

CHANNEL_NAME=<channel-id> TIMEOUT=<pick_a_value> docker-compose -f docker-compose-cli.yaml up -d
If you want to see the realtime logs for your network, then do not supply the -d flag.
If you let the logs stream, then you will need to open a second terminal to execute the CLI calls.
Environment variables
For the following CLI commands against peer0.org1.example.com to work, we need
to preface our commands with the four environment variables given below. These
variables for peer0.org1.example.com are baked into the CLI container,
therefore we can operate without passing them. HOWEVER, if you want to send
calls to other peers or the orderer, then you will need to provide these
values accordingly. Inspect the docker-compose-base.yaml for the specific
paths:
# Environment variables for PEER0

CORE_PEER_MSPCONFIGPATH=/opt/gopath/src/github.com/hyperledger/fabric/peer/crypto/peerOrganizations/org1.example.com/users/Admin@org1.example.com/msp
CORE_PEER_ADDRESS=peer0.org1.example.com:7051
CORE_PEER_LOCALMSPID="Org1MSP"
CORE_PEER_TLS_ROOTCERT_FILE=/opt/gopath/src/github.com/hyperledger/fabric/peer/crypto/peerOrganizations/org1.example.com/peers/peer0.org1.example.com/tls/ca.crt
Create & Join Channel
Exec into the cli container:
docker exec -it cli bash
If successful you should see the following:
root@0d78bb69300d:/opt/gopath/src/github.com/hyperledger/fabric/peer#
Recall that we used the configtxgen tool to generate a channel configuration
artifact - channel.tx. We are going to pass in this artifact to the orderer
as part of the create channel request.
Note
notice the -- cafile which we pass as part of this command. It is the
local path to the orderer’s root cert, allowing us to verify the TLS handshake.
We specify our channel name with the -c flag and our channel configuration
transaction with the -f flag. In this case it is channel.tx, however
you can mount your own configuration transaction with a different name.
# the channel.tx file is mounted in the channel-artifacts directory within your cli container
# as a result, we pass the full path for the file
# we also pass the path for the orderer ca-cert in order to verify the TLS handshake
# be sure to replace the $CHANNEL_NAME variable appropriately

peer channel create -o orderer.example.com:7050 -c $CHANNEL_NAME -f ./channel-artifacts/channel.tx --tls $CORE_PEER_TLS_ENABLED --cafile /opt/gopath/src/github.com/hyperledger/fabric/peer/crypto/ordererOrganizations/example.com/orderers/orderer.example.com/msp/cacerts/ca.example.com-cert.pem
This command returns a genesis block - <channel-ID.block> - which we will use to join the channel.
It contains the configuration information specified in channel.tx.
Note
You will remain in the CLI container for the remainder of
these manual commands. You must also remember to preface all commands
with the corresponding environment variables when targeting a peer other than
peer0.org1.example.com.
Now let’s join peer0.org1.example.com to the channel.
# By default, this joins ``peer0.org1.example.com`` only
# the <channel-ID>.block was returned by the previous command

 peer channel join -b <channel-ID.block>
You can make other peers join the channel as necessary by making appropriate changes in the four environment variables.
Install & Instantiate
Applications interact with the blockchain ledger through chaincode. As such we need to install the chaincode on any peer that will execute and endorse transactions, and then instantiate the chaincode on the channel.
First, install the sample go code onto one of the four peer nodes. This command places the source code onto our peer’s filesystem.
peer chaincode install -n mycc -v 1.0 -p github.com/hyperledger/fabric/examples/chaincode/go/chaincode_example02
Next, instantiate the chaincode on the channel. This will initialize the chaincode
on the channel, set the endorsement policy for the chaincode, and launch a chaincode
container for the targeted peer. Take note of the -P argument. This is our policy where we specify the required
level of endorsement for a transaction against this chaincode to be validated.
In the command below you’ll notice that we specify our policy as
-P "OR ('Org0MSP.member','Org1MSP.member')". This means that we need
“endorsement” from a peer belonging to Org1 OR Org2 (i.e. only one endorsement).
If we changed the syntax to AND then we would need two endorsements.
# be sure to replace the $CHANNEL_NAME environment variable
# if you did not install your chaincode with a name of mycc, then modify that argument as well

peer chaincode instantiate -o orderer.example.com:7050 --tls $CORE_PEER_TLS_ENABLED --cafile /opt/gopath/src/github.com/hyperledger/fabric/peer/crypto/ordererOrganizations/example.com/orderers/orderer.example.com/msp/cacerts/ca.example.com-cert.pem -C $CHANNEL_NAME -n mycc -v 1.0 -p github.com/hyperledger/fabric/examples/chaincode/go/chaincode_example02 -c '{"Args":["init","a", "100", "b","200"]}' -P "OR ('Org1MSP.member','Org2MSP.member')"
See the endorsement policies documentation for more details on policy implementation.
Query
Let’s query for the value of a to make sure the chaincode was properly
instantiated and the state DB was populated. The syntax for query is as follows:
# be sure to set the -C and -n flags appropriately

peer chaincode query -C $CHANNEL_NAME -n mycc -c '{"Args":["query","a"]}'
Invoke
Now let’s move 10 from a to b. This transaction will cut a new block and
update the state DB. The syntax for invoke is as follows:
# be sure to set the -C and -n flags appropriately

peer chaincode invoke -o orderer.example.com:7050  --tls $CORE_PEER_TLS_ENABLED --cafile /opt/gopath/src/github.com/hyperledger/fabric/peer/crypto/ordererOrganizations/example.com/orderers/orderer.example.com/msp/cacerts/ca.example.com-cert.pem  -C $CHANNEL_NAME -n mycc -c '{"Args":["invoke","a","b","10"]}'
Query
Let’s confirm that our previous invocation executed properly. We initialized the
key a with a value of 100 and just removed 10 with our previous
invocation. Therefore, a query against a should reveal 90. The syntax
for query is as follows.
# be sure to set the -C and -n flags appropriately

peer chaincode query -C $CHANNEL_NAME -n mycc -c '{"Args":["query","a"]}'
We should see the following:
Query Result: 90
Feel free to start over and manipulate the key value pairs and subsequent invocations.
Scripts
We exposed the verbosity of the commands in order to provide some edification on the underlying flow and the appropriate syntax. Entering the commands manually through the CLI is quite onerous, therefore we provide a few scripts to do the entirety of the heavy lifting.
All in one
This script literally does it all. It calls generateArtifacts.sh to exercise
the cryptogen and configtxgen tools, followed by script.sh which
launches the network, joins peers to a generated channel and then drives
transactions. If you choose not to supply a channel ID, then the
script will use a default name of mychannel. The cli timeout parameter
is an optional value; if you choose not to set it, then your cli container
will exit upon conclusion of the script.
./network_setup.sh up
OR
./network_setup.sh up <channel-ID> <timeout-value>
Now clean up...
The following script will kill our containers, remove the crypto material and four artifacts, and remove our three chaincode images:
./network_setup.sh down
Config only
The other option is to manually generate your crypto material and configuration
artifacts, and then use the embedded script.sh in the docker-compose files
to drive your network. Make sure this script is not commented out in your
CLI container. Before starting, make sure you’ve cleaned up your environment:
./network_setup.sh down
Next, open your docker-compose-cli.yaml and make sure the script.sh
command is not commented out in the CLI container. It should look exactly like
this:
working_dir: /opt/gopath/src/github.com/hyperledger/fabric/peer
command: /bin/bash -c './scripts/script.sh ${CHANNEL_NAME}; sleep $TIMEOUT'
volumes
From the <your_platform> directory, use docker-compose to spawn the network
entities and drive the tests. Notice that you can set a TIMEOUT variable
(specified in seconds) so that your cli container does not exit after the script
completes. You can choose any value:
# the TIMEOUT variable is optional

CHANNEL_NAME=<channel-id> TIMEOUT=<pick_a_value> docker-compose -f docker-compose-cli.yaml up -d
If you created a unique channel name, be sure to pass in that parameter. For example,
CHANNEL_NAME=abc TIMEOUT=1000 docker-compose -f docker-compose-cli.yaml up -d
Wait, 60 seconds or so. Behind the scenes, there are transactions being sent
to the peers. Execute a docker ps to view your active containers.
You should see an output identical to the following:
CONTAINER ID        IMAGE                                 COMMAND                  CREATED             STATUS              PORTS                                              NAMES
b568de3fe931        dev-peer1.org2.example.com-mycc-1.0   "chaincode -peer.a..."   4 minutes ago       Up 4 minutes                                                           dev-peer1.org2.example.com-mycc-1.0
17c1c82087e7        dev-peer0.org1.example.com-mycc-1.0   "chaincode -peer.a..."   4 minutes ago       Up 4 minutes                                                           dev-peer0.org1.example.com-mycc-1.0
0e1c5034c47b        dev-peer0.org2.example.com-mycc-1.0   "chaincode -peer.a..."   4 minutes ago       Up 4 minutes                                                           dev-peer0.org2.example.com-mycc-1.0
71339e7e1d38        hyperledger/fabric-peer               "peer node start -..."   5 minutes ago       Up 5 minutes        0.0.0.0:8051->7051/tcp, 0.0.0.0:8053->7053/tcp     peer1.org1.example.com
add6113ffdcf        hyperledger/fabric-peer               "peer node start -..."   5 minutes ago       Up 5 minutes        0.0.0.0:10051->7051/tcp, 0.0.0.0:10053->7053/tcp   peer1.org2.example.com
689396c0e520        hyperledger/fabric-peer               "peer node start -..."   5 minutes ago       Up 5 minutes        0.0.0.0:7051->7051/tcp, 0.0.0.0:7053->7053/tcp     peer0.org1.example.com
65424407a653        hyperledger/fabric-orderer            "orderer"                5 minutes ago       Up 5 minutes        0.0.0.0:7050->7050/tcp                             orderer.example.com
ce14853db660        hyperledger/fabric-peer               "peer node start -..."   5 minutes ago       Up 5 minutes        0.0.0.0:9051->7051/tcp, 0.0.0.0:9053->7053/tcp     peer0.org2.example.com
If you set a moderately high TIMEOUT value, then you will see your cli
container as well.
What’s happening behind the scenes?
- A script -
script.sh- is baked inside the CLI container. The script drives thecreateChannelcommand against the supplied channel name and uses the channel.tx file for channel configuration. - The output of
createChannelis a genesis block -<your_channel_name>.block- which gets stored on the peers’ file systems and contains the channel configuration specified from channel.tx. - The
joinChannelcommand is exercised for all four peers, which takes as input the previously generated genesis block. This command instructs the peers to join<your_channel_name>and create a chain starting with<your_channel_name>.block. - Now we have a channel consisting of four peers, and two
organizations. This is our
TwoOrgsChannelprofile. peer0.org1.example.comandpeer1.org1.example.combelong to Org1;peer0.org2.example.comandpeer1.org2.example.combelong to Org2- These relationships are defined through the
crypto-config.yamland the MSP path is specified in our docker compose. - The anchor peers for Org1MSP (
peer0.org1.example.com) and Org2MSP (peer0.org2.example.com) are then updated. We do this by passing theOrg1MSPanchors.txandOrg2MSPanchors.txartifacts to the ordering service along with the name of our channel. - A chaincode - chaincode_example02 - is installed on
peer0.org1.example.comandpeer0.org2.example.com - The chaincode is then “instantiated” on
peer0.org2.example.com. Instantiation adds the chaincode to the channel, starts the container for the target peer, and initializes the key value pairs associated with the chaincode. The initial values for this example are [“a”,”100” “b”,”200”]. This “instantiation” results in a container by the name ofdev-peer0.org2.example.com-mycc-1.0starting. - The instantiation also passes in an argument for the endorsement
policy. The policy is defined as
-P "OR ('Org1MSP.member','Org2MSP.member')", meaning that any transaction must be endorsed by a peer tied to Org1 or Org2. - A query against the value of “a” is issued to
peer0.org1.example.com. The chaincode was previously installed onpeer0.org1.example.com, so this will start a container for Org1 peer0 by the name ofdev-peer0.org1.example.com-mycc-1.0. The result of the query is also returned. No write operations have occurred, so a query against “a” will still return a value of “100”. - An invoke is sent to
peer0.org1.example.comto move “10” from “a” to “b” - The chaincode is then installed on
peer1.org2.example.com - A query is sent to
peer1.org2.example.comfor the value of “a”. This starts a third chaincode container by the name ofdev-peer1.org2.example.com-mycc-1.0. A value of 90 is returned, correctly reflecting the previous transaction during which the value for key “a” was modified by 10.
What does this demonstrate?
Chaincode MUST be installed on a peer in order for it to
successfully perform read/write operations against the ledger.
Furthermore, a chaincode container is not started for a peer until an init or
traditional transaction - read/write - is performed against that chaincode (e.g. query for
the value of “a”). The transaction causes the container to start. Also,
all peers in a channel maintain an exact copy of the ledger which
comprises the blockchain to store the immutable, sequenced record in
blocks, as well as a state database to maintain current fabric state.
This includes those peers that do not have chaincode installed on them
(like peer1.org1.example.com in the above example) . Finally, the chaincode is accessible
after it is installed (like peer1.org2.example.com in the above example) because it
has already been instantiated.
How do I see these transactions?
Check the logs for the CLI docker container.
docker logs -f cli
You should see the following output:
2017-05-16 17:08:01.366 UTC [msp] GetLocalMSP -> DEBU 004 Returning existing local MSP
2017-05-16 17:08:01.366 UTC [msp] GetDefaultSigningIdentity -> DEBU 005 Obtaining default signing identity
2017-05-16 17:08:01.366 UTC [msp/identity] Sign -> DEBU 006 Sign: plaintext: 0AB1070A6708031A0C08F1E3ECC80510...6D7963631A0A0A0571756572790A0161
2017-05-16 17:08:01.367 UTC [msp/identity] Sign -> DEBU 007 Sign: digest: E61DB37F4E8B0D32C9FE10E3936BA9B8CD278FAA1F3320B08712164248285C54
Query Result: 90
2017-05-16 17:08:15.158 UTC [main] main -> INFO 008 Exiting.....
===================== Query on PEER3 on channel 'mychannel' is successful =====================

===================== All GOOD, End-2-End execution completed =====================


 _____   _   _   ____            _____   ____    _____
| ____| | \ | | |  _ \          | ____| |___ \  | ____|
|  _|   |  \| | | | | |  _____  |  _|     __) | |  _|
| |___  | |\  | | |_| | |_____| | |___   / __/  | |___
|_____| |_| \_| |____/          |_____| |_____| |_____|
You can scroll through these logs to see the various transactions.
How can I see the chaincode logs?
Inspect the individual chaincode containers to see the separate transactions executed against each container. Here is the combined output from each container:
$ docker logs dev-peer0.org2.example.com-mycc-1.0
04:30:45.947 [BCCSP_FACTORY] DEBU : Initialize BCCSP [SW]
ex02 Init
Aval = 100, Bval = 200

$ docker logs dev-peer0.org1.example.com-mycc-1.0
04:31:10.569 [BCCSP_FACTORY] DEBU : Initialize BCCSP [SW]
ex02 Invoke
Query Response:{"Name":"a","Amount":"100"}
ex02 Invoke
Aval = 90, Bval = 210

$ docker logs dev-peer1.org2.example.com-mycc-1.0
04:31:30.420 [BCCSP_FACTORY] DEBU : Initialize BCCSP [SW]
ex02 Invoke
Query Response:{"Name":"a","Amount":"90"}
Understanding the docker-compose topology
The <your_platform directory offers us two flavors of docker-compose files, both of which
are extended from the docker-compose-base.yaml (located in the base folder). Our first flavor,
docker-compose-cli.yaml, provides us with a CLI container, along with an orderer,
four peers, and the optional couchDB containers. We use this docker-compose for
the entirety of the instructions on this page.
Note
the remainder of this section covers a docker-compose file designed for the SDK. Refer to the Node.js SDK repo for details on running these tests.
The second flavor, docker-compose-e2e.yaml, is constructed to run end-to-end tests
using the Node.js SDK. Aside from functioning with the SDK, its primary differentiation
is that there are containers for the fabric-ca servers. As a result, we are able
to send REST calls to the organizational CAs for user registration and enrollment.
If you want to use the docker-compose-e2e.yaml without first running the
All in one script, then we will need to make four slight modifications.
We need to point to the private keys for our Organization’s CA’s. You can locate
these values in your crypto-config folder. For example, to locate the private
key for Org1 we would follow this path - crypto-config/peerOrganizations/org1.example.com/ca/.
The private key is a long hash value followed by _sk. The path for Org2
would be - crypto-config/peerOrganizations/org2.example.com/ca/.
In the docker-compose-e2e.yaml update the FABRIC_CA_SERVER_TLS_KEYFILE variable
for ca0 and ca1. You also need to edit the path that is provided in the command
to start the ca server. You are providing the same private key twice for each
CA container.
Using CouchDB
The state database can be switched from the default (goleveldb) to CouchDB. The same chaincode functions are available with CouchDB, however, there is the added ability to perform rich and complex queries against the state database data content contingent upon the chaincode data being modeled as JSON.
To use CouchDB instead of the default database (goleveldb), follow the same procedures outlined earlier for generating the artifacts, except when starting the network pass the couchdb docker-compose as well:
# make sure you are in the /e2e_cli directory where your docker-compose script resides
CHANNEL_NAME=<channel-id> TIMEOUT=<pick_a_value> docker-compose -f docker-compose-cli.yaml -f docker-compose-couch.yaml up -d
chaincode_example02 should now work using CouchDB underneath.
Note
If you choose to implement mapping of the fabric-couchdb container port to a host port, please make sure you are aware of the security implications. Mapping of the port in a development environment makes the CouchDB REST API available, and allows the visualization of the database via the CouchDB web interface (Fauxton). Production environments would likely refrain from implementing port mapping in order to restrict outside access to the CouchDB containers.
You can use chaincode_example02 chaincode against the CouchDB state database
using the steps outlined above, however in order to exercise the CouchDB query
capabilities you will need to use a chaincode that has data modeled as JSON,
(e.g. marbles02). You can locate the marbles02 chaincode in the
fabric/examples/chaincode/go directory.
We will follow the same process to create and join the channel as outlined in the Manually exercise the commands section above. Once you have joined your peer(s) to the channel, use the following steps to interact with the marbles02 chaincode:
- Install and instantiate the chaincode on
peer0.org1.example.com:
# be sure to modify the $CHANNEL_NAME variable accordingly for the instantiate command

peer chaincode install -o orderer.example.com:7050 -n marbles -v 1.0 -p github.com/hyperledger/fabric/examples/chaincode/go/marbles02
peer chaincode instantiate -o orderer.example.com:7050 --tls $CORE_PEER_TLS_ENABLED --cafile /opt/gopath/src/github.com/hyperledger/fabric/peer/crypto/ordererOrganizations/example.com/orderers/orderer.example.com/msp/cacerts/ca.example.com-cert.pem -C $CHANNEL_NAME -n marbles -v 1.0 -p github.com/hyperledger/fabric/examples/chaincode/go/marbles02 -c '{"Args":["init"]}' -P "OR ('Org0MSP.member','Org1MSP.member')"
- Create some marbles and move them around:
# be sure to modify the $CHANNEL_NAME variable accordingly

peer chaincode invoke -o orderer.example.com:7050 --tls $CORE_PEER_TLS_ENABLED --cafile /opt/gopath/src/github.com/hyperledger/fabric/peer/crypto/ordererOrganizations/example.com/orderers/orderer.example.com/msp/cacerts/ca.example.com-cert.pem -C $CHANNEL_NAME -n marbles -c '{"Args":["initMarble","marble1","blue","35","tom"]}'
peer chaincode invoke -o orderer.example.com:7050 --tls $CORE_PEER_TLS_ENABLED --cafile /opt/gopath/src/github.com/hyperledger/fabric/peer/crypto/ordererOrganizations/example.com/orderers/orderer.example.com/msp/cacerts/ca.example.com-cert.pem -C $CHANNEL_NAME -n marbles -c '{"Args":["initMarble","marble2","red","50","tom"]}'
peer chaincode invoke -o orderer.example.com:7050 --tls $CORE_PEER_TLS_ENABLED --cafile /opt/gopath/src/github.com/hyperledger/fabric/peer/crypto/ordererOrganizations/example.com/orderers/orderer.example.com/msp/cacerts/ca.example.com-cert.pem -C $CHANNEL_NAME -n marbles -c '{"Args":["initMarble","marble3","blue","70","tom"]}'
peer chaincode invoke -o orderer.example.com:7050 --tls $CORE_PEER_TLS_ENABLED --cafile /opt/gopath/src/github.com/hyperledger/fabric/peer/crypto/ordererOrganizations/example.com/orderers/orderer.example.com/msp/cacerts/ca.example.com-cert.pem -C $CHANNEL_NAME -n marbles -c '{"Args":["transferMarble","marble2","jerry"]}'
peer chaincode invoke -o orderer.example.com:7050 --tls $CORE_PEER_TLS_ENABLED --cafile /opt/gopath/src/github.com/hyperledger/fabric/peer/crypto/ordererOrganizations/example.com/orderers/orderer.example.com/msp/cacerts/ca.example.com-cert.pem -C $CHANNEL_NAME -n marbles -c '{"Args":["transferMarblesBasedOnColor","blue","jerry"]}'
peer chaincode invoke -o orderer.example.com:7050 --tls $CORE_PEER_TLS_ENABLED --cafile /opt/gopath/src/github.com/hyperledger/fabric/peer/crypto/ordererOrganizations/example.com/orderers/orderer.example.com/msp/cacerts/ca.example.com-cert.pem -C $CHANNEL_NAME -n marbles -c '{"Args":["delete","marble1"]}'
If you chose to map the CouchDB ports in docker-compose, you can now view the state database through the CouchDB web interface (Fauxton) by opening a browser and navigating to the following URL:
http://localhost:5984/_utils
You should see a database named mychannel (or your unique channel name) and
the documents inside it.
Note
For the below commands, be sure to update the $CHANNEL_NAME variable appropriately.
You can run regular queries from the CLI (e.g. reading marble2):
peer chaincode query -C $CHANNEL_NAME -n marbles -c '{"Args":["readMarble","marble2"]}'
The output should display the details of marble2:
Query Result: {"color":"red","docType":"marble","name":"marble2","owner":"jerry","size":50}
You can retrieve the history of a specific marble - e.g. marble1:
peer chaincode query -C $CHANNEL_NAME -n marbles -c '{"Args":["getHistoryForMarble","marble1"]}'
The output should display the transactions on marble1:
Query Result: [{"TxId":"1c3d3caf124c89f91a4c0f353723ac736c58155325f02890adebaa15e16e6464", "Value":{"docType":"marble","name":"marble1","color":"blue","size":35,"owner":"tom"}},{"TxId":"755d55c281889eaeebf405586f9e25d71d36eb3d35420af833a20a2f53a3eefd", "Value":{"docType":"marble","name":"marble1","color":"blue","size":35,"owner":"jerry"}},{"TxId":"819451032d813dde6247f85e56a89262555e04f14788ee33e28b232eef36d98f", "Value":}]
You can also perform rich queries on the data content, such as querying marble fields by owner jerry:
peer chaincode query -C $CHANNEL_NAME -n marbles -c '{"Args":["queryMarblesByOwner","jerry"]}'
The output should display the two marbles owned by jerry:
Query Result: [{"Key":"marble2", "Record":{"color":"red","docType":"marble","name":"marble2","owner":"jerry","size":50}},{"Key":"marble3", "Record":{"color":"blue","docType":"marble","name":"marble3","owner":"jerry","size":70}}]
A Note on Data Persistence
If data persistence is desired on the peer container or the CouchDB container,
one option is to mount a directory in the docker-host into a relevant directory
in the container. For example, you may add the following two lines in
the peer container specification in the docker-compose-base.yaml file:
volumes:
 - /var/hyperledger/peer0:/var/hyperledger/production
For the CouchDB container, you may add the following two lines in the CouchDB container specification:
volumes:
 - /var/hyperledger/couchdb0:/opt/couchdb/data
Troubleshooting
- Always start your network fresh. Use the following command to remove artifacts, crypto, containers and chaincode images:
./network_setup.sh down
- YOU WILL SEE ERRORS IF YOU DO NOT REMOVE CONTAINERS AND IMAGES
- If you see docker errors, first check your version (should be 1.12 or above), and then try restarting your docker process. Problems with Docker are oftentimes not immediately recognizable. For example, you may see errors resulting from an inability to access crypto material mounted within a container.
- If they persist remove your images and start from scratch:
docker rm -f $(docker ps -aq)
docker rmi -f $(docker images -q)
- If you see errors on your create, instantiate, invoke or query commands, make sure you have properly updated the channel name and chaincode name. There are placeholder values in the supplied sample commands.
- If you see the below error:
Error: Error endorsing chaincode: rpc error: code = 2 desc = Error installing chaincode code mycc:1.0(chaincode /var/hyperledger/production/chaincodes/mycc.1.0 exits)
You likely have chaincode images (e.g. dev-peer1.org2.example.com-mycc-1.0 or
dev-peer0.org1.example.com-mycc-1.0) from prior runs. Remove them and try
again.
docker rmi -f $(docker images | grep peer[0-9]-peer[0-9] | awk '{print $3}')
- If you see something similar to the following:
Error connecting: rpc error: code = 14 desc = grpc: RPC failed fast due to transport failure
Error: rpc error: code = 14 desc = grpc: RPC failed fast due to transport failure
Make sure you are running your network against the “beta” images that have been retagged as “latest”.
If you see the below error:
[configtx/tool/localconfig] Load -> CRIT 002 Error reading configuration: Unsupported Config Type ""
panic: Error reading configuration: Unsupported Config Type ""
Then you did not set the FABRIC_CFG_PATH environment variable properly. The
configtxgen tool needs this variable in order to locate the configtx.yaml. Go
back and recreate your channel artifacts.
- To cleanup the network, use the
downoption:
./network_setup.sh down
- If you see an error stating that you still have “active endpoints”, then prune your docker networks. This will wipe your previous networks and start you with a fresh environment:
docker network prune
You will see the following message:
WARNING! This will remove all networks not used by at least one container.
Are you sure you want to continue? [y/N]
Select y.
- If you continue to see errors, share your logs on the # fabric-questions channel on Hyperledger Rocket Chat.
Introduction
Hyperledger Fabric is a platform for distributed ledger solutions underpinned by a modular architecture delivering high degrees of confidentiality, resiliency, flexibility and scalability. It is designed to support pluggable implementations of different components and accommodate the complexity and intricacies that exist across the economic ecosystem.
Fabric delivers a uniquely elastic and extensible architecture, distinguishing it from alternative blockchain solutions. Planning for the future of enterprise blockchain requires building on top of a fully vetted, open-source architecture; Hyperledger Fabric is your starting point.
We recommended first-time users begin by going through the rest of the introduction below in order to gain familiarity with how blockchains work and with the specific features and components of Fabric.
Once comfortable – or if you’re already familiar with blockchain and Hyperledger Fabric – go to Getting Started and from there explore the demos, technical specifications, APIs, etc.
What is a Blockchain?
A Distributed Ledger
At the heart of a blockchain network is a distributed ledger that records all the transactions that take place on the network.
A blockchain ledger is often described as decentralized because it is replicated across many network participants, each of whom collaborate in its maintenance. We’ll see that decentralization and collaboration are powerful attributes that mirror the way businesses exchange goods and services in the real world.

In addition to being decentralized and collaborative, the information recorded to a blockchain is append-only, using cryptographic techniques that guarantee that once a transaction has been added to the ledger it cannot be modified. This property of immutability makes it simple to determine the provenance of information because participants can be sure information has not been changed after the fact. It’s why blockchains are sometimes described as systems of proof.
Smart Contracts
To support the consistent update of information – and to enable a whole host of ledger functions (transacting, querying, etc) – a blockchain network uses smart contracts to provide controlled access to the ledger.

Smart contracts are not only a key mechanism for encapsulating information and keeping it simple across the network, they can also be written to allow participants to execute certain aspects of transactions automatically.
A smart contract can, for example, be written to stipulate the cost of shipping an item that changes depending on when it arrives. With the terms agreed to by both parties and written to the ledger, the appropriate funds change hands automatically when the item is received.
Consensus
The process of keeping the ledger transactions synchronized across the network – to ensure that ledgers only update when transactions are approved by the appropriate participants, and that when ledgers do update, they update with the same transactions in the same order – is called consensus.

We’ll learn a lot more about ledgers, smart contracts and consensus later. For now, it’s enough to think of a blockchain as a shared, replicated transaction system which is updated via smart contracts and kept consistently synchronized through a collaborative process called consensus.
Why is a Blockchain useful?
Today’s Systems of Record
The transactional networks of today are little more than slightly updated versions of networks that have existed since business records have been kept. The members of a Business Network transact with each other, but they maintain separate records of their transactions. And the things they’re transacting – whether it’s Flemish tapestries in the 16th century or the securities of today – must have their provenance established each time they’re sold to ensure that the business selling an item possesses a chain of title verifying their ownership of it.
What you’re left with is a business network that looks like this:

Modern technology has taken this process from stone tablets and paper folders to hard drives and cloud platforms, but the underlying structure is the same. Unified systems for managing the identity of network participants do not exist, establishing provenance is so laborious it takes days to clear securities transactions (the world volume of which is numbered in the many trillions of dollars), contracts must be signed and executed manually, and every database in the system contains unique information and therefore represents a single point of failure.
It’s impossible with today’s fractured approach to information and process sharing to build a system of record that spans a business network, even though the needs of visibility and trust are clear.
The Blockchain Difference
What if instead of the rat’s nest of inefficiencies represented by the “modern” system of transactions, business networks had standard methods for establishing identity on the network, executing transactions, and storing data? What if establishing the provenance of an asset could be determined by looking through a list of transactions that, once written, cannot be changed, and can therefore be trusted?
That business network would look more like this:

This is a blockchain network. Every participant in it has their own replicated copy of the ledger. In addition to ledger information being shared, the processes which update the ledger are also shared. Unlike today’s systems, where a participant’s private programs are used to update their private ledgers, a blockchain system has shared programs to update shared ledgers.
With the ability to coordinate their business network through a shared ledger, blockchain networks can reduce the time, cost, and risk associated with private information and processing while improving trust and visibility.
You now know what blockchain is and why it’s useful. There are a lot of other details that are important, but they all relate to these fundamental ideas of the sharing of information and processes.
What is Hyperledger Fabric?
The Linux Foundation founded Hyperledger in 2015 to advance cross-industry blockchain technologies. Rather than declaring a single blockchain standard, it encourages a collaborative approach to developing blockchain technologies via a community process, with intellectual property rights that encourage open development and the adoption of key standards over time.
Hyperledger Fabric is a one of the blockchain projects within Hyperledger. Like other blockchain technologies, it has a ledger, uses smart contracts, and is a system by which participants manage their transactions.
Where Hyperledger Fabric breaks from some other blockchain systems is that it is private and permissioned. Rather than the “proof of work” some blockchain networks use to verify identity (allowing anyone who meets those criteria to join the network), the members of a Fabric network enroll through a membership services provider.
Fabric also offers several pluggable options. Ledger data can be stored in multiple formats, consensus mechanisms can be switched in and out, and different membership service providers are supported.
Fabric also offers the ability to create channels, allowing a group of participants to create a separate ledger of transactions. This is an especially important option for networks where some participants might be competitors and not want every transaction they make - a special price they’re offering to some participants and not others, for example - known to every participant. If two participants form a channel, then those participants – and no others – have copies of the ledger for that channel.
The following diagram outlines the four building blocks of Hyperledger Fabric:

Shared Ledger
Hyperledger Fabric has a ledger subsystem comprising two components: the world state and the transaction log. Each participant has a copy of the ledger to every Fabric network they belong to.

The world state component describes the state of the ledger at a given point in time. It’s the database of the ledger. The transaction log component records all transactions which have resulted in the current value of the world state. It’s the update history for the world state. The ledger, then, is a combination of the world state database and the transaction log history.
The ledger has a replaceable data store for the world state. By default, this is a LevelDB key-value store database. The transaction log does not need to be pluggable. It simply records the before and after values of the ledger database being used by the blockchain network.
Smart Contracts
Hyperledger Fabric smart contracts are written in chaincode and are invoked by an application external to the blockchain when that application needs to interact with the ledger. In most cases chaincode only interacts with the database component of the ledger, the world state (querying it, for example), and not the transaction log.

You can write chaincode in several programming languages. Currently supported languages include GOLANG and Java with others coming soon.
Privacy
Depending on the needs of a network, participants in a Business-to-Business (B2B) network might be extremely sensitive about how much information they share. For other networks, privacy will not be a top concern.

Hyperledger Fabric supports networks where privacy (using channels) is a key operational requirement as well as networks that are comparatively open.
Consensus
Transactions must be written to the ledger in the order in which they occur, even though they might be between different sets of participants within the network. For this to happen, the order of transactions must be established and a method for rejecting bad transactions that have been inserted into the ledger in error (or maliciously) must be put into place.

This is a thoroughly researched area of computer science, and there are many ways to achieve it, each with different trade-offs. For example, PBFT (Practical Byzantine Fault Tolerance) can provide a mechanism for file replicas to communicate with each other to keep each copy consistent, even in the event of corruption. Alternatively, in Bitcoin, ordering happens through a process called mining where competing computers race to solve a cryptographic puzzle which defines the order that all processes subsequently build upon.
Hyperledger Fabric has been designed to allow network starters to choose a consensus mechanism that best represents the relationships that exist between participants. As with privacy, there is a spectrum of needs; from networks that are highly structured in their relationships to those that are more peer-to-peer.
We’ll learn more about the Hyperledger Fabric consensus mechanisms, which currently include SOLO, Kafka, and will soon extend to SBFT (Simplified Byzantine Fault Tolerance), in another document.
Where can I learn more?
Where you learn how to set up a sample network on your local machine. You’ll be introduced to most of the key components within a blockchain network, learn more about how they interact with each other, and then you’ll actually get the code and run some simple query and update transactions.
A deeper look at the components and concepts brought up in this introduction as well as a few others and describes how they work together in a sample transaction flow.
Where you can learn how to write a sample smart contract in GOLANG and invoke it from an application written in JavaScript. You’ll become comfortable with the key APIs used by both smart contract developers and application developers and ready to write your own application using the Hyperledger Fabric API reference information.
Designing a Business Network (coming soon)
Takes you through how to design a business network using a standard process. You’ll start by defining the business network and identify the participants and the goods and services that move between them. You’ll think about the key lifecycles and how they are impacted by the activities of the key participants. By the time you’re through, you’ll be ready to start working with key stakeholders in your company to design a business network that uses Hyperledger Fabric.
planning_guide
Deals with the practical concerns of setting up and managing a production Hyperledger Fabric blockchain. You’ll understand the key factors to consider when planning a blockchain solution, such as compute, storage and network requirements. You’ll also understand the key non-functional requirements, including maintainability, performance, availability and disaster recovery.
Hyperledger Fabric Capabilities
Hyperledger Fabric is a unique implementation of distributed ledger technology (DLT) that delivers enterprise-ready network security, scalability, confidentiality and performance, in a modular blockchain architecture. The fabric delivers the following blockchain network capabilities:
Identity management
To enable permissioned networks, Hyperledger Fabric provides a membership identity service that manages user IDs and authenticates all participants on the network. Access control lists can be used to provide additional layers of permission through authorization of specific network operations. For example, a specific user ID could be permitted to invoke a chaincode application, but blocked from deploying new chaincode. One truism about Hyperledger Fabric networks is that members know each other (identity), but they do not know what each other are doing (privacy and confidentiality).
Privacy and confidentiality
Hyperledger Fabric enables competing business interests, and any groups that require private, confidential transactions, to coexist on the same permissioned network. Private channels are restricted messaging paths that can be used to provide transaction privacy and confidentiality for specific subsets of network members. All data, including transaction, member and channel information, on a channel are invisible and inaccessible to any network members not explicitly granted access to that channel.
Efficient processing
Hyperledger Fabric assigns network roles by node type. To provide concurrency and parallelism to the network, transaction execution is separated from transaction ordering and commitment. Executing transactions prior to ordering them enables each peer node to process multiple transactions simultaneously. This concurrent execution increases processing efficiency on each peer and accelerates delivery of transactions to the ordering service.
In addition to enabling parallel processing, the division of labor unburdens ordering nodes from the demands of transaction execution and ledger maintenance, while peer nodes are freed from ordering (consensus) workloads. This bifurcation of roles also limits the processing required for authorization and authentication; all peer nodes do not have to trust all ordering nodes, and vice versa, so processes on one can run independently of verification by the other.
Chaincode functionality
Chaincode applications encode logic that is invoked by specific types of transactions on the channel. Chaincode that defines parameters for a change of asset ownership, for example, ensures that all transactions that transfer ownership are subject to the same rules and requirements. System chaincode is distinguished as chaincode that defines operating parameters for the entire channel. Lifecycle and configuration system chaincode defines the rules for the channel; endorsement and validation system chaincode defines the requirements for endorsing and validating transactions.
Modular design
Hyperledger Fabric implements a modular architecture to provide functional choice to network designers. Specific algorithms for identity, ordering (consensus) and encryption, for example, can be plugged in to any fabric network. The result is a universal blockchain architecture that any industry or public domain can adopt, with the assurance that its networks will be interoperable across market, regulatory and geographic boundaries. By contrast, current alternatives to Hyperledger Fabric are largely partisan, constrained and industry-specific.
Hyperledger Fabric Model
This section outlines the key design features woven into Hyperledger Fabric that fulfill its promise of a comprehensive, yet customizable, enterprise blockchain solution:
- Assets - Asset definitions enable the exchange of almost anything with monetary value over the network, from whole foods to antique cars to currency futures.
- Chaincode - Chaincode execution is partitioned from transaction ordering, limiting the required levels of trust and verification across node types, and optimizing network scalability and performance.
- Ledger Features - The immutable, shared ledger encodes the entire transaction history for each channel, and includes SQL-like query capability for efficient auditing and dispute resolution.
- Privacy through Channels - Channels enable multi-lateral transactions with the high degrees of privacy and confidentiality required by competing businesses and regulated industries that exchange assets on a common network.
- Security & Membership Services - Permissioned membership provides a trusted blockchain network, where participants know that all transactions can be detected and traced by authorized regulators and auditors.
- Consensus - Fabric’s unique approach to consensus enables the flexibility and scalability needed for the enterprise.
Assets
Assets can range from the tangible (real estate and hardware) to the intangible (contracts and intellectual property). You can easily define Assets in client-side javascript and use them in your Fabric application using the included Fabric Composer tool.
Fabric supports the ability to exchange assets using unspent transaction outputs as the inputs for subsequent transactions. Assets (and asset registries) live in Fabric as a collection of key-value pairs, with state changes recorded as transactions on a Channel ledger. Fabric allows for any asset to be represented in binary or JSON format.
Chaincode
Chaincode is software defining an asset or assets, and the transaction instructions for modifying the asset(s). In other words, it’s the business logic. Chaincode enforces the rules for reading or altering key value pairs or other state database information. Chaincode functions execute against the ledger current state database and are initiated through a transaction proposal. Chaincode execution results in a set of key value writes (write set) that can be submitted to the network and applied to the ledger on all peers.
Ledger Features
The ledger is the sequenced, tamper-resistant record of all state transitions in the fabric. State transitions are a result of chaincode invocations (‘transactions’) submitted by participating parties. Each transaction results in a set of asset key-value pairs that are committed to the ledger as creates, updates, or deletes.
The ledger is comprised of a blockchain (‘chain’) to store the immutable, sequenced record in blocks, as well as a state database to maintain current fabric state. There is one ledger per channel. Each peer maintains a copy of the ledger for each channel of which they are a member.
- Query and update ledger using key-based lookups, range queries, and composite key queries
- Read-only queries using a rich query language (if using CouchDB as state database)
- Read-only history queries - Query ledger history for a key, enabling data provenance scenarios
- Transactions consist of the versions of keys/values that were read in chaincode (read set) and keys/values that were written in chaincode (write set)
- Transactions contain signatures of every endorsing peer and are submitted to ordering service
- Transactions are ordered into blocks and are “delivered” from an ordering service to peers on a channel
- Peers validate transactions against endorsement policies and enforce the policies
- Prior to appending a block, a versioning check is performed to ensure that states for assets that were read have not changed since chaincode execution time
- There is immutability once a transaction is validated and committed
- A channel’s ledger contains a configuration block defining policies, access control lists, and other pertinent information
- Channel’s contain Membership Service Provider instances allowing for crypto materials to be derived from different certificate authorities
See the Ledger topic for a deeper dive on the databases, storage structure, and “query-ability.”
Privacy through Channels
Fabric employs an immutable ledger on a per-channel basis, as well as chaincodes that can manipulate and modify the current state of assets (i.e. update key value pairs). A ledger exists in the scope of a channel - it can be shared across the entire network (assuming every participant is operating on one common channel) - or it can be privatized to only include a specific set of participants.
In the latter scenario, these participants would create a separate channel and thereby isolate/segregate their transactions and ledger. Fabric even solves scenarios that want to bridge the gap between total transparency and privacy. Chaincode gets installed only on peers that need to access the asset states to perform reads and writes (in other words, if a chaincode is not installed on a peer, it will not be able to properly interface with the ledger). To further obfuscate the data, values within chaincode can be encrypted (in part or in total) using common cryptographic algorithms such as SHA-256 before appending to the ledger.
Security & Membership Services
Hyperledger Fabric underpins a transactional network where all participants have known identities. Public Key Infrastructure is used to generate cryptographic certificates which are tied to organizations, network components, and end users or client applications. As a result, data access control can be manipulated and governed on the broader network and on channel levels. This “permissioned” notion of Fabric, coupled with the existence and capabilities of channels, helps address scenarios where privacy and confidentiality are paramount concerns.
See the Fabric CA section to better understand cryptographic implementations, and the sign, verify, authenticate approach used in Fabric.
Consensus
In distributed ledger technology, consensus has recently become synonymous with a specific algorithm, within a single function. However, consensus encompasses more than simply agreeing upon the order of transactions, and this differentiation is highlighted in Hyperledger Fabric through its fundamental role in the entire transaction flow, from proposal and endorsement, to ordering, validation and commitment. In a nutshell, consensus is defined as the full-circle verification of the correctness of a set of transactions comprising a block.
Consensus is ultimately achieved when the order and results of a block’s transactions have met the explicit policy criteria checks. These checks and balances take place during the lifecycle of a transaction, and include the usage of endorsement policies to dictate which specific members must endorse a certain transaction class, as well as system chaincodes to ensure that these policies are enforced and upheld. Prior to commitment, the peers will employ these system chaincodes to make sure that enough endorsements are present, and that they were derived from the appropriate entities. Moreover, a versioning check will take place during which the current state of the ledger is agreed or consented upon, before any blocks containing transactions are appended to the ledger. This final check provides protection against double spend operations and other threats that might compromise data integrity, and allows for functions to be executed against non-static variables.
In addition to the multitude of endorsement, validity and versioning checks that take place, there are also ongoing identity verifications happening in all directions of the transaction flow. Access control lists are implemented on hierarchal layers of the network (ordering service down to channels), and payloads are repeatedly signed, verified and authenticated as a transaction proposal passes through the different architectural components. To conclude, consensus is not merely limited to the agreed upon order of a batch of transactions, but rather, it is an overarching characterization that is achieved as a byproduct of the ongoing verifications that take place during a transaction’s journey from proposal to commitment.
Check out the Transaction Flow diagram for a visual representation of consensus.
What is chaincode?
Chaincode is a piece of code that is written in one of the supported languages such as Go or Java. It is installed and instantiated through an SDK or CLI onto a network of Hyperledger Fabric peer nodes, enabling interaction with that network’s shared ledger.
There are three aspects to chaincode development:
- Chaincode Interfaces
- APIs
- Chaincode Responses
Chaincode interfaces
A chaincode implements the Chaincode Interface that supports two methods:
InitInvoke
Init()
Init is called when you first deploy your chaincode. As the name implies, this function is used to do any initialization your chaincode needs.
Invoke()
Invoke is called when you want to call chaincode functions to do real work (i.e. read and write to the ledger). Invocations are captured as transactions, which get grouped into blocks on the chain. When you need to update or query the ledger, you do so by invoking your chaincode.
Dependencies
The import statement lists a few dependencies for the chaincode to compile successfully.
- fmt – contains
Printlnfor debugging/logging. - errors – standard go error format.
- shim – contains the definitions for the chaincode interface and the chaincode stub, which are required to interact with the ledger.
Chaincode APIs
When the Init or Invoke function of a chaincode is called, the fabric
passes the stub shim.ChaincodeStubInterface parameter and the
chaincode returns a pb.Response. This stub can be used to call APIs
to access to the ledger services, transaction context, or to invoke
other chaincodes.
The current APIs are defined in the shim package, and can be generated with the following command:
godoc github.com/hyperledger/fabric/core/chaincode/shim
However, it also includes functions from chaincode.pb.go (protobuffer functions) that are not intended as public APIs. The best practice is to look at the function definitions and comments in interfaces.go and the examples directory.
Response
The chaincode response comes in the form of a protobuffer.
message Response {

    // A status code that should follow the HTTP status codes.
    int32 status = 1;

    // A message associated with the response code.
    string message = 2;

    // A payload that can be used to include metadata with this response.
    bytes payload = 3;

}
The chaincode will also return events. Message events and chaincode events.
messageEvent {

    oneof Event {

    //Register consumer sent event
    Register register = 1;

    //producer events common.
    Block block = 2;
    ChaincodeEvent chaincodeEvent = 3;
    Rejection rejection = 4;

    //Unregister consumer sent events
    Unregister unregister = 5;

    }

}
messageChaincodeEvent {

    string chaincodeID = 1;
    string txID = 2;
    string eventName = 3;
    bytes payload = 4;

}
Once developed and deployed, there are two ways to interact with the chaincode - through an SDK or the CLI. The steps for CLI are described below. For SDK interaction, refer to the balance transfer samples. Note: This SDK interaction is covered in the Getting Started section.
Command Line Interfaces
To view the currently available CLI commands, execute the following:
# this assumes that you have correctly set the GOPATH variable and cloned the Fabric codebase into that path
cd /opt/gopath/src/github.com/hyperledger/fabric
build /bin/peer
You will see output similar to the example below. (NOTE: rootcommand below is hardcoded in main.go. Currently, the build will create a peer executable file).
Usage:
      peer [flags]
      peer [command]

    Available Commands:
      version     Print fabric peer version.
      node        node specific commands.
      channel     channel specific commands.
      chaincode   chaincode specific commands.
      logging     logging specific commands


    Flags:
      --logging-level string: Default logging level and overrides, see core.yaml for full syntax
      --test.coverprofile string: Done (default “coverage.cov)
      -v, --version: Display current version of fabric peer server
    Use "peer [command] --help" for more information about a command.
The peer command supports several subcommands and flags, as shown
above. To facilitate its use in scripted applications, the peer
command always produces a non-zero return code in the event of command
failure. Upon success, many of the subcommands produce a result on
stdout as shown in the table below:
Command | stdout result in the event of success |
|---|---|
version | String form of peer.version defined in core.yaml |
node start | N/A |
node status | String form of StatusCode |
node stop | String form of StatusCode |
chaincode deploy | The chaincode container name (hash) required for subsequent chaincode invoke and chaincode query commands |
chaincode invoke | The transaction ID (UUID) |
chaincode query | By default, the query result is formatted as a printable |
channel create | Create a chain |
channel join | Adds a peer to the chain |
Chaincode Swimlanes

Deploy a chaincode
[WIP] - the CLI commands need to be refactored based on the new deployment model. Channel Create and Channel Join will remain the same.
Best Practices
Coming soon...
Intended to contain best practices and configurations for MSP, networks, ordering service, channels, ACL, stress, policies, chaincode development, functions, etc...
Membership Service Providers (MSP)
The document serves to provide details on the setup and best practices for MSPs.
Membership service provider (MSP) is a component that aims to offer an abstraction of a membership operation architecture.
In particular, MSP abstracts away all cryptographic mechanisms and protocols behind issuing and validating certificates, and user authentication. An MSP may define their own notion of identity, and the rules by which those identities are governed (identity validation) and authenticated (signature generation and verification).
A Fabric blockchain network can be governed by one or more MSPs. In this way Fabric offers modularity of membership operations, and interoperability across different membership standards and architectures.
In the rest of this document we elaborate on the setup of the MSP implementation supported by Fabric, and discuss best practices concerning its use.
MSP Configuration
To setup an instance of the MSP, its configuration needs to be specified locally at each peer and orderer (to enable peer, and orderer signing), and on the channels to enable peer, orderer, client identity validation, and respective signature verification (authentication) by and for all channel members.
Firstly, for each MSP a name needs to be specified in order to reference that MSP
in the network (e.g. msp1, org2, and org3.divA). This is the name under
which membership rules of an MSP representing a consortium, organisation or
organisation division is to be referenced in a channel. This is also referred
to as the MSP Identifier or MSP ID. MSP Identifiers are required to be unique per MSP
instance. For example, shall two MSP instances with the same identifier be
detected at the system channel genesis, orderer setup will fail.
In the case of default implementation of MSP, a set of parameters need to be specified to allow for identity (certificate) validation and signature verification. These parameters are deduced by RFC5280, and include:
- A list of self-signed (X.509) certificates to constitute the root of trust
- A list of X.509 certificates to represent intermediate CAs this provider considers for certificate validation; these certificates ought to be certified by exactly one of the certificates in the root of trust; intermediate CAs are optional parameters
- A list of X.509 certificates with a verifiable certificate path to exactly one of the certificates of the root of trust to represent the administrators of this MSP; owners of these certificates are authorized to request changes to this MSP configuration (e.g. root CAs, intermediate CAs)
- A list of Organizational Units that valid members of this MSP should include in their X.509 certificate; this is an optional configuration parameter, used when, e.g., multiple organisations leverage the same root of trust, and intermediate CAs, and have reserved an OU field for their members
- A list of certificate revocation lists (CRLs) each corresponding to exactly one of the listed (intermediate or root) MSP Certificate Authorities; this is an optional parameter
Valid identities for this MSP instance are required to satisfy the following conditions:
- They are in the form of X.509 certificates with a verifiable certificate path to exactly one of the root of trust certificates
- They are not included in any CRL
- And they list one or more of the Organizational Units of the MSP configuration
in the
OUfield of their X.509 certificate structure.
For more information on the validity of identities in the current MSP implementation we refer the reader to the identity validation rules <no title>.
In addition to verification related parameters, for the MSP to enable the node on which it is instantiated to sign or authenticate, one needs to specify:
- The signing key used for signing by the node, and
- The node’s X.509 certificate, that is a valid identity under the verification parameters of this MSP
How to generate MSP certificates and their signing keys?
To generate X.509 certificates to feed its MSP configuration, the application can use Openssl.
Alternatively one can use cryptogen tool, whose operation is explained in
Getting Started.
For fabric-ca related certificate generation, we refer the reader to the fabric-ca related documentation - Setup/ca-setup.
MSP setup on the peer & orderer side
To set up a local MSP (for either a peer or an orderer), the administrator
should create a folder (e.g. $MY_PATH/mspconfig) that contains six subfolders
and a file:
- a folder
admincertsto include PEM files each corresponding to an administrator certificate - a folder
cacertsto include PEM files each corresponding to a root CA’s certificate - (optional) a folder
intermediatecertsto include PEM files each corresponding to an intermediate CA’s certificate - (optional) a file
config.yamlto include information on the considered OUs; the latter are defined as pairs of<Certificate, OrganizationalUnitIdentifier>entries of a yaml array calledOrganizationalUnitIdentifiers, whereCertificaterepresents the relative path to the certificate of the certificate authority (root or intermediate) that should be considered for certifying members of this organizational unit (e.g. ./cacerts/cacert.pem), andOrganizationalUnitIdentifierrepresents the actual string as expected to appear in X.509 certificate OU-field (e.g. “COP”) - (optional) a folder
crlsto include the considered CRLs - a folder
keystoreto include a PEM file with the node’s signing key - a folder
signcertsto include a PEM file with the node’s X.509 certificate
In the configuration file of the node (core.yaml file for the peer, and
orderer.yaml for the orderer), one needs to specify the path to the
mspconfig folder, and the MSP Identifier of the node’s MSP. The path to the
mspconfig folder is expected to be relative to FABRIC_CFG_PATH and is provided
as the value of parameter mspConfigPath for the peer, and LocalMSPDir
for the orderer. The identifier of the node’s MSP is provided as a value of
parameter localMspId for the peer and LocalMSPID for the orderer.
These variables can be overriden via the environment using the CORE prefix for
peer (e.g. CORE_PEER_LOCALMSPID) and the ORDERER prefix for the orderer (e.g.
ORDERER_GENERAL_LOCALMSPID). Notice that for the orderer setup, one needs to
generate, and provide to the orderer the genesis block of the system channel.
The MSP configuration needs of this block are detailed in the next section.
Reconfiguration of a “local” MSP is only possible manually, and requires that the peer or orderer process is restarted. In subsequent releases we aim to offer online/dynamic reconfiguration (i.e. without requiring to stop the node by using a node managed system chaincode).
Channel MSP setup
At the genesis of the system, verification parameters of all the MSPs that appear in the network need to be specified, and included in the system channel’s genesis block. Recall that MSP verification parameters consist of the MSP identifier, the root of trust certificates, intermediate CA and admin certificates, as well as OU specifications and CRLs. The system genesis block is provided to the orderers at their setup phase, and allows them to authenticate channel creation requests. Orderers would reject the system genesis block, if the latter includes two MSPs with the same identifier, and consequently the bootstrapping of the network would fail.
For application channels, the verification components of only the MSPs that govern a channel need to reside in the channel’s genesis block. We emphasise that it is the responsibility of the application to ensure that correct MSP configuration information is included in the genesis blocks (or the most recent configuration block) of a channel prior to instructing one or more of their peers to join the channel.
When bootstrapping a channel with the help of the configtxgen tool, one can
configure the channel MSPs by including the verification parameters of MSP
in the mspconfig folder, and setting that path in the relevant section in
configtx.yaml.
Reconfiguration of an MSP on the channel, including announcements of the
certificate revocation lists associated to the CAs of that MSP is achieved
through the creation of a config_update object by the owner of one of the
administrator certificates of the MSP. The client application managed by the
admin would then announce this update to the channels in which this MSP appears.
Best Practices
In this section we elaborate on best practices for MSP configuration in commonly met scenarios.
1) Mapping between organizations/corporations and MSPs
We recommend that there is a one-to-one mapping between organizations and MSPs. If a different mapping type of mapping is chosen, the following needs to be to considered:
- One organization employing various MSPs. This corresponds to the case of an organization including a variety of divisions each represented by its MSP, either for management independence reasons, or for privacy reasons. In this case a peer can only be owned by a single MSP, and will not recognize peers with identities from other MSPs as peers of the same organization. The implication of this is that peers may share through gossip organization-scoped data with a set of peers that are members of the same subdivision, and NOT with the full set of providers constituting the actual organization.
- Multiple organizations using a single MSP. This corresponds to a case of a consortium of organisations that are governed by similar membership architecture. One needs to know here that peers would propagate organization-scoped messages to the peers that have an identity under the same MSP regardless of whether they belong to the same actual organization. This is a limitation of the granularity of MSP definition, and/or of the peer’s configuration. In future versions of Fabric, this can change as we move towards (i) an identity channel that contains all membership related information of the network, (ii) peer notion of “trust-zone” being configurable, where a peer’s administrator specifying at peer setup time whose MSP members should be treated by peers as authorized to receive organization-scoped messages.
2) One organization has different divisions (say organizational units), to which it wants to grant access to different channels.
Two ways to handle this:
- Define one MSP to accommodate membership for all organization’s members.
Configuration of that MSP would consist of a list of root CAs,
intermediate CAs and admin certificates; and membership identities would
include the organizational unit (
OU) a member belongs to. Policies can then be defined to capture members of a specificOU, and these policies may constitute the read/write policies of a channel or endorsement policies of a chaincode. A limitation of this approach is that gossip peers would consider peers with membership identities under their local MSP as members of the same organization, and would consequently gossip with them organisation-scoped data (e.g. their status). - Defining one MSP to represent each division. This would involve specifying for each division, a set of certificates for root CAs, intermediate CAs, and admin Certs, such that there is no overlapping certification path across MSPs. This would mean that, for example, a different intermediate CA per subdivision is employed. Here the disadvantage is the management of more than one MSPs instead of one, but this circumvents the issue present in the previous approach. One could also define one MSP for each division by leveraging an OU extension of the MSP configuration.
3) Separating clients from peers of the same organization.
In many cases it is required that the “type” of an identity is retrievable from the identity itself (e.g. it may be needed that endorsements are guaranteed to have derived by peers, and not clients or nodes acting solely as orderers).
There is limited support for such requirements.
One way to allow for this separation is to to create a separate intermediate CA for each node type - one for clients and one for peers/orderers; and configure two different MSPs - one for clients and one for peers/orderers. Channels this organization should be accessing would need to include both MSPs, while endorsement policies will leverage only the MSP that refers to the peers. This would ultimately result in the organization being mapped to two MSP instances, and would have certain consequences on the way peers and clients interact.
Gossip would not be drastically impacted as all peers of the same organization would still belong to one MSP. Peers can restrict the execution of certain system chaincodes to local MSP based policies. For example, peers would only execute “joinChannel” request if the request is signed by the admin of their local MSP who can only be a client (end-user should be sitting at the origin of that request). We can go around this inconsistency if we accept that the only clients to be members of a peer/orderer MSP would be the administrators of that MSP.
Another point to be considered with this approach is that peers authorize event registration requests based on membership of request originator within their local MSP. Clearly, since the originator of the request is a client, the request originator is always doomed to belong to a different MSP than the requested peer and the peer would reject the request.
4) Admin and CA certificates.
It is important to set MSP admin certificates to be different than any of the
certificates considered by the MSP for root of trust, or intermediate CAs.
This is a common (security) practice to separate the duties of management of
membership components from the issuing of new certificates, and/or validation of existing ones.
5) Blacklisting an intermediate CA.
As mentioned in previous sections, reconfiguration of an MSP is achieved by
reconfiguration mechanisms (manual reconfiguration for the local MSP instances,
and via properly constructed config_update messages for MSP instances of a channel).
Clearly, there are two ways to ensure an intermediate CA considered in an MSP is no longer
considered for that MSP’s identity validation:
- Reconfigure the MSP to no longer include the certificate of that
intermediate CA in the list of trusted intermediate CA certs. For the
locally configured MSP, this would mean that the certificate of this CA is
removed from the
intermediatecertsfolder. - Reconfigure the MSP to include a CRL produced by the root of trust which denounces the mentioned intermediate CA’s certificate.
In the current MSP implementation we only support method (1) as it is simpler and does not require blacklisting the no longer considered intermediate CA.
Channel Configuration (configtx)
Shared configuration for a Hyperledger Fabric blockchain network is stored in a collection configuration transactions, one per channel. Each configuration transaction is usually referred to by the shorter name configtx.
Channel configuration has the following important properties:
- Versioned: All elements of the configuration have an associated version which is advanced with every modification. Further, every committed configuration receives a sequence number.
- Permissioned: Each element of the configuration has an associated policy which governs whether or not modification to that element is permitted. Anyone with a copy of the previous configtx (and no additional info) may verify the validity of a new config based on these policies.
- Hierarchical: A root configuration group contains sub-groups, and each group of the hierarchy has associated values and policies. These policies can take advantage of the hierarchy to derive policies at one level from policies of lower levels.
Anatomy of a configuration
Configuration is stored as a transaction of type HeaderType_CONFIG
in a block with no other transactions. These blocks are referred to as
Configuration Blocks, the first of which is referred to as the
Genesis Block.
The proto structures for configuration are stored in
fabric/protos/common/configtx.proto. The Envelope of type
HeaderType_CONFIG encodes a ConfigEnvelope message as the
Payload data field. The proto for ConfigEnvelope is defined
as follows:
message ConfigEnvelope {
    Config config = 1;
    Envelope last_update = 2;
}
The last_update field is defined below in the Updates to
configuration section, but is only necessary when validating the
configuration, not reading it. Instead, the currently committed
configuration is stored in the config field, containing a Config
message.
message Config {
    uint64 sequence = 1;
    ConfigGroup channel_group = 2;
}
The sequence number is incremented by one for each committed
configuration. The channel_group field is the root group which
contains the configuration. The ConfigGroup structure is recursively
defined, and builds a tree of groups, each of which contains values and
policies. It is defined as follows:
message ConfigGroup {
    uint64 version = 1;
    map<string,ConfigGroup> groups = 2;
    map<string,ConfigValue> values = 3;
    map<string,ConfigPolicy> policies = 4;
    string mod_policy = 5;
}
Because ConfigGroup is a recursive structure, it has hierarchical
arrangement. The following example is expressed for clarity in golang
notation.
// Assume the following groups are defined
var root, child1, child2, grandChild1, grandChild2, grandChild3 *ConfigGroup

// Set the following values
root.Groups["child1"] = child1
root.Groups["child2"] = child2
child1.Groups["grandChild1"] = grandChild1
child2.Groups["grandChild2"] = grandChild2
child2.Groups["grandChild3"] = grandChild3

// The resulting config structure of groups looks like:
// root:
//     child1:
//         grandChild1
//     child2:
//         grandChild2
//         grandChild3
Each group defines a level in the config hierarchy, and each group has an associated set of values (indexed by string key) and policies (also indexed by string key).
Values are defined by:
message ConfigValue {
    uint64 version = 1;
    bytes value = 2;
    string mod_policy = 3;
}
Policies are defined by:
message ConfigPolicy {
    uint64 version = 1;
    Policy policy = 2;
    string mod_policy = 3;
}
Note that Values, Policies, and Groups all have a version and a
mod_policy. The version of an element is incremented each time
that element is modified. The mod_policy is used to govern the
required signatures to modify that element. For Groups, modification is
adding or removing elements to the Values, Policies, or Groups maps (or
changing the mod_policy). For Values and Policies, modification is
changing the Value and Policy fields respectively (or changing the
mod_policy). Each element’s mod_policy is evaluated in the
context of the current level of the config. Consider the following
example mod policies defined at Channel.Groups["Application"] (Here,
we use the golang map reference syntax, so
Channel.Groups["Application"].Policies["policy1"] refers to the base
Channel group’s Application group’s Policies map’s
policy1 policy.)
policy1maps toChannel.Groups["Application"].Policies["policy1"]Org1/policy2maps toChannel.Groups["Application"].Groups["Org1"].Policies["policy2"]/Channel/policy3maps toChannel.Policies["policy3"]
Note that if a mod_policy references a policy which does not exist,
the item cannot be modified.
Configuration updates
Configuration updates are submitted as an Envelope message of type
HeaderType_CONFIG_UPDATE. The Payload data of the
transaction is a marshaled ConfigUpdateEnvelope. The ConfigUpdateEnvelope
is defined as follows:
message ConfigUpdateEnvelope {
    bytes config_update = 1;
    repeated ConfigSignature signatures = 2;
}
The signatures field contains the set of signatures which authorizes
the config update. Its message definition is:
message ConfigSignature {
    bytes signature_header = 1;
    bytes signature = 2;
}
The signature_header is as defined for standard transactions, while
the signature is over the concatenation of the signature_header
bytes and the config_update bytes from the ConfigUpdateEnvelope
message.
The ConfigUpdateEnvelope config_update bytes are a marshaled
ConfigUpdate message which is defined as follows:
message ConfigUpdate {
    string channel_id = 1;
    ConfigGroup read_set = 2;
    ConfigGroup write_set = 3;
}
The channel_id is the channel ID the update is bound for, this is
necessary to scope the signatures which support this reconfiguration.
The read_set specifies a subset of the existing configuration,
specified sparsely where only the version field is set and no other
fields must be populated. The particular ConfigValue value or
ConfigPolicy policy fields should never be set in the
read_set. The ConfigGroup may have a subset of its map fields
populated, so as to reference an element deeper in the config tree. For
instance, to include the Application group in the read_set, its
parent (the Channel group) must also be included in the read set,
but, the Channel group does not need to populate all of the keys,
such as the Orderer group key, or any of the values or
policies keys.
The write_set specifies the pieces of configuration which are
modified. Because of the hierarchical nature of the configuration, a
write to an element deep in the hierarchy must contain the higher level
elements in its write_set as well. However, for any element in the
write_set which is also specified in the read_set at the same
version, the element should be specified sparsely, just as in the
read_set.
For example, given the configuration:
Channel: (version 0)
    Orderer (version 0)
    Appplication (version 3)
       Org1 (version 2)
To submit a configuration update which modifies Org1, the
read_set would be:
Channel: (version 0)
    Application: (version 3)
and the write_set would be
Channel: (version 0)
    Application: (version 3)
        Org1 (version 3)
When the CONFIG_UPDATE is received, the orderer computes the
resulting CONFIG by doing the following:
- Verifies the
channel_idandread_set. All elements in theread_setmust exist at the given versions. - Computes the update set by collecting all elements in the
write_setwhich do not appear at the same version in theread_set. - Verifies that each element in the update set increments the version number of the element update by exactly 1.
- Verifies that the signature set attached to the
ConfigUpdateEnvelopesatisfies themod_policyfor each element in the update set. - Computes a new complete version of the config by applying the update set to the current config.
- Writes the new config into a
ConfigEnvelopewhich includes theCONFIG_UPDATEas thelast_updatefield and the new config encoded in theconfigfield, along with the incrementedsequencevalue. - Writes the new
ConfigEnvelopeinto aEnvelopeof typeCONFIG, and ultimately writes this as the sole transaction in a new configuration block.
When the peer (or any other receiver for Deliver) receives this
configuration block, it should verify that the config was appropriately
validated by applying the last_update message to the current config
and verifying that the orderer-computed config field contains the
correct new configuration.
Permitted configuration groups and values
Any valid configuration is a subset of the following configuration. Here
we use the notation peer.<MSG> to define a ConfigValue whose
value field is a marshaled proto message of name <MSG> defined
in fabric/protos/peer/configuration.proto. The notations
common.<MSG>, msp.<MSG>, and orderer.<MSG> correspond
similarly, but with their messages defined in
fabric/protos/common/configuration.proto,
fabric/protos/msp/mspconfig.proto, and
fabric/protos/orderer/configuration.proto respectively.
Note, that the keys {{org_name}} and {{consortium_name}}
represent arbitrary names, and indicate an element which may be repeated
with different names.
&ConfigGroup{
    Groups: map<string, *ConfigGroup> {
        "Application":&ConfigGroup{
            Groups:map<String, *ConfigGroup> {
                {{org_name}}:&ConfigGroup{
                    Values:map<string, *ConfigValue>{
                        "MSP":msp.MSPConfig,
                        "AnchorPeers":peer.AnchorPeers,
                    },
                },
            },
        },
        "Orderer":&ConfigGroup{
            Groups:map<String, *ConfigGroup> {
                {{org_name}}:&ConfigGroup{
                    Values:map<string, *ConfigValue>{
                        "MSP":msp.MSPConfig,
                    },
                },
            },

            Values:map<string, *ConfigValue> {
                "ConsensusType":orderer.ConsensusType,
                "BatchSize":orderer.BatchSize,
                "BatchTimeout":orderer.BatchTimeout,
                "KafkaBrokers":orderer.KafkaBrokers,
            },
        },
        "Consortiums":&ConfigGroup{
            Groups:map<String, *ConfigGroup> {
                {{consortium_name}}:&ConfigGroup{
                    Groups:map<string, *ConfigGroup> {
                        {{org_name}}:&ConfigGroup{
                            Values:map<string, *ConfigValue>{
                                "MSP":msp.MSPConfig,
                            },
                        },
                    },
                    Values:map<string, *ConfigValue> {
                        "ChannelCreationPolicy":common.Policy,
                    }
                },
            },
        },
    },

    Values: map<string, *ConfigValue> {
        "HashingAlgorithm":common.HashingAlgorithm,
        "BlockHashingDataStructure":common.BlockDataHashingStructure,
        "Consortium":common.Consortium,
        "OrdererAddresses":common.OrdererAddresses,
    },
}
Orderer system channel configuration
The ordering system channel needs to define ordering parameters, and consortiums for creating channels. There must be exactly one ordering system channel for an ordering service, and it is the first channel to be created (or more accurately bootstrapped). It is recommended never to define an Application section inside of the ordering system channel genesis configuration, but may be done for testing. Note that any member with read access to the ordering system channel may see all channel creations, so this channel’s access should be restricted.
The ordering parameters are defined as the following subset of config:
&ConfigGroup{
    Groups: map<string, *ConfigGroup> {
        "Orderer":&ConfigGroup{
            Groups:map<String, *ConfigGroup> {
                {{org_name}}:&ConfigGroup{
                    Values:map<string, *ConfigValue>{
                        "MSP":msp.MSPConfig,
                    },
                },
            },

            Values:map<string, *ConfigValue> {
                "ConsensusType":orderer.ConsensusType,
                "BatchSize":orderer.BatchSize,
                "BatchTimeout":orderer.BatchTimeout,
                "KafkaBrokers":orderer.KafkaBrokers,
            },
        },
    },
Each organization participating in ordering has a group element under
the Orderer group. This group defines a single parameter MSP
which contains the cryptographic identity information for that
organization. The Values of the Orderer group determine how the
ordering nodes function. They exist per channel, so
orderer.BatchTimeout for instance may be specified differently on
one channel than another.
At startup, the orderer is faced with a filesystem which contains information for many channels. The orderer identifies the system channel by identifying the channel with the consortiums group defined. The consortiums group has the following structure.
&ConfigGroup{
    Groups: map<string, *ConfigGroup> {
        "Consortiums":&ConfigGroup{
            Groups:map<String, *ConfigGroup> {
                {{consortium_name}}:&ConfigGroup{
                    Groups:map<string, *ConfigGroup> {
                        {{org_name}}:&ConfigGroup{
                            Values:map<string, *ConfigValue>{
                                "MSP":msp.MSPConfig,
                            },
                        },
                    },
                    Values:map<string, *ConfigValue> {
                        "ChannelCreationPolicy":common.Policy,
                    }
                },
            },
        },
    },
},
Note that each consortium defines a set of members, just like the
organizational members for the ordering orgs. Each consortium also
defines a ChannelCreationPolicy. This is a policy which is applied
to authorize channel creation requests. Typically, this value will be
set to an ImplicitMetaPolicy requiring that the new members of the
channel sign to authorize the channel creation. More details about
channel creation follow later in this document.
Application channel configuration
Application configuration is for channels which are designed for application type transactions. It is defined as follows:
&ConfigGroup{
    Groups: map<string, *ConfigGroup> {
        "Application":&ConfigGroup{
            Groups:map<String, *ConfigGroup> {
                {{org_name}}:&ConfigGroup{
                    Values:map<string, *ConfigValue>{
                        "MSP":msp.MSPConfig,
                        "AnchorPeers":peer.AnchorPeers,
                    },
                },
            },
        },
    },
}
Just like with the Orderer section, each organization is encoded as
a group. However, instead of only encoding the MSP identity
information, each org additionally encodes a list of AnchorPeers.
This list allows the peers of different organizations to contact each
other for peer gossip networking.
The application channel encodes a copy of the orderer orgs and consensus
options to allow for deterministic updating of these parameters, so the
same Orderer section from the orderer system channel configuration
is included. However from an application perspective this may be largely
ignored.
Channel creation
When the orderer receives a CONFIG_UPDATE for a channel which does
not exist, the orderer assumes that this must be a channel creation
request and performs the following.
- The orderer identifies the consortium which the channel creation
request is to be performed for. It does this by looking at the
Consortiumvalue of the top level group. - The orderer verifies that the organizations included in the
Applicationgroup are a subset of the organizations included in the corresponding consortium and that theApplicationGroupis set toversion1. - The orderer verifies that if the consortium has members, that the new channel also has application members (creation consortiums and channels with no members is useful for testing only).
- The orderer creates a template configuration by taking the
Orderergroup from the ordering system channel, and creating anApplicationgroup with the newly specified members and specifying itsmod_policyto be theChannelCreationPolicyas specified in the consortium config. Note that the policy is evaluated in the context of the new configuration, so a policy requiringALLmembers, would require signatures from all the new channel members, not all the members of the consortium. - The orderer then applies the
CONFIG_UPDATEas an update to this template configuration. Because theCONFIG_UPDATEapplies modifications to theApplicationgroup (itsversionis1), the config code validates these updates against theChannelCreationPolicy. If the channel creation contains any other modifications, such as to an individual org’s anchor peers, the corresponding mod policy for the element will be invoked. - The new
CONFIGtransaction with the new channel config is wrapped and sent for ordering on the ordering system channel. After ordering, the channel is created.
Channel Configuration (configtxgen)
This document describe the usage for the configtxgen utility for
manipulating fabric channel configuration.
For now, the tool is primarily focused on generating the genesis block for bootstrapping the orderer, but it is intended to be enhanced in the future for generating new channel configurations as well as reconfiguring existing channels.
Configuration Profiles
The configuration parameters supplied to the configtxgen tool are
primarily provided by the configtx.yaml file. This file is located
at fabric/sampleconfig/configtx.yaml in the fabric.git
repository.
This configuration file is split primarily into three pieces.
- The
Profilessection. By default, this section includes some sample configurations which can be used for development or testing scenarios, and refer to crypto material present in the fabric.git tree. These profiles can make a good starting point for construction a real deployment profile. Theconfigtxgentool allows you to specify the profile it is operating under by passing the-profileflag. Profiles may explicitly declare all configuration, but usually inherit configuration from the defaults in (3) below. - The
Organizationssection. By default, this section includes a single reference to the sampleconfig MSP definition. For production deployments, the sample organization should be removed, and the MSP definitions of the network members should be referenced and defined instead. Each element in theOrganizationssection should be tagged with an anchor label such as&orgNamewhich will allow the definition to be referenced in theProfilessections. - The default sections. There are default sections for
OrdererandApplicationconfiguration, these include attributes likeBatchTimeoutand are generally used as the base inherited values for the profiles.
This configuration file may be edited, or, individual properties may be
overridden by setting environment variables, such as
CONFIGTX_ORDERER_ORDERERTYPE=kafka. Note that the Profiles
element and profile name do not need to be specified.
Bootstrapping the orderer
After creating a configuration profile as desired, simply invoke
configtxgen -profile <profile_name>
This will produce a genesis.block file in the current directory. You
may optionally specify another filename by passing in the -path
parameter, or, you may skip the writing of the file by passing the
dryRun parameter if you simply wish to test parsing of the file.
Then, to utilize this genesis block, before starting the orderer, simply
specify ORDERER_GENERAL_GENESISMETHOD=file and
ORDERER_GENERAL_GENESISFILE=$PWD/genesis.block or modify the
orderer.yaml file to encode these values.
Creating a channel
The tool can also output a channel creation tx by executing
configtxgen -profile <profile_name> -channelID <channel_name> -outputCreateChannelTx <tx_filename>
This will output a marshaled Envelope message which may be sent to
broadcast to create a channel.
Reviewing a configuration
In addition to creating configuration, the configtxgen tool is also
capable of inspecting configuration.
It supports inspecting both configuration blocks, and configuration
transactions. You may use the inspect flags -inspectBlock and
-inspectChannelCreateTx respectively with the path to a file to
inspect to output a human readable (JSON) representation of the
configuration.
You may even wish to combine the inspection with generation. For example:
$ build/bin/configtxgen -channelID foo -outputBlock foo.block -inspectBlock foo.block
2017/03/01 21:24:24 Loading configuration
2017/03/01 21:24:24 Checking for configtx.yaml at:
2017/03/01 21:24:24 Checking for configtx.yaml at:
2017/03/01 21:24:24 Checking for configtx.yaml at: /home/yellickj/go/src/github.com/hyperledger/fabric/common/configtx/tool
2017/03/01 21:24:24 map[orderer:map[BatchSize:map[MaxMessageCount:10 AbsoluteMaxBytes:99 MB PreferredMaxBytes:512 KB] Kafka:map[Brokers:[127.0.0.1:9092]] Organizations:<nil> OrdererType:solo Addresses:[127.0.0.1:7050] BatchTimeout:10s] application:map[Organizations:<nil>] profiles:map[SampleInsecureSolo:map[Orderer:map[BatchTimeout:10s BatchSize:map[MaxMessageCount:10 AbsoluteMaxBytes:99 MB PreferredMaxBytes:512 KB] Kafka:map[Brokers:[127.0.0.1:9092]] Organizations:<nil> OrdererType:solo Addresses:[127.0.0.1:7050]] Application:map[Organizations:<nil>]] SampleInsecureKafka:map[Orderer:map[Addresses:[127.0.0.1:7050] BatchTimeout:10s BatchSize:map[AbsoluteMaxBytes:99 MB PreferredMaxBytes:512 KB MaxMessageCount:10] Kafka:map[Brokers:[127.0.0.1:9092]] Organizations:<nil> OrdererType:kafka] Application:map[Organizations:<nil>]] SampleSingleMSPSolo:map[Orderer:map[OrdererType:solo Addresses:[127.0.0.1:7050] BatchTimeout:10s BatchSize:map[MaxMessageCount:10 AbsoluteMaxBytes:99 MB PreferredMaxBytes:512 KB] Kafka:map[Brokers:[127.0.0.1:9092]] Organizations:[map[Name:SampleOrg ID:DEFAULT MSPDir:msp BCCSP:map[Default:SW SW:map[Hash:SHA3 Security:256 FileKeyStore:map[KeyStore:<nil>]]] AnchorPeers:[map[Host:127.0.0.1 Port:7051]]]]] Application:map[Organizations:[map[Name:SampleOrg ID:DEFAULT MSPDir:msp BCCSP:map[Default:SW SW:map[Hash:SHA3 Security:256 FileKeyStore:map[KeyStore:<nil>]]] AnchorPeers:[map[Port:7051 Host:127.0.0.1]]]]]]] organizations:[map[Name:SampleOrg ID:DEFAULT MSPDir:msp BCCSP:map[Default:SW SW:map[Hash:SHA3 Security:256 FileKeyStore:map[KeyStore:<nil>]]] AnchorPeers:[map[Host:127.0.0.1 Port:7051]]]]]
2017/03/01 21:24:24 Generating genesis block
2017/03/01 21:24:24 Writing genesis block
2017/03/01 21:24:24 Inspecting block
2017/03/01 21:24:24 Parsing genesis block
Config for channel: foo
{
    "": {
        "Values": {},
        "Groups": {
            "/Channel": {
                "Values": {
                    "HashingAlgorithm": {
                        "Version": "0",
                        "ModPolicy": "",
                        "Value": {
                            "name": "SHA256"
                        }
                    },
                    "BlockDataHashingStructure": {
                        "Version": "0",
                        "ModPolicy": "",
                        "Value": {
                            "width": 4294967295
                        }
                    },
                    "OrdererAddresses": {
                        "Version": "0",
                        "ModPolicy": "",
                        "Value": {
                            "addresses": [
                                "127.0.0.1:7050"
                            ]
                        }
                    }
                },
                "Groups": {
                    "/Channel/Orderer": {
                        "Values": {
                            "ChainCreationPolicyNames": {
                                "Version": "0",
                                "ModPolicy": "",
                                "Value": {
                                    "names": [
                                        "AcceptAllPolicy"
                                    ]
                                }
                            },
                            "ConsensusType": {
                                "Version": "0",
                                "ModPolicy": "",
                                "Value": {
                                    "type": "solo"
                                }
                            },
                            "BatchSize": {
                                "Version": "0",
                                "ModPolicy": "",
                                "Value": {
                                    "maxMessageCount": 10,
                                    "absoluteMaxBytes": 103809024,
                                    "preferredMaxBytes": 524288
                                }
                            },
                            "BatchTimeout": {
                                "Version": "0",
                                "ModPolicy": "",
                                "Value": {
                                    "timeout": "10s"
                                }
                            },
                            "IngressPolicyNames": {
                                "Version": "0",
                                "ModPolicy": "",
                                "Value": {
                                    "names": [
                                        "AcceptAllPolicy"
                                    ]
                                }
                            },
                            "EgressPolicyNames": {
                                "Version": "0",
                                "ModPolicy": "",
                                "Value": {
                                    "names": [
                                        "AcceptAllPolicy"
                                    ]
                                }
                            }
                        },
                        "Groups": {}
                    },
                    "/Channel/Application": {
                        "Values": {},
                        "Groups": {}
                    }
                }
            }
        }
    }
}
Chaincode Packaging and Signing
Introduction
A chaincode will be placed on the file system of the peer on
installation simply as a file with name
<chaincode name>.<chaincode version. The contents of that file is
called a chaincode package.
This document describes how a chaincode package can be created and
signed from CLI. It also describes how the install command can
be used to install the chaincode package.
What’s in the package ?
The package consists of 3 parts * the chaincode as defined by
ChaincodeDeploymentSpec. This defines the code and other meta
properties such as name and version * an instantiation policy which can
be syntactically described by the same policy used for endorsement and
described in endorsement-policies.rst * a set of signatures by the
entities that “own” the chaincode.
The signatures serve the following purposes * establish an ownership of the chaincode * allows verification that the signatures are over the same content * allows detection of package tampering
The creator of the instantiation of the chaincode on a channel is validated against the instantiation policy of the chaincode.
Chaincode Packaging
The package is created and signed using the command
peer chaincode package -n mycc -p github.com/hyperledger/fabric/examples/chaincode/go/chaincode_example02 -v 0 -s -S -i "AND('OrgA.admin')" ccpack.out
where -s specifies creating the package as opposed to generating raw
ChaincodeDeploymentSpec -S specifies instructs to sign the package
using the Local MSP (as defined by localMspid property in
core.yaml)
The -S option is optional. However if a package is created without a
signature, it cannot be signed by any other owner using the
signpackage command in the next section.
The -i option is optional. It allows specifying an instantiation policy
for the chaincode. The instantiation policy has the same format as an
endorsement policy and specifies who can instantiate the chaincode. In the
example above, only the admin of OrgA is allowed to instantiate the chaincode.
If no policy is provided, the default policy is used, which only allows the
admin of the peer’s MSP to instantiate chaincode.
Package signing
A package can be handed over to other owners for inspection and signing. The workflow supports out of band signing of package.
A previously created package can be signed using the command
peer chaincode signpackage ccpack.out signedccpack.out
where ccpack.out and signedccpack.out are input and output
packages respectively. signedccpack.out contains an additional
signature over the package signed using the Local MSP.
Installing the package
The package can be installed using the install command as follows
peer chaincode install ccpack.out
where ccpack.out is a package filecreated using the package
or signedpackage commands.
Conclusion
The peer will support use of both raw ChaincodeDeploymentSpec and the package structure described in this document. This will allow existing commands and workflows to work which is especially useful in development and test phases.
Endorsement policies
Endorsement policies are used to instruct a peer on how to decide whether a transaction is properly endorsed. When a peer receives a transaction, it invokes the VSCC (Validation System Chaincode) associated with the transaction’s Chaincode as part of the transaction validation flow to determine the validity of the transaction. Recall that a transaction contains one or more endorsement from as many endorsing peers. VSCC is tasked to make the following determinations: - all endorsements are valid (i.e. they are valid signatures from valid certificates over the expected message) - there is an appropriate number of endorsements - endorsements come from the expected source(s)
Endorsement policies are a way of specifying the second and third points.
Endorsement policy design
Endorsement policies have two main components: - a principal - a threshold gate
A principal P identifies the entity whose signature is expected.
A threshold gate T takes two inputs: an integer t (the
threshold) and a list of n principals or gates; this gate
essentially captures the expectation that out of those n principals
or gates, t are requested to be satisfied.
For example: - T(2, 'A', 'B', 'C') requests a signature from any 2
principals out of ‘A’, ‘B’ or ‘C’; - T(1, 'A', T(2, 'B', 'C'))
requests either one signature from principal A or 1 signature from
B and C each.
Endorsement policy syntax in the CLI
In the CLI, a simple language is used to express policies in terms of boolean expressions over principals.
A principal is described in terms of the MSP that is tasked to validate
the identity of the signer and of the role that the signer has within
that MSP. Currently, two roles are supported: member and admin.
Principals are described as MSP.ROLE, where MSP is the MSP
ID that is required, and ROLE is either one of the two strings
member and admin. Examples of valid principals are
'Org0.admin' (any administrator of the Org0 MSP) or
'Org1.member' (any member of the Org1 MSP).
The syntax of the language is:
EXPR(E[, E...])
where EXPR is either AND or OR, representing the two boolean
expressions and E is either a principal (with the syntax described
above) or another nested call to EXPR.
For example: - AND('Org1.member', 'Org2.member', 'Org3.member')
requests 1 signature from each of the three principals -
OR('Org1.member', 'Org2.member') requests 1 signature from either
one of the two principals -
OR('Org1.member', AND('Org2.member', 'Org3.member')) requests either
one signature from a member of the Org1 MSP or 1 signature from a
member of the Org2 MSP and 1 signature from a member of the Org3
MSP.
Specifying endorsement policies for a chaincode
Using this language, a chaincode deployer can request that the
endorsements for a chaincode be validated against the specified policy.
NOTE - the default policy requires one signature from a member of the
DEFAULT MSP). This is used if a policy is not specified in the CLI.
The policy can be specified at deploy time using the -P switch,
followed by the policy.
For example:
peer chaincode deploy -C testchainid -n mycc -p github.com/hyperledger/fabric/examples/chaincode/go/chaincode_example02 -c '{"Args":["init","a","100","b","200"]}' -P "AND('Org1.member', 'Org2.member')"
This command deploys chaincode mycc on chain testchainid with
the policy AND('Org1.member', 'Org2.member').
Future enhancements
In this section we list future enhancements for endorsement policies: -
alongside the existing way of identifying principals by their
relationship with an MSP, we plan to identify principals in terms of the
Organization Unit (OU) expected in their certificates; this is useful
to express policies where we request signatures from any identity
displaying a valid certificate with an OU matching the one requested in
the definition of the principal. - instead of the syntax AND(., .)
we plan to move to a more intuitive syntax . AND . - we plan to
expose generalized threshold gates in the language as well alongside
AND (which is the special n-out-of-n gate) and OR (which
is the special 1-out-of-n gate)
Error handling
General Overview
The Fabric error handling framework can be found in the Fabric repository under common/errors. It defines a new type of error, CallStackError, to use in place of the standard error type provided by Go.
A CallStackError consists of the following:
- Component code - a name for the general area of the code that is generating the error. Component codes should consist of three uppercase letters. Numerics and special characters are not allowed. A set of component codes is defined in common/errors/codes.go
- Reason code - a short code to help identify the reason the error occurred. Reason codes should consist of three numeric values. Letters and special characters are not allowed. A set of reason codes is defined in common/error/codes.go
- Error code - the component code and reason code separated by a colon, e.g. MSP:404
- Error message - the text that describes the error. This is the same as the
input provided to
fmt.Errorf()andErrors.New(). If an error has been wrapped into the current error, its message will be appended. - Callstack - the callstack at the time the error is created. If an error has been wrapped into the current error, its error message and callstack will be appended to retain the context of the wrapped error.
The CallStackError interface exposes the following functions:
- Error() - returns the error message with callstack appended
- Message() - returns the error message (without callstack appended)
- GetComponentCode() - returns the 3-character component code
- GetReasonCode() - returns the 3-digit reason code
- GetErrorCode() - returns the error code, which is “component:reason”
- GetStack() - returns just the callstack
- WrapError(error) - wraps the provided error into the CallStackError
Usage Instructions
The new error handling framework should be used in place of all calls to
fmt.Errorf() or Errors.new(). Using this framework will provide error
codes to check against as well as the option to generate a callstack that will be
appended to the error message.
Using the framework is simple and will only require an easy tweak to your code.
First, you’ll need to import github.com/hyperledger/fabric/common/errors into any file that uses this framework.
Let’s take the following as an example from core/chaincode/chaincode_support.go:
err = fmt.Errorf("Error starting container: %s", err)
For this error, we will simply call the constructor for Error and pass a
component code, reason code, followed by the error message. At the end, we
then call the WrapError() function, passing along the error itself.
fmt.Errorf("Error starting container: %s", err)
becomes
errors.ErrorWithCallstack("CHA", "505", "Error starting container").WrapError(err)
You could also just leave the message as is without any problems:
errors.ErrorWithCallstack("CHA", "505", "Error starting container: %s", err)
With this usage you will be able to format the error message from the previous error into the new error, but will lose the ability to print the callstack (if the wrapped error is a CallStackError).
A second example to highlight a scenario that involves formatting directives for parameters other than errors, while still wrapping an error, is as follows:
fmt.Errorf("failed to get deployment payload %s - %s", canName, err)
becomes
errors.ErrorWithCallstack("CHA", "506", "Failed to get deployment payload %s", canName).WrapError(err)
Displaying error messages
Once the error has been created using the framework, displaying the error message is as simple as:
logger.Errorf(err)
or
fmt.Println(err)
or
fmt.Printf("%s\n", err)
An example from peer/common/common.go:
errors.ErrorWithCallstack("PER", "404", "Error trying to connect to local peer").WrapError(err)
would display the error message:
PER:404 - Error trying to connect to local peer
Caused by: grpc: timed out when dialing
Note
The callstacks have not been displayed for this example for the sake of brevity.
General guidelines for error handling in Fabric
- If it is some sort of best effort thing you are doing, you should log the error and ignore it.
- If you are servicing a user request, you should log the error and return it.
- If the error comes from elsewhere in the Fabric, you have the choice to wrap the error or not. Typically, it’s best to not wrap the error and simply return it as is. However, for certain cases where a utility function is called, wrapping the error with a new component and reason code can help an end user understand where the error is really occurring without inspecting the callstack.
- A panic should be handled within the same layer by throwing an internal error code/start a recovery process and should not be allowed to propagate to other packages.
Logging Control
Overview
Logging in the peer application and in the shim interface to
chaincodes is programmed using facilities provided by the
github.com/op/go-logging package. This package supports
- Logging control based on the severity of the message
- Logging control based on the software module generating the message
- Different pretty-printing options based on the severity of the message
All logs are currently directed to stderr, and the pretty-printing
is currently fixed. However global and module-level control of logging
by severity is provided for both users and developers. There are
currently no formalized rules for the types of information provided at
each severity level, however when submitting bug reports the developers
may want to see full logs down to the DEBUG level.
In pretty-printed logs the logging level is indicated both by color and by a 4-character code, e.g, “ERRO” for ERROR, “DEBU” for DEBUG, etc. In the logging context a module is an arbitrary name (string) given by developers to groups of related messages. In the pretty-printed example below, the logging modules “peer”, “rest” and “main” are generating logs.
16:47:09.634 [peer] GetLocalAddress -> INFO 033 Auto detected peer address: 9.3.158.178:7051
16:47:09.635 [rest] StartOpenchainRESTServer -> INFO 035 Initializing the REST service...
16:47:09.635 [main] serve -> INFO 036 Starting peer with id=name:"vp1" , network id=dev, address=9.3.158.178:7051, discovery.rootnode=, validator=true
An arbitrary number of logging modules can be created at runtime, therefore there is no “master list” of modules, and logging control constructs can not check whether logging modules actually do or will exist. Also note that the logging module system does not understand hierarchy or wildcarding: You may see module names like “foo/bar” in the code, but the logging system only sees a flat string. It doesn’t understand that “foo/bar” is related to “foo” in any way, or that “foo/*” might indicate all “submodules” of foo.
peer
The logging level of the peer command can be controlled from the
command line for each invocation using the --logging-level flag, for
example
peer node start --logging-level=debug
The default logging level for each individual peer subcommand can
also be set in the
core.yaml
file. For example the key logging.node sets the default level for
the node subcommmand. Comments in the file also explain how the
logging level can be overridden in various ways by using environment
varaibles.
Logging severity levels are specified using case-insensitive strings chosen from
CRITICAL | ERROR | WARNING | NOTICE | INFO | DEBUG
The full logging level specification for the peer is of the form
[<module>[,<module>...]=]<level>[:[<module>[,<module>...]=]<level>...]
A logging level by itself is taken as the overall default. Otherwise, overrides for individual or groups of modules can be specified using the
<module>[,<module>...]=<level>
syntax. Examples of specifications (valid for all of
--logging-level, environment variable and
core.yaml
settings):
info                                       - Set default to INFO
warning:main,db=debug:chaincode=info       - Default WARNING; Override for main,db,chaincode
chaincode=info:main=debug:db=debug:warning - Same as above
Go chaincodes
The standard mechanism to log within a chaincode application is to
integrate with the logging transport exposed to each chaincode instance
via the peer. The chaincode shim package provides APIs that allow a
chaincode to create and manage logging objects whose logs will be
formatted and interleaved consistently with the shim logs.
As independently executed programs, user-provided chaincodes may technically also produce output on stdout/stderr. While naturally useful for “devmode”, these channels are normally disabled on a production network to mitigate abuse from broken or malicious code. However, it is possible to enable this output even for peer-managed containers (e.g. “netmode”) on a per-peer basis via the CORE_VM_DOCKER_ATTACHSTDOUT=true configuration option.
Once enabled, each chaincode will receive its own logging channel keyed by its container-id. Any output written to either stdout or stderr will be integrated with the peer’s log on a per-line basis. It is not recommended to enable this for production.
API
NewLogger(name string) *ChaincodeLogger - Create a logging object
for use by a chaincode
(c *ChaincodeLogger) SetLevel(level LoggingLevel) - Set the logging
level of the logger
(c *ChaincodeLogger) IsEnabledFor(level LoggingLevel) bool - Return
true if logs will be generated at the given level
LogLevel(levelString string) (LoggingLevel, error) - Convert a
string to a LoggingLevel
A LoggingLevel is a member of the enumeration
LogDebug, LogInfo, LogNotice, LogWarning, LogError, LogCritical
which can be used directly, or generated by passing a case-insensitive version of the strings
DEBUG, INFO, NOTICE, WARNING, ERROR, CRITICAL
to the LogLevel API.
Formatted logging at various severity levels is provided by the functions
(c *ChaincodeLogger) Debug(args ...interface{})
(c *ChaincodeLogger) Info(args ...interface{})
(c *ChaincodeLogger) Notice(args ...interface{})
(c *ChaincodeLogger) Warning(args ...interface{})
(c *ChaincodeLogger) Error(args ...interface{})
(c *ChaincodeLogger) Critical(args ...interface{})

(c *ChaincodeLogger) Debugf(format string, args ...interface{})
(c *ChaincodeLogger) Infof(format string, args ...interface{})
(c *ChaincodeLogger) Noticef(format string, args ...interface{})
(c *ChaincodeLogger) Warningf(format string, args ...interface{})
(c *ChaincodeLogger) Errorf(format string, args ...interface{})
(c *ChaincodeLogger) Criticalf(format string, args ...interface{})
The f forms of the logging APIs provide for precise control over the
formatting of the logs. The non-f forms of the APIs currently
insert a space between the printed representations of the arguments, and
arbitrarily choose the formats to use.
In the current implementation, the logs produced by the shim and a
ChaincodeLogger are timestamped, marked with the logger name and
severity level, and written to stderr. Note that logging level
control is currently based on the name provided when the
ChaincodeLogger is created. To avoid ambiguities, all
ChaincodeLogger should be given unique names other than “shim”. The
logger name will appear in all log messages created by the logger. The
shim logs as “shim”.
Go language chaincodes can also control the logging level of the
chaincode shim interface through the SetLoggingLevel API.
SetLoggingLevel(LoggingLevel level) - Control the logging level of
the shim
The default logging level for the shim is LogDebug.
Below is a simple example of how a chaincode might create a private
logging object logging at the LogInfo level, and also control the
amount of logging provided by the shim based on an environment
variable.
var logger = shim.NewLogger("myChaincode")

func main() {

    logger.SetLevel(shim.LogInfo)

    logLevel, _ := shim.LogLevel(os.Getenv("SHIM_LOGGING_LEVEL"))
    shim.SetLoggingLevel(logLevel)
    ...
}
Architecture Explained
The Hyperledger Fabric architecture delivers the following advantages:
- Chaincode trust flexibility. The architecture separates trust assumptions for chaincodes (blockchain applications) from trust assumptions for ordering. In other words, the ordering service may be provided by one set of nodes (orderers) and tolerate some of them to fail or misbehave, and the endorsers may be different for each chaincode.
- Scalability. As the endorser nodes responsible for particular chaincode are orthogonal to the orderers, the system may scale better than if these functions were done by the same nodes. In particular, this results when different chaincodes specify disjoint endorsers, which introduces a partitioning of chaincodes between endorsers and allows parallel chaincode execution (endorsement). Besides, chaincode execution, which can potentially be costly, is removed from the critical path of the ordering service.
- Confidentiality. The architecture facilitates deployment of chaincodes that have confidentiality requirements with respect to the content and state updates of its transactions.
- Consensus modularity. The architecture is modular and allows pluggable consensus (i.e., ordering service) implementations.
Part I: Elements of the architecture relevant to Hyperledger Fabric v1
System architecture
Basic workflow of transaction endorsement
Endorsement policies
Part II: Post-v1 elements of the architecture
Ledger checkpointing (pruning)
1. System architecture
The blockchain is a distributed system consisting of many nodes that communicate with each other. The blockchain runs programs called chaincode, holds state and ledger data, and executes transactions. The chaincode is the central element as transactions are operations invoked on the chaincode. Transactions have to be “endorsed” and only endorsed transactions may be committed and have an effect on the state. There may exist one or more special chaincodes for management functions and parameters, collectively called system chaincodes.
1.1. Transactions
Transactions may be of two types:
- Deploy transactions create new chaincode and take a program as parameter. When a deploy transaction executes successfully, the chaincode has been installed “on” the blockchain.
- Invoke transactions perform an operation in the context of previously deployed chaincode. An invoke transaction refers to a chaincode and to one of its provided functions. When successful, the chaincode executes the specified function - which may involve modifying the corresponding state, and returning an output.
As described later, deploy transactions are special cases of invoke transactions, where a deploy transaction that creates new chaincode, corresponds to an invoke transaction on a system chaincode.
Remark: This document currently assumes that a transaction either creates new chaincode or invokes an operation provided by *one already deployed chaincode. This document does not yet describe: a) optimizations for query (read-only) transactions (included in v1), b) support for cross-chaincode transactions (post-v1 feature).*
1.2. Blockchain datastructures
1.2.1. State
The latest state of the blockchain (or, simply, state) is modeled as a
versioned key/value store (KVS), where keys are names and values are
arbitrary blobs. These entries are manipulated by the chaincodes
(applications) running on the blockchain through put and get
KVS-operations. The state is stored persistently and updates to the
state are logged. Notice that versioned KVS is adopted as state model,
an implementation may use actual KVSs, but also RDBMSs or any other
solution.
More formally, state s is modeled as an element of a mapping
K -> (V X N), where:
Kis a set of keysVis a set of valuesNis an infinite ordered set of version numbers. Injective functionnext: N -> Ntakes an element ofNand returns the next version number.
Both V and N contain a special element \bot, which is in
case of N the lowest element. Initially all keys are mapped to
(\bot,\bot). For s(k)=(v,ver) we denote v by s(k).value,
and ver by s(k).version.
KVS operations are modeled as follows:
put(k,v), fork\in Kandv\in V, takes the blockchain statesand changes it tos'such thats'(k)=(v,next(s(k).version))withs'(k')=s(k')for allk'!=k.get(k)returnss(k).
State is maintained by peers, but not by orderers and clients.
State partitioning. Keys in the KVS can be recognized from their name to belong to a particular chaincode, in the sense that only transaction of a certain chaincode may modify the keys belonging to this chaincode. In principle, any chaincode can read the keys belonging to other chaincodes. Support for cross-chaincode transactions, that modify the state belonging to two or more chaincodes is a post-v1 feature.
1.2.2 Ledger
Ledger provides a verifiable history of all successful state changes (we talk about valid transactions) and unsuccessful attempts to change state (we talk about invalid transactions), occurring during the operation of the system.
Ledger is constructed by the ordering service (see Sec 1.3.3) as a totally ordered hashchain of blocks of (valid or invalid) transactions. The hashchain imposes the total order of blocks in a ledger and each block contains an array of totally ordered transactions. This imposes total order across all transactions.
Ledger is kept at all peers and, optionally, at a subset of orderers. In
the context of an orderer we refer to the Ledger as to
OrdererLedger, whereas in the context of a peer we refer to the
ledger as to PeerLedger. PeerLedger differs from the
OrdererLedger in that peers locally maintain a bitmask that tells
apart valid transactions from invalid ones (see Section XX for more
details).
Peers may prune PeerLedger as described in Section XX (post-v1
feature). Orderers maintain OrdererLedger for fault-tolerance and
availability (of the PeerLedger) and may decide to prune it at
anytime, provided that properties of the ordering service (see Sec.
1.3.3) are maintained.
The ledger allows peers to replay the history of all transactions and to reconstruct the state. Therefore, state as described in Sec 1.2.1 is an optional datastructure.
1.3. Nodes
Nodes are the communication entities of the blockchain. A “node” is only a logical function in the sense that multiple nodes of different types can run on the same physical server. What counts is how nodes are grouped in “trust domains” and associated to logical entities that control them.
There are three types of nodes:
- Client or submitting-client: a client that submits an actual transaction-invocation to the endorsers, and broadcasts transaction-proposals to the ordering service.
- Peer: a node that commits transactions and maintains the state and a copy of the ledger (see Sec, 1.2). Besides, peers can have a special endorser role.
- Ordering-service-node or orderer: a node running the communication service that implements a delivery guarantee, such as atomic or total order broadcast.
The types of nodes are explained next in more detail.
1.3.1. Client
The client represents the entity that acts on behalf of an end-user. It must connect to a peer for communicating with the blockchain. The client may connect to any peer of its choice. Clients create and thereby invoke transactions.
As detailed in Section 2, clients communicate with both peers and the ordering service.
1.3.2. Peer
A peer receives ordered state updates in the form of blocks from the ordering service and maintain the state and the ledger.
Peers can additionally take up a special role of an endorsing peer, or an endorser. The special function of an endorsing peer occurs with respect to a particular chaincode and consists in endorsing a transaction before it is committed. Every chaincode may specify an endorsement policy that may refer to a set of endorsing peers. The policy defines the necessary and sufficient conditions for a valid transaction endorsement (typically a set of endorsers’ signatures), as described later in Sections 2 and 3. In the special case of deploy transactions that install new chaincode the (deployment) endorsement policy is specified as an endorsement policy of the system chaincode.
1.3.3. Ordering service nodes (Orderers)
The orderers form the ordering service, i.e., a communication fabric that provides delivery guarantees. The ordering service can be implemented in different ways: ranging from a centralized service (used e.g., in development and testing) to distributed protocols that target different network and node fault models.
Ordering service provides a shared communication channel to clients and peers, offering a broadcast service for messages containing transactions. Clients connect to the channel and may broadcast messages on the channel which are then delivered to all peers. The channel supports atomic delivery of all messages, that is, message communication with total-order delivery and (implementation specific) reliability. In other words, the channel outputs the same messages to all connected peers and outputs them to all peers in the same logical order. This atomic communication guarantee is also called total-order broadcast, atomic broadcast, or consensus in the context of distributed systems. The communicated messages are the candidate transactions for inclusion in the blockchain state.
Partitioning (ordering service channels). Ordering service may support multiple channels similar to the topics of a publish/subscribe (pub/sub) messaging system. Clients can connects to a given channel and can then send messages and obtain the messages that arrive. Channels can be thought of as partitions - clients connecting to one channel are unaware of the existence of other channels, but clients may connect to multiple channels. Even though some ordering service implementations included with Hyperledger Fabric v1 will support multiple channels, for simplicity of presentation, in the rest of this document, we assume ordering service consists of a single channel/topic.
Ordering service API. Peers connect to the channel provided by the ordering service, via the interface provided by the ordering service. The ordering service API consists of two basic operations (more generally asynchronous events):
TODO add the part of the API for fetching particular blocks under client/peer specified sequence numbers.
broadcast(blob): a client calls this to broadcast an arbitrary messageblobfor dissemination over the channel. This is also calledrequest(blob)in the BFT context, when sending a request to a service.deliver(seqno, prevhash, blob): the ordering service calls this on the peer to deliver the messageblobwith the specified non-negative integer sequence number (seqno) and hash of the most recently delivered blob (prevhash). In other words, it is an output event from the ordering service.deliver()is also sometimes callednotify()in pub-sub systems orcommit()in BFT systems.
Ledger and block formation. The ledger (see also Sec. 1.2.2)
contains all data output by the ordering service. In a nutshell, it is a
sequence of deliver(seqno, prevhash, blob) events, which form a hash
chain according to the computation of prevhash described before.
Most of the time, for efficiency reasons, instead of outputting
individual transactions (blobs), the ordering service will group (batch)
the blobs and output blocks within a single deliver event. In this
case, the ordering service must impose and convey a deterministic
ordering of the blobs within each block. The number of blobs in a block
may be chosen dynamically by an ordering service implementation.
In the following, for ease of presentation, we define ordering service
properties (rest of this subsection) and explain the workflow of
transaction endorsement (Section 2) assuming one blob per deliver
event. These are easily extended to blocks, assuming that a deliver
event for a block corresponds to a sequence of individual deliver
events for each blob within a block, according to the above mentioned
deterministic ordering of blobs within a blocs.
Ordering service properties
The guarantees of the ordering service (or atomic-broadcast channel) stipulate what happens to a broadcasted message and what relations exist among delivered messages. These guarantees are as follows:
Safety (consistency guarantees): As long as peers are connected for sufficiently long periods of time to the channel (they can disconnect or crash, but will restart and reconnect), they will see an identical series of delivered
(seqno, prevhash, blob)messages. This means the outputs (deliver()events) occur in the same order on all peers and according to sequence number and carry identical content (blobandprevhash) for the same sequence number. Note this is only a logical order, and adeliver(seqno, prevhash, blob)on one peer is not required to occur in any real-time relation todeliver(seqno, prevhash, blob)that outputs the same message at another peer. Put differently, given a particularseqno, no two correct peers deliver differentprevhashorblobvalues. Moreover, no valueblobis delivered unless some client (peer) actually calledbroadcast(blob)and, preferably, every broadcasted blob is only delivered once.Furthermore, the
deliver()event contains the cryptographic hash of the data in the previousdeliver()event (prevhash). When the ordering service implements atomic broadcast guarantees,prevhashis the cryptographic hash of the parameters from thedeliver()event with sequence numberseqno-1. This establishes a hash chain acrossdeliver()events, which is used to help verify the integrity of the ordering service output, as discussed in Sections 4 and 5 later. In the special case of the firstdeliver()event,prevhashhas a default value.Liveness (delivery guarantee): Liveness guarantees of the ordering service are specified by a ordering service implementation. The exact guarantees may depend on the network and node fault model.
In principle, if the submitting client does not fail, the ordering service should guarantee that every correct peer that connects to the ordering service eventually delivers every submitted transaction.
To summarize, the ordering service ensures the following properties:
- Agreement. For any two events at correct peers
deliver(seqno, prevhash0, blob0)anddeliver(seqno, prevhash1, blob1)with the sameseqno,prevhash0==prevhash1andblob0==blob1; - Hashchain integrity. For any two events at correct peers
deliver(seqno-1, prevhash0, blob0)anddeliver(seqno, prevhash, blob),prevhash = HASH(seqno-1||prevhash0||blob0). - No skipping. If an ordering service outputs
deliver(seqno, prevhash, blob)at a correct peer p, such thatseqno>0, then p already delivered an eventdeliver(seqno-1, prevhash0, blob0). - No creation. Any event
deliver(seqno, prevhash, blob)at a correct peer must be preceded by abroadcast(blob)event at some (possibly distinct) peer; - No duplication (optional, yet desirable). For any two events
broadcast(blob)andbroadcast(blob'), when two eventsdeliver(seqno0, prevhash0, blob)anddeliver(seqno1, prevhash1, blob')occur at correct peers andblob == blob', thenseqno0==seqno1andprevhash0==prevhash1. - Liveness. If a correct client invokes an event
broadcast(blob)then every correct peer “eventually” issues an eventdeliver(*, *, blob), where*denotes an arbitrary value.
2. Basic workflow of transaction endorsement
In the following we outline the high-level request flow for a transaction.
Remark: Notice that the following protocol *does not assume that all transactions are deterministic, i.e., it allows for non-deterministic transactions.*
2.1. The client creates a transaction and sends it to endorsing peers of its choice
To invoke a transaction, the client sends a PROPOSE message to a set
of endorsing peers of its choice (possibly not at the same time - see
Sections 2.1.2. and 2.3.). The set of endorsing peers for a given
chaincodeID is made available to client via peer, which in turn
knows the set of endorsing peers from endorsement policy (see Section
3). For example, the transaction could be sent to all endorsers of a
given chaincodeID. That said, some endorsers could be offline,
others may object and choose not to endorse the transaction. The
submitting client tries to satisfy the policy expression with the
endorsers available.
In the following, we first detail PROPOSE message format and then
discuss possible patterns of interaction between submitting client and
endorsers.
2.1.1. PROPOSE message format
The format of a PROPOSE message is <PROPOSE,tx,[anchor]>, where
tx is a mandatory and anchor optional argument explained in the
following.
tx=<clientID,chaincodeID,txPayload,timestamp,clientSig>, whereclientIDis an ID of the submitting client,chaincodeIDrefers to the chaincode to which the transaction pertains,txPayloadis the payload containing the submitted transaction itself,timestampis a monotonically increasing (for every new transaction) integer maintained by the client,clientSigis signature of a client on other fields oftx.
The details of
txPayloadwill differ between invoke transactions and deploy transactions (i.e., invoke transactions referring to a deploy-specific system chaincode). For an invoke transaction,txPayloadwould consist of two fieldstxPayload = <operation, metadata>, whereoperationdenotes the chaincode operation (function) and arguments,metadatadenotes attributes related to the invocation.
For a deploy transaction,
txPayloadwould consist of three fieldstxPayload = <source, metadata, policies>, wheresourcedenotes the source code of the chaincode,metadatadenotes attributes related to the chaincode and application,policiescontains policies related to the chaincode that are accessible to all peers, such as the endorsement policy. Note that endorsement policies are not supplied withtxPayloadin adeploytransaction, buttxPayloadof adeploycontains endorsement policy ID and its parameters (see Section 3).
anchorcontains read version dependencies, or more specifically, key-version pairs (i.e.,anchoris a subset ofKxN), that binds or “anchors” thePROPOSErequest to specified versions of keys in a KVS (see Section 1.2.). If the client specifies theanchorargument, an endorser endorses a transaction only upon read version numbers of corresponding keys in its local KVS matchanchor(see Section 2.2. for more details).
Cryptographic hash of tx is used by all nodes as a unique
transaction identifier tid (i.e., tid=HASH(tx)). The client
stores tid in memory and waits for responses from endorsing peers.
2.1.2. Message patterns
The client decides on the sequence of interaction with endorsers. For
example, a client would typically send <PROPOSE, tx> (i.e., without
the anchor argument) to a single endorser, which would then produce
the version dependencies (anchor) which the client can later on use
as an argument of its PROPOSE message to other endorsers. As another
example, the client could directly send <PROPOSE, tx> (without
anchor) to all endorsers of its choice. Different patterns of
communication are possible and client is free to decide on those (see
also Section 2.3.).
2.2. The endorsing peer simulates a transaction and produces an endorsement signature
On reception of a <PROPOSE,tx,[anchor]> message from a client, the
endorsing peer epID first verifies the client’s signature
clientSig and then simulates a transaction. If the client specifies
anchor then endorsing peer simulates the transactions only upon read
version numbers (i.e., readset as defined below) of corresponding
keys in its local KVS match those version numbers specified by
anchor.
Simulating a transaction involves endorsing peer tentatively executing
a transaction (txPayload), by invoking the chaincode to which the
transaction refers (chaincodeID) and the copy of the state that the
endorsing peer locally holds.
As a result of the execution, the endorsing peer computes read version
dependencies (readset) and state updates (writeset), also
called MVCC+postimage info in DB language.
Recall that the state consists of key/value (k/v) pairs. All k/v entries are versioned, that is, every entry contains ordered version information, which is incremented every time when the value stored under a key is updated. The peer that interprets the transaction records all k/v pairs accessed by the chaincode, either for reading or for writing, but the peer does not yet update its state. More specifically:
- Given state
sbefore an endorsing peer executes a transaction, for every keykread by the transaction, pair(k,s(k).version)is added toreadset. - Additionally, for every key
kmodified by the transaction to the new valuev', pair(k,v')is added towriteset. Alternatively,v'could be the delta of the new value to previous value (s(k).value).
If a client specifies anchor in the PROPOSE message then client
specified anchor must equal readset produced by endorsing peer
when simulating the transaction.
Then, the peer forwards internally tran-proposal (and possibly
tx) to the part of its (peer’s) logic that endorses a transaction,
referred to as endorsing logic. By default, endorsing logic at a
peer accepts the tran-proposal and simply signs the
tran-proposal. However, endorsing logic may interpret arbitrary
functionality, to, e.g., interact with legacy systems with
tran-proposal and tx as inputs to reach the decision whether to
endorse a transaction or not.
If endorsing logic decides to endorse a transaction, it sends
<TRANSACTION-ENDORSED, tid, tran-proposal,epSig> message to the
submitting client(tx.clientID), where:
tran-proposal := (epID,tid,chaincodeID,txContentBlob,readset,writeset),where
txContentBlobis chaincode/transaction specific information. The intention is to havetxContentBlobused as some representation oftx(e.g.,txContentBlob=tx.txPayload).epSigis the endorsing peer’s signature ontran-proposal
Else, in case the endorsing logic refuses to endorse the transaction, an
endorser may send a message (TRANSACTION-INVALID, tid, REJECTED)
to the submitting client.
Notice that an endorser does not change its state in this step, the updates produced by transaction simulation in the context of endorsement do not affect the state!
2.3. The submitting client collects an endorsement for a transaction and broadcasts it through ordering service
The submitting client waits until it receives “enough” messages and
signatures on (TRANSACTION-ENDORSED, tid, *, *) statements to
conclude that the transaction proposal is endorsed. As discussed in
Section 2.1.2., this may involve one or more round-trips of interaction
with endorsers.
The exact number of “enough” depend on the chaincode endorsement policy
(see also Section 3). If the endorsement policy is satisfied, the
transaction has been endorsed; note that it is not yet committed. The
collection of signed TRANSACTION-ENDORSED messages from endorsing
peers which establish that a transaction is endorsed is called an
endorsement and denoted by endorsement.
If the submitting client does not manage to collect an endorsement for a transaction proposal, it abandons this transaction with an option to retry later.
For transaction with a valid endorsement, we now start using the
ordering service. The submitting client invokes ordering service using
the broadcast(blob), where blob=endorsement. If the client does
not have capability of invoking ordering service directly, it may proxy
its broadcast through some peer of its choice. Such a peer must be
trusted by the client not to remove any message from the endorsement
or otherwise the transaction may be deemed invalid. Notice that,
however, a proxy peer may not fabricate a valid endorsement.
2.4. The ordering service delivers a transactions to the peers
When an event deliver(seqno, prevhash, blob) occurs and a peer has
applied all state updates for blobs with sequence number lower than
seqno, a peer does the following:
- It checks that the
blob.endorsementis valid according to the policy of the chaincode (blob.tran-proposal.chaincodeID) to which it refers. - In a typical case, it also verifies that the dependencies
(
blob.endorsement.tran-proposal.readset) have not been violated meanwhile. In more complex use cases,tran-proposalfields in endorsement may differ and in this case endorsement policy (Section 3) specifies how the state evolves.
Verification of dependencies can be implemented in different ways,
according to a consistency property or “isolation guarantee” that is
chosen for the state updates. Serializability is a default isolation
guarantee, unless chaincode endorsement policy specifies a different
one. Serializability can be provided by requiring the version associated
with every key in the readset to be equal to that key’s version in
the state, and rejecting transactions that do not satisfy this
requirement.
- If all these checks pass, the transaction is deemed valid or
committed. In this case, the peer marks the transaction with 1 in
the bitmask of the
PeerLedger, appliesblob.endorsement.tran-proposal.writesetto blockchain state (iftran-proposalsare the same, otherwise endorsement policy logic defines the function that takesblob.endorsement). - If the endorsement policy verification of
blob.endorsementfails, the transaction is invalid and the peer marks the transaction with 0 in the bitmask of thePeerLedger. It is important to note that invalid transactions do not change the state.
Note that this is sufficient to have all (correct) peers have the same
state after processing a deliver event (block) with a given sequence
number. Namely, by the guarantees of the ordering service, all correct
peers will receive an identical sequence of
deliver(seqno, prevhash, blob) events. As the evaluation of the
endorsement policy and evaluation of version dependencies in readset
are deterministic, all correct peers will also come to the same
conclusion whether a transaction contained in a blob is valid. Hence,
all peers commit and apply the same sequence of transactions and update
their state in the same way.
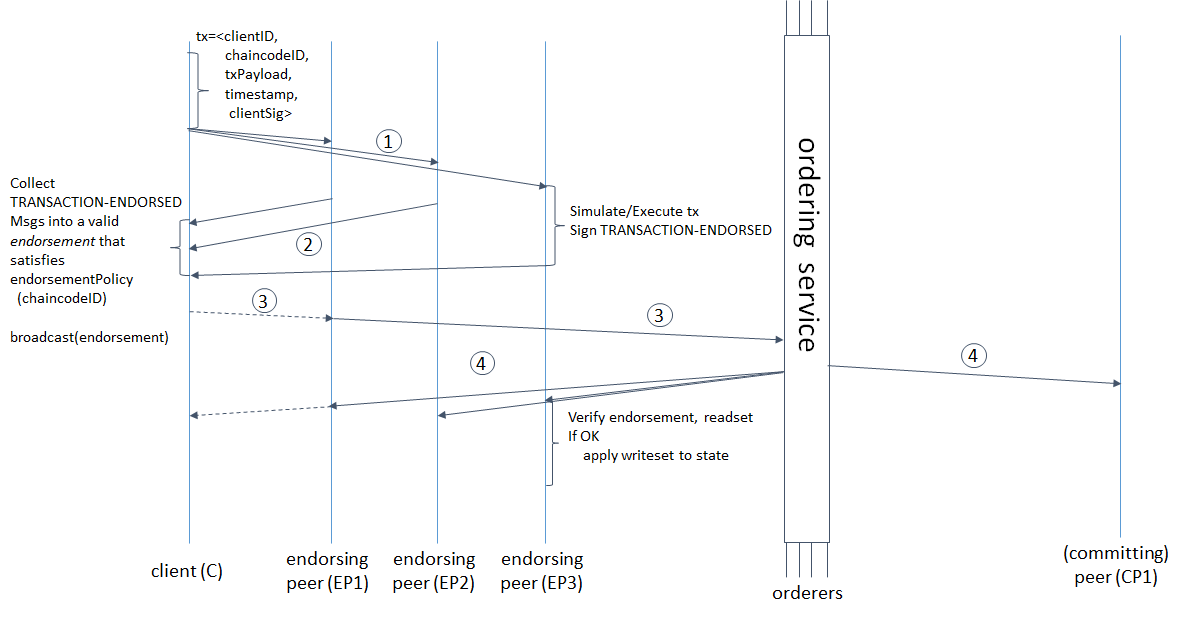
Illustration of the transaction flow (common-case path).
Figure 1. Illustration of one possible transaction flow (common-case path).
3. Endorsement policies
3.1. Endorsement policy specification
An endorsement policy, is a condition on what endorses a
transaction. Blockchain peers have a pre-specified set of endorsement
policies, which are referenced by a deploy transaction that installs
specific chaincode. Endorsement policies can be parametrized, and these
parameters can be specified by a deploy transaction.
To guarantee blockchain and security properties, the set of endorsement policies should be a set of proven policies with limited set of functions in order to ensure bounded execution time (termination), determinism, performance and security guarantees.
Dynamic addition of endorsement policies (e.g., by deploy
transaction on chaincode deploy time) is very sensitive in terms of
bounded policy evaluation time (termination), determinism, performance
and security guarantees. Therefore, dynamic addition of endorsement
policies is not allowed, but can be supported in future.
3.2. Transaction evaluation against endorsement policy
A transaction is declared valid only if it has been endorsed according to the policy. An invoke transaction for a chaincode will first have to obtain an endorsement that satisfies the chaincode’s policy or it will not be committed. This takes place through the interaction between the submitting client and endorsing peers as explained in Section 2.
Formally the endorsement policy is a predicate on the endorsement, and potentially further state that evaluates to TRUE or FALSE. For deploy transactions the endorsement is obtained according to a system-wide policy (for example, from the system chaincode).
An endorsement policy predicate refers to certain variables. Potentially it may refer to:
- keys or identities relating to the chaincode (found in the metadata of the chaincode), for example, a set of endorsers;
- further metadata of the chaincode;
- elements of the
endorsementandendorsement.tran-proposal; - and potentially more.
The above list is ordered by increasing expressiveness and complexity, that is, it will be relatively simple to support policies that only refer to keys and identities of nodes.
The evaluation of an endorsement policy predicate must be deterministic. An endorsement shall be evaluated locally by every peer such that a peer does not need to interact with other peers, yet all correct peers evaluate the endorsement policy in the same way.
3.3. Example endorsement policies
The predicate may contain logical expressions and evaluates to TRUE or FALSE. Typically the condition will use digital signatures on the transaction invocation issued by endorsing peers for the chaincode.
Suppose the chaincode specifies the endorser set
E = {Alice, Bob, Charlie, Dave, Eve, Frank, George}. Some example
policies:
- A valid signature from on the same
tran-proposalfrom all members of E. - A valid signature from any single member of E.
- Valid signatures on the same
tran-proposalfrom endorsing peers according to the condition(Alice OR Bob) AND (any two of: Charlie, Dave, Eve, Frank, George). - Valid signatures on the same
tran-proposalby any 5 out of the 7 endorsers. (More generally, for chaincode withn > 3fendorsers, valid signatures by any2f+1out of thenendorsers, or by any group of more than(n+f)/2endorsers.) - Suppose there is an assignment of “stake” or “weights” to the
endorsers, like
{Alice=49, Bob=15, Charlie=15, Dave=10, Eve=7, Frank=3, George=1}, where the total stake is 100: The policy requires valid signatures from a set that has a majority of the stake (i.e., a group with combined stake strictly more than 50), such as{Alice, X}with anyXdifferent from George, or{everyone together except Alice}. And so on. - The assignment of stake in the previous example condition could be static (fixed in the metadata of the chaincode) or dynamic (e.g., dependent on the state of the chaincode and be modified during the execution).
- Valid signatures from (Alice OR Bob) on
tran-proposal1and valid signatures from(any two of: Charlie, Dave, Eve, Frank, George)ontran-proposal2, wheretran-proposal1andtran-proposal2differ only in their endorsing peers and state updates.
How useful these policies are will depend on the application, on the desired resilience of the solution against failures or misbehavior of endorsers, and on various other properties.
4 (post-v1). Validated ledger and PeerLedger checkpointing (pruning)
4.1. Validated ledger (VLedger)
To maintain the abstraction of a ledger that contains only valid and committed transactions (that appears in Bitcoin, for example), peers may, in addition to state and Ledger, maintain the Validated Ledger (or VLedger). This is a hash chain derived from the ledger by filtering out invalid transactions.
The construction of the VLedger blocks (called here vBlocks) proceeds
as follows. As the PeerLedger blocks may contain invalid
transactions (i.e., transactions with invalid endorsement or with
invalid version dependencies), such transactions are filtered out by
peers before a transaction from a block becomes added to a vBlock. Every
peer does this by itself (e.g., by using the bitmask associated with
PeerLedger). A vBlock is defined as a block without the invalid
transactions, that have been filtered out. Such vBlocks are inherently
dynamic in size and may be empty. An illustration of vBlock construction
is given in the figure below. 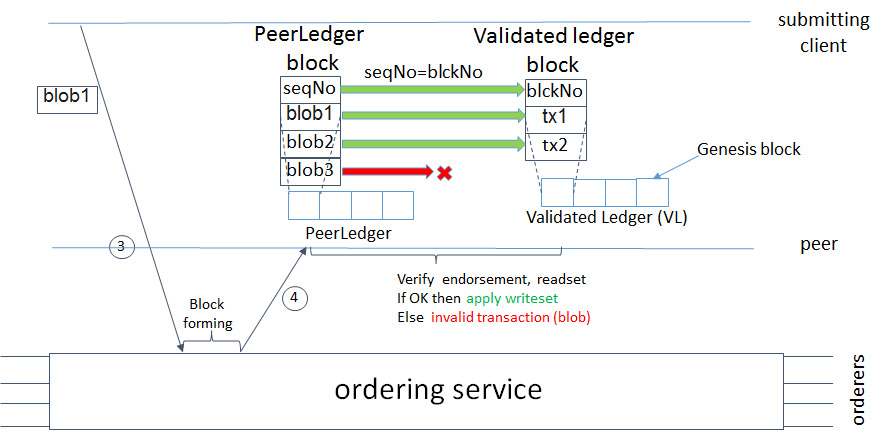
Figure 2. Illustration of validated ledger block (vBlock) formation from
ledger (PeerLedger) blocks.
vBlocks are chained together to a hash chain by every peer. More specifically, every block of a validated ledger contains:
- The hash of the previous vBlock.
- vBlock number.
- An ordered list of all valid transactions committed by the peers since the last vBlock was computed (i.e., list of valid transactions in a corresponding block).
- The hash of the corresponding block (in
PeerLedger) from which the current vBlock is derived.
All this information is concatenated and hashed by a peer, producing the hash of the vBlock in the validated ledger.
4.2. PeerLedger Checkpointing
The ledger contains invalid transactions, which may not necessarily be
recorded forever. However, peers cannot simply discard PeerLedger
blocks and thereby prune PeerLedger once they establish the
corresponding vBlocks. Namely, in this case, if a new peer joins the
network, other peers could not transfer the discarded blocks (pertaining
to PeerLedger) to the joining peer, nor convince the joining peer of
the validity of their vBlocks.
To facilitate pruning of the PeerLedger, this document describes a
checkpointing mechanism. This mechanism establishes the validity of
the vBlocks across the peer network and allows checkpointed vBlocks to
replace the discarded PeerLedger blocks. This, in turn, reduces
storage space, as there is no need to store invalid transactions. It
also reduces the work to reconstruct the state for new peers that join
the network (as they do not need to establish validity of individual
transactions when reconstructing the state by replaying PeerLedger,
but may simply replay the state updates contained in the validated
ledger).
4.2.1. Checkpointing protocol
Checkpointing is performed periodically by the peers every CHK blocks,
where CHK is a configurable parameter. To initiate a checkpoint, the
peers broadcast (e.g., gossip) to other peers message
<CHECKPOINT,blocknohash,blockno,stateHash,peerSig>, where
blockno is the current blocknumber and blocknohash is its
respective hash, stateHash is the hash of the latest state (produced
by e.g., a Merkle hash) upon validation of block blockno and
peerSig is peer’s signature on
(CHECKPOINT,blocknohash,blockno,stateHash), referring to the
validated ledger.
A peer collects CHECKPOINT messages until it obtains enough
correctly signed messages with matching blockno, blocknohash and
stateHash to establish a valid checkpoint (see Section 4.2.2.).
Upon establishing a valid checkpoint for block number blockno with
blocknohash, a peer:
- if
blockno>latestValidCheckpoint.blockno, then a peer assignslatestValidCheckpoint=(blocknohash,blockno), - stores the set of respective peer signatures that constitute a valid
checkpoint into the set
latestValidCheckpointProof, - stores the state corresponding to
stateHashtolatestValidCheckpointedState, - (optionally) prunes its
PeerLedgerup to block numberblockno(inclusive).
4.2.2. Valid checkpoints
Clearly, the checkpointing protocol raises the following questions: When can a peer prune its ``PeerLedger``? How many ``CHECKPOINT`` messages are “sufficiently many”?. This is defined by a checkpoint validity policy, with (at least) two possible approaches, which may also be combined:
- Local (peer-specific) checkpoint validity policy (LCVP). A local
policy at a given peer p may specify a set of peers which peer p
trusts and whose
CHECKPOINTmessages are sufficient to establish a valid checkpoint. For example, LCVP at peer Alice may define that Alice needs to receiveCHECKPOINTmessage from Bob, or from both Charlie and Dave. - Global checkpoint validity policy (GCVP). A checkpoint validity
policy may be specified globally. This is similar to a local peer
policy, except that it is stipulated at the system (blockchain)
granularity, rather than peer granularity. For instance, GCVP may
specify that:
- each peer may trust a checkpoint if confirmed by 11 different peers.
- in a specific deployment in which every orderer is collocated with a peer in the same machine (i.e., trust domain) and where up to f orderers may be (Byzantine) faulty, each peer may trust a checkpoint if confirmed by f+1 different peers collocated with orderers.
Transaction Flow
This document outlines the transactional mechanics that take place during a standard asset exchange. The scenario includes two clients, A and B, who are buying and selling radishes. They each have a peer on the network through which they send their transactions and interact with the ledger.

Assumptions
This flow assumes that a channel is set up and running. The application user has registered and enrolled with the organization’s certificate authority (CA) and received back necessary cryptographic material, which is used to authenticate to the network.
The chaincode (containing a set of key value pairs representing the initial
state of the radish market) is installed on the peers and instantiated on the
channel. The chaincode contains logic defining a set of transaction
instructions and the agreed upon price for a radish. An endorsement policy has
also been set for this chaincode, stating that both peerA and peerB must endorse
any transaction.

- Client A initiates a transaction
What’s happening? - Client A is sending a request to purchase radishes. The
request targets peerA and peerB, who are respectively representative of
Client A and Client B. The endorsement policy states that both peers must endorse
any transaction, therefore the request goes to peerA and peerB.
Next, the transaction proposal is constructed. An application leveraging a supported SDK (node, java, python) utilizes one of the available API’s which generates a transaction proposal. The proposal is a request to invoke a chaincode function so that data can be read and/or written to the ledger (i.e. write new key value pairs for the assets). The SDK serves as a shim to package the transaction proposal into the properly architected format (protocol buffer over gRPC) and takes the user’s cryptographic credentials to produce a unique signature for this transaction proposal.

- Endorsing peers verify signature & execute the transaction
The endorsing peers verify (1) that the transaction proposal is well formed, (2) it has not been submitted already in the past (replay-attack protection), (3) the signature is valid (using MSP), and (4) that the submitter (Client A, in the example) is properly authorized to perform the proposed operation on that channel (namely, each endorsing peer ensures that the submitter satisfies the channel’s Writers policy). The endorsing peers take the transaction proposal inputs as arguments to the invoked chaincode’s function. The chaincode is then executed against the current state database to produce transaction results including a response value, read set, and write set. No updates are made to the ledger at this point. The set of these values, along with the endorsing peer’s signature and a YES/NO endorsement statement is passed back as a “proposal response” to the SDK which parses the payload for the application to consume.
{The MSP is a peer component that allows them to verify transaction requests arriving from clients and to sign transaction results(endorsements). The *Writing policy is defined at channel creation time, and determines which user is entitled to submit a transaction to that channel.}*

- Proposal responses are inspected
The application verifies the endorsing peer signatures and compares the proposal responses (link to glossary term which will contain a representation of the payload) to determine if the proposal responses are the same and if the specified endorsement policy has been fulfilled (i.e. did peerA and peerB both endorse). The architecture is such that even if an application chooses not to inspect responses or otherwise forwards an unendorsed transaction, the policy will still be enforced by peers and upheld at the commit validation phase.

- Client assembles endorsements into a transaction
The application “broadcasts” the transaction proposal and response within a “transaction message” to the Ordering Service. The transaction will contain the read/write sets, the endorsing peers signatures and the Channel ID. The Ordering Service does not need to inspect the entire content of a transaction in order to perform its operation, it simply receives transactions from all channels in the network, orders them chronologically by channel, and creates blocks of transactions per channel.

- Transaction is validated and committed
The blocks of transactions are “delivered” to all peers on the channel. The transactions within the block are validated to ensure endorsement policy is fulfilled and to ensure that there have been no changes to ledger state for read set variables since the read set was generated by the transaction execution. Transactions in the block are tagged as being valid or invalid.

- Ledger updated
Each peer appends the block to the channel’s chain, and for each valid transaction the write sets are committed to current state database. An event is emitted, to notify the client application that the transaction (invocation) has been immutably appended to the chain, as well as notification of whether the transaction was validated or invalidated.
Note: See the Chaincode Swimlanes diagram to better understand the server side flow and the protobuffers.
Hyperledger Fabric SDKs
Hyperledger Fabric intends to offer a number of SDKs for a wide variety of programming languages. The first two delivered are the Node.js and Java SDKs. We hope to provide Python and Go SDKs soon after the 1.0.0 release.
Bringing up a Kafka-based Ordering Service
Caveat emptor
This document assumes that the reader generally knows how to set up a Kafka cluster and a ZooKeeper ensemble. The purpose of this guide is to identify the steps you need to take so as to have a set of Hyperledger Fabric ordering service nodes (OSNs) use your Kafka cluster and provide an ordering service to your blockchain network.
Big picture
Each channel in Fabric maps to a separate single-partition topic in Kafka. When
an OSN receives transactions via the Broadcast RPC, it checks to make sure
that the broadcasting client has permissions to write on the channel, then
relays (i.e. produces) those transactions to the appropriate partition in Kafka.
This partition is also consumed by the OSN which groups the received
transactions into blocks locally, persists them in its local ledger, and serves
them to receiving clients via the Deliver RPC. For low-level details, refer
to the document that describes how we came to this design
– Figure 8 is a schematic representation of the process described above.
Steps
Let K and Z be the number of nodes in the Kafka cluster and the
ZooKeeper ensemble respectively:
i. At a minimum, K should be set to 4. (As we will explain in Step 4 below,
this is the minimum number of nodes necessary in order to exhibit crash fault
tolerance, i.e. with 4 brokers, you can have 1 broker go down, all channels will
continue to be writeable and readable, and new channels can be created.)
ii. Z will either be 3, 5, or 7. It has to be an odd number to avoid
split-brain scenarios, and larger than 1 in order to avoid single point of
failures. Anything beyond 7 ZooKeeper servers is considered an overkill.
Proceed as follows:
1. Orderers: Encode the Kafka-related information in the network’s genesis
block. If you are using configtxgen, edit configtx.yaml – or pick a
preset profile for the system channel’s genesis block – so that:
Orderer.OrdererTypeis set tokafka.b.
Orderer.Kafka.Brokerscontains the address of at least two of the Kafka brokers in your cluster inIP:portnotation. The list does not need to be exhaustive. (These are your seed brokers.)
2. Orderers: Set the maximum block size. Each block will have at most
Orderer.AbsoluteMaxBytes bytes (not including headers), a value that you can
set in configtx.yaml. Let the value you pick here be A and make note of
it – it will affect how you configure your Kafka brokers in Step 4.
3. Orderers: Create the genesis block. Use configtxgen. The settings you
picked in Steps 1 and 2 above are system-wide settings, i.e. they apply across
the network for all the OSNs. Make note of the genesis block’s location.
4. Kafka cluster: Configure your Kafka brokers appropriately. Ensure that every Kafka broker has these keys configured:
a.
unclean.leader.election.enable = false– Data consistency is key in a blockchain environment. We cannot have a channel leader chosen outside of the in-sync replica set, or we run the risk of overwriting the offsets that the previous leader produced, and –as a result– rewrite the blockchain that the orderers produce.b.
min.insync.replicas = M– Where you pick a valueMsuch that 1 < M < N (seedefault.replication.factorbelow). Data is considered committed when it is written to at leastMreplicas (which are then considered in-sync and belong to the in-sync replica set, or ISR). In any other case, the write operation returns an error. Then:i. If up to N-M replicas – out of theNthat the channel data is written to – become unavailable, operations proceed normally. ii. If more replicas become unavailable, Kafka cannot maintain an ISR set ofM,so it stops accepting writes. Reads work without issues. The channel becomes writeable again whenMreplicas get in-sync.c.
default.replication.factor = N– Where you pick a valueNsuch that N < K. A replication factor ofNmeans that each channel will have its data replicated toNbrokers. These are the candidates for the ISR set of a channel. As we noted in themin.insync.replicas sectionabove, not all of these brokers have to be available all the time.Nshould be set strictly smaller toKbecause channel creations cannot go forward if less thanNbrokers are up. So if you set N = K, a single broker going down means that no new channels can be created on the blockchain network – the crash fault tolerance of the ordering service is non-existent.d.
message.max.bytesandreplica.fetch.max.bytesshould be set to a value larger thanA, the value you picked inOrderer.AbsoluteMaxBytesin Step 2 above. Add some buffer to account for headers – 1 MiB is more than enough. The following condition applies:Orderer.AbsoluteMaxBytes < replica.fetch.max.bytes <= message.max.bytes(For completeness, we note that
message.max.bytesshould be strictly smaller tosocket.request.max.byteswhich is set by default to 100 MiB. If you wish to have blocks larger than 100 MiB you will need to edit the hard-coded value inbrokerConfig.Producer.MaxMessageBytesinfabric/orderer/kafka/config.goand rebuild the binary from source. This is not advisable.)e.
log.retention.ms = -1. Until the ordering service in Fabric adds support for pruning of the Kafka logs, you should disable time-based retention and prevent segments from expiring. (Size-based retention – seelog.retention.bytes– is disabled by default in Kafka at the time of this writing, so there’s no need to set it explicitly.)Based on what we’ve described above, the minimum allowed values for
MandNare 2 and 3 respectively. This configuration allows for the creation of new channels to go forward, and for all channels to continue to be writeable.
5. Orderers: Point each OSN to the genesis block. Edit
General.GenesisFile in orderer.yaml so that it points to the genesis
block created in Step 3 above. (While at it, ensure all other keys in that YAML
file are set appropriately.)
Orderers: Adjust polling intervals and timeouts. (Optional step.)
a. The
Kafka.Retrysection in theorderer.yamlfile allows you to adjust the frequency of the metadata/producer/consumer requests, as well as the socket timeouts. (These are all settings you would expect to see in a Kafka producer or consumer.)b. Additionally, when a new channel is created, or when an existing channel is reloaded (in case of a just-restarted orderer), the orderer interacts with the Kafka cluster in the following ways:
a. It creates a Kafka producer (writer) for the Kafka partition that corresponds to the channel.
b. It uses that producer to post a no-op
CONNECTmessage to that partition.- It creates a Kafka consumer (reader) for that partition.
If any of these steps fail, you can adjust the frequency with which they are repeated. Specifically they will be re-attempted every
Kafka.Retry.ShortIntervalfor a total ofKafka.Retry.ShortTotal, and then everyKafka.Retry.LongIntervalfor a total ofKafka.Retry.LongTotaluntil they succeed. Note that the orderer will be unable to write to or read from a channel until all of the steps above have been completed successfully.
7. Set up the OSNs and Kafka cluster so that they communicate over SSL.
(Optional step, but highly recommended.) Refer to the Confluent guide for the Kafka cluster side of
the equation, and set the keys under Kafka.TLS in orderer.yaml on every
OSN accordingly.
8. Bring up the nodes in the following order: ZooKeeper ensemble, Kafka cluster, ordering service nodes.
Additional considerations
1. Preferred message size. In Step 2 above (see Steps section) you can
also set the preferred size of blocks by setting the
Orderer.Batchsize.PreferredMaxBytes key. Kafka offers higher throughput when
dealing with relatively small messages; aim for a value no bigger than 1 MiB.
2. Using environment variables to override settings. You can override a
Kafka broker or a ZooKeeper server’s settings by using environment variables.
Replace the dots of the configuration key with underscores –
e.g. KAFKA_UNCLEAN_LEADER_ELECTION_ENABLE=false will allow you to override
the default value of unclean.leader.election.enable. The same applies to the
OSNs for their local configuration, i.e. what can be set in orderer.yaml.
For example ORDERER_KAFKA_RETRY_SHORTINTERVAL=1s allows you to override the
default value for Orderer.Kafka.Retry.ShortInterval.
Supported Kafka versions and upgrading
Supported Kafka versions for v1 are 0.9 and 0.10. (Fabric uses the
sarama client library and vendors a
version of it that supports Kafka 0.9 and 0.10.)
Out of the box the Kafka version defaults to 0.9.0.1. If you wish to use a
different supported version, you will have to edit the source code (modify the
Version field of the defaults struct in
orderer/localconfig/config.go) and rebuild the orderer binary. For
example, if you wish to run the ordering service in a Kafka cluster running
0.10.0.1, you would edit the file like so:
...
Verbose: false,
Version: sarama.V0_10_0_1,
TLS: TLS{
...
And then rebuild the binary. (This process will be improved with FAB-4619.)
Debugging
Set General.LogLevel to DEBUG and Kafka.Verbose in orderer.yaml
to true.
Example
Sample Docker Compose configuration files inline with the recommended settings
above can be found under the fabric/bddtests directory. Look for
dc-orderer-kafka-base.yml and dc-orderer-kafka.yml.
Channels
A Hyperledger Fabric channel is a private “subnet” of communication between two or more specific network members, for the purpose of conducting private and confidential transactions. A channel is defined by members (organizations), anchor peers per member, the shared ledger, chaincode application(s) and the ordering service node(s). Each transaction on the network is executed on a channel, where each party must be authenticated and authorized to transact on that channel. Each peer that joins a channel, has its own identity given by a membership services provider (MSP), which authenticates each peer to its channel peers and services.
To create a new channel, the client SDK calls configuration system chaincode and references properties such as anchor peer**s, and members (organizations). This request creates a **genesis block for the channel ledger, which stores configuration information about the channel policies, members and anchor peers. When adding a new member to an existing channel, either this genesis block, or if applicable, a more recent reconfiguration block, is shared with the new member.
Note
See the Channel Configuration (configtx) section for more more details on the properties and proto structures of config transactions.
The election of a leading peer for each member on a channel determines which peer communicates with the ordering service on behalf of the member. If no leader is identified, an algorithm can be used to identify the leader. The consensus service orders transactions and delivers them, in a block, to each leading peer, which then distributes the block to its member peers, and across the channel, using the gossip protocol.
Although any one anchor peer can belong to multiple channels, and therefore maintain multiple ledgers, no ledger data can pass from one channel to another. This separation of ledgers, by channel, is defined and implemented by configuration chaincode, the identity membership service and the gossip data dissemination protocol. The dissemination of data, which includes information on transactions, ledger state and channel membership, is restricted to peers with verifiable membership on the channel. This isolation of peers and ledger data, by channel, allows network members that require private and confidential transactions to coexist with business competitors and other restricted members, on the same blockchain network.
Ledger
The ledger is the sequenced, tamper-resistant record of all state transitions in the fabric. State transitions are a result of chaincode invocations (‘transactions’) submitted by participating parties. Each transaction results in a set of asset key-value pairs that are committed to the ledger as creates, updates, or deletes.
The ledger is comprised of a blockchain (‘chain’) to store the immutable, sequenced record in blocks, as well as a state database to maintain current fabric state. There is one ledger per channel. Each peer maintains a copy of the ledger for each channel of which they are a member.
Chain
The chain is a transaction log, structured as hash-linked blocks, where each block contains a sequence of N transactions. The block header includes a hash of the block’s transactions, as well as a hash of the prior block’s header. In this way, all transactions on the ledger are sequenced and cryptographically linked together. In other words, it is not possible to tamper with the ledger data, without breaking the hash links. The hash of the latest block represents every transaction that has come before, making it possible to ensure that all peers are in a consistent and trusted state.
The chain is stored on the peer file system (either local or attached storage), efficiently supporting the append-only nature of the blockchain workload.
State Database
The ledger’s current state data represents the latest values for all keys ever included in the chain transaction log. Since current state represents all latest key values known to the channel, it is sometimes referred to as World State.
Chaincode invocations execute transactions against the current state data. To make these chaincode interactions extremely efficient, the latest values of all keys are stored in a state database. The state database is simply an indexed view into the chain’s transaction log, it can therefore be regenerated from the chain at any time. The state database will automatically get recovered (or generated if needed) upon peer startup, before transactions are accepted.
Transaction Flow
At a high level, the transaction flow consists of a transaction proposal sent by an application client to specific endorsing peers. The endorsing peers verify the client signature, and execute a chaincode function to simulate the transaction. The output is the chaincode results, a set of key/value versions that were read in the chaincode (read set), and the set of keys/values that were written in chaincode (write set). The proposal response gets sent back to the client along with an endorsement signature.
The client assembles the endorsements into a transaction payload and broadcasts it to an ordering service. The ordering service delivers ordered transactions as blocks to all peers on a channel.
Before committal, peers will validate the transactions. First, they will check the endorsement policy to ensure that the correct allotment of the specified peers have signed the results, and they will authenticate the signatures against the transaction payload.
Secondly, peers will perform a versioning check against the transaction read set, to ensure data integrity and protect against threats such as double-spending. The fabric has concurrency control whereby transactions execute in parallel (by endorsers) to increase throughput, and upon commit (by all peers) each transaction is verified to ensure that no other transaction has modified data it has read. In other words, it ensures that the data that was read during chaincode execution has not changed since execution (endorsement) time, and therefore the execution results are still valid and can be committed to the ledger state database. If the data that was read has been changed by another transaction, then the transaction in the block is marked as invalid and is not applied to the ledger state database. The client application is alerted, and can handle the error or retry as appropriate.
See the Transaction Flow and Read-Write set semantics topics for a deeper dive on transaction structure, concurrency control, and the state DB.
State Database options
State database options include LevelDB and CouchDB (beta). LevelDB is the default key/value state database embedded in the peer process. CouchDB is an optional alternative external state database. Like the LevelDB key/value store, CouchDB can store any binary data that is modeled in chaincode (CouchDB attachment functionality is used internally for non-JSON binary data). But as a JSON document store, CouchDB additionally enables rich query against the chaincode data, when chaincode values (e.g. assets) are modeled as JSON data.
Both LevelDB and CouchDB support core chaincode operations such as getting and setting a key (asset), and querying based on keys. Keys can be queried by range, and composite keys can be modeled to enable equivalence queries against multiple parameters. For example a composite key of (owner,asset_id) can be used to query all assets owned by a certain entity. These key-based queries can be used for read-only queries against the ledger, as well as in transactions that update the ledger.
If you model assets as JSON and use CouchDB, you can also perform complex rich queries against the chaincode data values, using the CouchDB JSON query language within chaincode. These types of queries are excellent for understanding what is on the ledger. Proposal responses for these types of queries are typically useful to the client application, but are not typically submitted as transactions to the ordering service. In fact the fabric does not guarantee the result set is stable between chaincode execution and commit time for rich queries, and therefore rich queries are not appropriate for use in update transactions, unless your application can guarantee the result set is stable between chaincode execution time and commit time, or can handle potential changes in subsequent transactions. For example, if you perform a rich query for all assets owned by Alice and transfer them to Bob, a new asset may be assigned to Alice by another transaction between chaincode execution time and commit time, and you would miss this ‘phantom’ item.
CouchDB runs as a separate database process alongside the peer, therefore there are additional considerations in terms of setup, management, and operations. You may consider starting with the default embedded LevelDB, and move to CouchDB if you require the additional complex rich queries. It is a good practice to model chaincode asset data as JSON, so that you have the option to perform complex rich queries if needed in the future.
To enable CouchDB as the state database, configure the /fabric/sampleconfig/core.yaml stateDatabase
section.
Read-Write set semantics
This documents discusses the details of the current implementation about the semantics of read-write sets.
Transaction simulation and read-write set
During simulation of a transaction at an endorser, a read-write set
is prepared for the transaction. The read set contains a list of
unique keys and their committed versions that the transaction reads
during simulation. The write set contains a list of unique keys
(though there can be overlap with the keys present in the read set) and
their new values that the transaction writes. A delete marker is set (in
the place of new value) for the key if the update performed by the
transaction is to delete the key.
Further, if the transaction writes a value multiple times for a key, only the last written value is retained. Also, if a transaction reads a value for a key, the value in the committed state is returned even if the transaction has updated the value for the key before issuing the read. In another words, Read-your-writes semantics are not supported.
As noted earlier, the versions of the keys are recorded only in the read set; the write set just contains the list of unique keys and their latest values set by the transaction.
There could be various schemes for implementing versions. The minimal requirement for a versioning scheme is to produce non-repeating identifiers for a given key. For instance, using monotonically increasing numbers for versions can be one such scheme. In the current implementation, we use a blockchain height based versioning scheme in which the height of the committing transaction is used as the latest version for all the keys modified by the transaction. In this scheme, the height of a transaction is represented by a tuple (txNumber is the height of the transaction within the block). This scheme has many advantages over the incremental number scheme - primarily, it enables other components such as statedb, transaction simulation and validation for making efficient design choices.
Following is an illustration of an example read-write set prepared by simulation of a hypothetical transaction. For the sake of simplicity, in the illustrations, we use the incremental numbers for representing the versions.
<TxReadWriteSet>
  <NsReadWriteSet name="chaincode1">
    <read-set>
      <read key="K1", version="1">
      <read key="K2", version="1">
    </read-set>
    <write-set>
      <write key="K1", value="V1"
      <write key="K3", value="V2"
      <write key="K4", isDelete="true"
    </write-set>
  </NsReadWriteSet>
<TxReadWriteSet>
Additionally, if the transaction performs a range query during
simulation, the range query as well as its results will be added to the
read-write set as query-info.
Transaction validation and updating world state using read-write set
A committer uses the read set portion of the read-write set for
checking the validity of a transaction and the write set portion of the
read-write set for updating the versions and the values of the affected
keys.
In the validation phase, a transaction is considered valid if the
version of each key present in the read set of the transaction matches
the version for the same key in the world state - assuming all the
preceding valid transactions (including the preceding transactions
in the same block) are committed (committed-state). An additional
validation is performed if the read-write set also contains one or more
query-info.
This additional validation should ensure that no key has been
inserted/deleted/updated in the super range (i.e., union of the ranges)
of the results captured in the query-info(s). In other words, if we
re-execute any of the range queries (that the transaction performed
during simulation) during validation on the committed-state, it should
yield the same results that were observed by the transaction at the time
of simulation. This check ensures that if a transaction observes phantom
items during commit, the transaction should be marked as invalid. Note
that the this phantom protection is limited to range queries (i.e.,
GetStateByRange function in the chaincode) and not yet implemented
for other queries (i.e., GetQueryResult function in the chaincode).
Other queries are at risk of phantoms, and should therefore only be used
in read-only transactions that are not submitted to ordering, unless the
application can guarantee the stability of the result set between
simulation and validation/commit time.
If a transaction passes the validity check, the committer uses the write set for updating the world state. In the update phase, for each key present in the write set, the value in the world state for the same key is set to the value as specified in the write set. Further, the version of the key in the world state is changed to reflect the latest version.
Example simulation and validation
This section helps with understanding the semantics through an example
scenario. For the purpose of this example, the presence of a key, k,
in the world state is represented by a tuple (k,ver,val) where
ver is the latest version of the key k having val as its
value.
Now, consider a set of five transactions T1, T2, T3, T4, and T5, all
simulated on the same snapshot of the world state. The following snippet
shows the snapshot of the world state against which the transactions are
simulated and the sequence of read and write activities performed by
each of these transactions.
World state: (k1,1,v1), (k2,1,v2), (k3,1,v3), (k4,1,v4), (k5,1,v5)
T1 -> Write(k1, v1'), Write(k2, v2')
T2 -> Read(k1), Write(k3, v3')
T3 -> Write(k2, v2'')
T4 -> Write(k2, v2'''), read(k2)
T5 -> Write(k6, v6'), read(k5)
Now, assume that these transactions are ordered in the sequence of T1,..,T5 (could be contained in a single block or different blocks)
T1passes validation because it does not perform any read. Further, the tuple of keysk1andk2in the world state are updated to(k1,2,v1'), (k2,2,v2')T2fails validation because it reads a key,k1, which was modified by a preceding transaction -T1T3passes the validation because it does not perform a read. Further the tuple of the key,k2, in the world state is updated to(k2,3,v2'')T4fails the validation because it reads a key,k2, which was modified by a preceding transactionT1T5passes validation because it reads a key,k5,which was not modified by any of the preceding transactions
Note: Transactions with multiple read-write sets are not yet supported.
Gossip data dissemination protocol
Hyperledger Fabric optimizes blockchain network performance, security and scalability by dividing workload across transaction execution (endorsing and committing) peers and transaction ordering nodes. This decoupling of network operations requires a secure, reliable and scalable data dissemination protocol to ensure data integrity and consistency. To meet these requirements, the fabric implements a gossip data dissemination protocol.
Gossip protocol
Peers leverage gossip to broadcast ledger and channel data in a scalable fashion. Gossip messaging is continuous, and each peer on a channel is constantly receiving current and consistent ledger data, from multiple peers. Each gossiped message is signed, thereby allowing Byzantine participants sending faked messages to be easily identified and the distribution of the message(s) to unwanted targets to be prevented. Peers affected by delays, network partitions or other causations resulting in missed blocks, will eventually be synced up to the current ledger state by contacting peers in possession of these missing blocks.
The gossip-based data dissemination protocol performs three primary functions on a Fabric network:
- Manages peer discovery and channel membership, by continually identifying available member peers, and eventually detecting peers that have gone offline.
- Disseminates ledger data across all peers on a channel. Any peer with data that is out of sync with the rest of the channel identifies the missing blocks and syncs itself by copying the correct data.
- Bring newly connected peers up to speed by allowing peer-to-peer state transfer update of ledger data.
Gossip-based broadcasting operates by peers receiving messages from other peers on the channel, and then forwarding these messages to a number of randomly-selected peers on the channel, where this number is a configurable constant. Peers can also exercise a pull mechanism, rather than waiting for delivery of a message. This cycle repeats, with the result of channel membership, ledger and state information continually being kept current and in sync. For dissemination of new blocks, the leader peer on the channel pulls the data from the ordering service and initiates gossip dissemination to peers.
Gossip messaging
Online peers indicate their availability by continually broadcasting “alive” messages, with each containing the public key infrastructure (PKI) ID and the signature of the sender over the message. Peers maintain channel membership by collecting these alive messages; if no peer receives an alive message from a specific peer, this “dead” peer is eventually purged from channel membership. Because “alive” messages are cryptographically signed, malicious peers can never impersonate other peers, as they lack a signing key authorized by a root certificate authority (CA).
In addition to the automatic forwarding of received messages, a state reconciliation process synchronizes world state across peers on each channel. Each peer continually pulls blocks from other peers on the channel, in order to repair its own state if discrepancies are identified. Because fixed connectivity is not required to maintain gossip-based data dissemination, the process reliably provides data consistency and integrity to the shared ledger, including tolerance for node crashes.
Because channels are segregated, peers on one channel cannot message or share information on any other channel. Though any peer can belong to multiple channels, partitioned messaging prevents blocks from being disseminated to peers that are not in the channel by applying message routing policies based on peers’ channel subscriptions.
Hyperledger Fabric FAQs
Endorsement
Endorsement architecture:
- How many peers in the network need to endorse a transaction?
A. The number of peers required to endorse a transaction is driven by the endorsement policy that is specified at chaincode deployment time.
- Does an application client need to connect to all peers?
A. Clients only need to connect to as many peers as are required by the endorsement policy for the chaincode.
Security & Access Control
Data Privacy and Access Control:
- How do I ensure data privacy?
A. There are various aspects to data privacy. First, you can segregate your network into channels, where each channel represents a subset of participants that are authorized to see the data for the chaincodes that are deployed to that channel. Second, within a channel you can restrict the input data to chaincode to the set of endorsers only, by using visibility settings. The visibility setting will determine whether input and output chaincode data is included in the submitted transaction, versus just output data. Third, you can hash or encrypt the data before calling chaincode. If you hash the data then you will need a way to share the source data outside of fabric. If you encrypt the data then you will need a way to share the decryption keys outside of fabric. Fourth, you can restrict data access to certain roles in your organization, by building access control into the chaincode logic. Fifth, ledger data at rest can be encrypted via file system encryption on the peer, and data in transit is encrypted via TLS.
- Do the orderers see the transaction data?
A. No, the orderers only order transactions, they do not open the transactions. If you do not want the data to go through the orderers at all, and you are only concerned about the input data, then you can use visibility settings. The visibility setting will determine whether input and output chaincode data is included in the submitted transaction, versus just output data. Therefore the input data can be private to the endorsers only. If you do not want the orderers to see chaincode output, then you can hash or encrypt the data before calling chaincode. If you hash the data then you will need a way to share the source data outside of fabric. If you encrypt the data then you will need a way to share the decryption keys outside of fabric.
Application-side Programming Model
Transaction execution result:
- How do application clients know the outcome of a transaction?
A. The transaction simulation results are returned to the client by the endorser in the proposal response. If there are multiple endorsers, the client can check that the responses are all the same, and submit the results and endorsements for ordering and commitment. Ultimately the committing peers will validate or invalidate the transaction, and the client becomes aware of the outcome via an event, that the SDK makes available to the application client.
Ledger queries:
- How do I query the ledger data?
Within chaincode you can query based on keys. Keys can be queried by range, and composite keys can be modeled to enable equivalence queries against multiple parameters. For example a composite key of (owner,asset_id) can be used to query all assets owned by a certain entity. These key-based queries can be used for read-only queries against the ledger, as well as in transactions that update the ledger.
If you model asset data as JSON in chaincode and use CouchDB as the state database, you can also perform complex rich queries against the chaincode data values, using the CouchDB JSON query language within chaincode. The application client can perform read-only queries, but these responses are not typically submitted as part of transactions to the ordering service.
- How do I query the historical data to understand data provenance?
A. The chaincode API GetHistoryForKey() will return history of
values for a key.
Q. How to guarantee the query result is correct, especially when the peer being queried may be recovering and catching up on block processing?
A. The client can query multiple peers, compare their block heights, compare their query results, and favor the peers at the higher block heights.
Chaincode (Smart Contracts and Digital Assets)
- Does the fabric implementation support smart contract logic?
Yes. Chaincode is the fabric’s interpretation of the smart contract method/algorithm, with additional features.
A chaincode is programmatic code deployed on the network, where it is executed and validated by chain validators together during the consensus process. Developers can use chaincodes to develop business contracts, asset definitions, and collectively-managed decentralized applications.
- How do I create a business contract using the fabric?
There are generally two ways to develop business contracts: the first way is to code individual contracts into standalone instances of chaincode; the second way, and probably the more efficient way, is to use chaincode to create decentralized applications that manage the life cycle of one or multiple types of business contracts, and let end users instantiate instances of contracts within these applications.
- How do I create assets using the fabric?
Users can use chaincode (for business rules) and membership service (for digital tokens) to design assets, as well as the logic that manages them.
There are two popular approaches to defining assets in most blockchain solutions: the stateless UTXO model, where account balances are encoded into past transaction records; and the account model, where account balances are kept in state storage space on the ledger.
Each approach carries its own benefits and drawbacks. This blockchain fabric does not advocate either one over the other. Instead, one of our first requirements was to ensure that both approaches can be easily implemented with tools available in the fabric.
- Which languages are supported for writing chaincode?
Chaincode can be written in any programming language and executed in containers inside the fabric context layer. We are also looking into developing a templating language (such as Apache Velocity) that can either get compiled into chaincode or have its interpreter embedded into a chaincode container.
The fabric’s first fully supported chaincode language is Golang, and support for JavaScript and Java is planned for 2016. Support for additional languages and the development of a fabric-specific templating language have been discussed, and more details will be released in the near future.
- Does the fabric have native currency?
No. However, if you really need a native currency for your chain network, you can develop your own native currency with chaincode. One common attribute of native currency is that some amount will get transacted (the chaincode defining that currency will get called) every time a transaction is processed on its chain.
Identity Management (Membership Service)
- What is unique about the fabric’s Membership Service module?
One of the things that makes the Membership Service module stand out from the pack is our implementation of the latest advances in cryptography.
In addition to ensuring private, auditable transactions, our Membership Service module introduces the concept of enrollment and transaction certificates. This innovation ensures that only verified owners can create asset tokens, allowing an infinite number of transaction certificates to be issued through parent enrollment certificates while guaranteeing the private keys of asset tokens can be regenerated if lost.
Issuers also have the ability revoke transaction certificates or designate them to expire within a certain timeframe, allowing greater control over the asset tokens they have issued.
Like most other modules on Fabric, you can always replace the default module with another membership service option should the need arise.
- Does its Membership Service make Fabric a centralized solution?
No. The only role of the Membership Service module is to issue digital certificates to validated entities that want to participate in the network. It does not execute transactions nor is it aware of how or when these certificates are used in any particular network.
However, because certificates are the way networks regulate and manage their users, the module serves a central regulatory and organizational role.
Contributions Welcome!
We welcome contributions to the Hyperledger Project in many forms, and there’s always plenty to do!
First things first, please review the Hyperledger Project’s Code of Conduct before participating. It is important that we keep things civil.
Install prerequisites
Before we begin, if you haven’t already done so, you may wish to check that you have all the prerequisites installed on the platform(s) on which you’ll be developing blockchain applications and/or operating Hyperledger Fabric.
Getting a Linux Foundation account
In order to participate in the development of the Hyperledger Fabric project, you will need a Linux Foundation account. You will need to use your LF ID to access to all the Hyperledger community development tools, including Gerrit, Jira and the Wiki (for editing, only).
Setting up your SSH key
For Gerrit, before you can submit any change set for review, you will need to register your public SSH key. Login to Gerrit with your LFID, and click on your name in the upper right-hand corner of your browser window and then click ‘Settings’. In the left-hand margin, you should see a link for ‘SSH Public Keys’. Copy-n-paste your public SSH key into the window and press ‘Add’.
Getting help
If you are looking for something to work on, or need some expert assistance in debugging a problem or working out a fix to an issue, our community is always eager to help. We hang out on Chat, IRC (#hyperledger on freenode.net) and the mailing lists. Most of us don’t bite :grin: and will be glad to help. The only silly question is the one you don’t ask. Questions are in fact a great way to help improve the project as they highlight where our documentation could be clearer.
Requirements and Use Cases
We have a Requirements WG that is documenting use cases and from those use cases deriving requirements. If you are interested in contributing to this effort, please feel free to join the discussion in chat.
Reporting bugs
If you are a user and you find a bug, please submit an issue using
JIRA.
Please try to provide sufficient information for someone else to reproduce the
issue. One of the project’s maintainers should respond to your issue within 24
hours. If not, please bump the issue with a comment and request that it be
reviewed. You can also post to the #fabric-maintainers channel in
chat.
Fixing issues and working stories
Review the issues list and find something that interests you. You could also check the “help-wanted” list. It is wise to start with something relatively straight forward and achievable, and that no one is already assigned. If no one is assigned, then assign the issue to yourself. Please be considerate and rescind the assignment if you cannot finish in a reasonable time, or add a comment saying that you are still actively working the issue if you need a little more time.
Making Feature/Enhancement Proposals
Review JIRA. to be sure that there isn’t already an open (or recently closed) proposal for the same function. If there isn’t, to make a proposal we recommend that you open a JIRA Epic, Story or Improvement, whichever seems to best fit the circumstance and link or inline a “one pager” of the proposal that states what the feature would do and, if possible, how it might be implemented. It would help also to make a case for why the feature should be added, such as identifying specific use case(s) for which the feature is needed and a case for what the benefit would be should the feature be implemented. Once the JIRA issue is created, and the “one pager” either attached, inlined in the description field, or a link to a publicly accessible document is added to the description, send an introductory email to the hyperledger-fabric@lists.hyperledger.org mailing list linking the JIRA issue, and soliciting feedback.
Discussion of the proposed feature should be conducted in the JIRA issue itself, so that we have a consistent pattern within our community as to where to find design discussion.
Getting the support of three or more of the Fabric maintainers for the new feature will greatly enhance the probability that the feature’s related CRs will be merged.
Working with a local clone and Gerrit
We are using Gerrit to manage code contributions. If you are unfamiliar, please review this document before proceeding.
After you have familiarized yourself with Gerrit, and maybe played
around with the lf-sandbox
project,
you should be ready to set up your local development
environment.
Next, try building the project in your local development environment to ensure that everything is set up correctly.
The Logging Control document describes how to tweak the logging levels of various components within the Fabric. Finally, every source file needs to include a license header: modified to include a copyright statement for the principle author(s).
What makes a good change request?
One change at a time. Not five, not three, not ten. One and only one. Why? Because it limits the blast area of the change. If we have a regression, it is much easier to identify the culprit commit than if we have some composite change that impacts more of the code.
Include a link to the JIRA story for the change. Why? Because a) we want to track our velocity to better judge what we think we can deliver and when and b) because we can justify the change more effectively. In many cases, there should be some discussion around a proposed change and we want to link back to that from the change itself.
Include unit and integration tests (or changes to existing tests) with every change. This does not mean just happy path testing, either. It also means negative testing of any defensive code that it correctly catches input errors. When you write code, you are responsible to test it and provide the tests that demonstrate that your change does what it claims. Why? Because without this we have no clue whether our current code base actually works.
Unit tests should have NO external dependencies. You should be able to run unit tests in place with
go testor equivalent for the language. Any test that requires some external dependency (e.g. needs to be scripted to run another component) needs appropriate mocking. Anything else is not unit testing, it is integration testing by definition. Why? Because many open source developers do Test Driven Development. They place a watch on the directory that invokes the tests automagically as the code is changed. This is far more efficient than having to run a whole build between code changes. See this definition of unit testing for a good set of criteria to keep in mind for writing effective unit tests.Minimize the lines of code per CR. Why? Maintainers have day jobs, too. If you send a 1,000 or 2,000 LOC change, how long do you think it takes to review all of that code? Keep your changes to < 200-300 LOC, if possible. If you have a larger change, decompose it into multiple independent changess. If you are adding a bunch of new functions to fulfill the requirements of a new capability, add them separately with their tests, and then write the code that uses them to deliver the capability. Of course, there are always exceptions. If you add a small change and then add 300 LOC of tests, you will be forgiven;-) If you need to make a change that has broad impact or a bunch of generated code (protobufs, etc.). Again, there can be exceptions.
Note: large change requests, e.g. those with more than 300 LOC are more likely than not going to receive a -2, and you’ll be asked to refactor the change to conform with this guidance.
Do not stack change requests (e.g. submit a CR from the same local branch as your previous CR) unless they are related. This will minimize merge conflicts and allow changes to be merged more quickly. If you stack requests your subsequent requests may be held up because of review comments in the preceding requests.
Write a meaningful commit message. Include a meaningful 50 (or less) character title, followed by a blank line, followed by a more comprehensive description of the change. Each change MUST include the JIRA identifier corresponding to the change (e.g. [FAB-1234]). This can be in the title but should also be in the body of the commit message.
Note that Gerrit will automatically create a hyperlink to the JIRA item.
e.g.
[FAB-1234] fix foobar() panic

Fix [FAB-1234] added a check to ensure that when foobar(foo string) is called,
that there is a non-empty string argument.
Finally, be responsive. Don’t let a change request fester with review comments such that it gets to a point that it requires a rebase. It only further delays getting it merged and adds more work for you - to remediate the merge conflicts.
Communication
We use RocketChat for communication and Google Hangouts™ for screen sharing between developers. Our development planning and prioritization is done in JIRA, and we take longer running discussions/decisions to the mailing list.
Maintainers
The project’s maintainers are responsible for reviewing and merging all patches submitted for review and they guide the over-all technical direction of the project within the guidelines established by the Hyperledger Project’s Technical Steering Committee (TSC).
Becoming a maintainer
This project is managed under an open governance model as described in our charter. Projects or sub-projects will be lead by a set of maintainers. New sub-projects can designate an initial set of maintainers that will be approved by the top-level project’s existing maintainers when the project is first approved. The project’s maintainers will, from time-to-time, consider adding or removing a maintainer. An existing maintainer can submit a change set to the MAINTAINERS.rst file. If there are less than eight maintainers, a majority of the existing maintainers on that project are required to merge the change set. If there are more than eight existing maintainers, then if five or more of the maintainers concur with the proposal, the change set is then merged and the individual is added to (or alternatively, removed from) the maintainers group. explicit resignation, some infraction of the code of conduct or consistently demonstrating poor judgement.
Legal stuff
Note: Each source file must include a license header for the Apache Software License 2.0. See the template of the license header.
We have tried to make it as easy as possible to make contributions. This applies to how we handle the legal aspects of contribution. We use the same approach—the Developer’s Certificate of Origin 1.1 (DCO)—that the Linux® Kernel community uses to manage code contributions.
We simply ask that when submitting a patch for review, the developer must include a sign-off statement in the commit message.
Here is an example Signed-off-by line, which indicates that the submitter accepts the DCO:
Signed-off-by: John Doe <john.doe@hisdomain.com>
You can include this automatically when you commit a change to your
local git repository using git commit -s.
Maintainers
| Name | Gerrit | GitHub | RocketChat | |
|---|---|---|---|---|
| Artem Barger | c0rwin | c0rwin | c0rwin | bartem@il.ibm.com |
| Binh Nguyen | binhn | binhn | binhn | binhn@us.ibm.com |
| Chris Ferris | ChristopherFerris | christo4ferris | cbf | chris.ferris@gmail.com |
| Dave Enyeart | denyeart | denyeart | dave.enyeart | enyeart@us.ibm.com |
| Gabor Hosszu | hgabre | gabre | hgabor | gabor@digitalasset.com |
| Gari Singh | mastersingh24 | mastersingh24 | garisingh | gari.r.singh@gmail.com |
| Greg Haskins | greg.haskins | ghaskins | ghaskins | gregory.haskins@gmail.com |
| Jason Yellick | jyellick | jyellick | jyellick | jyellick@us.ibm.com |
| Jim Zhang | jimthematrix | jimthematrix | jzhang | jim_the_matrix@hotmail.com |
| Jonathan Levi | JonathanLevi | JonathanLevi | JonathanLevi | jonathan@hacera.com |
| Keith Smith | smithbk | smithbk | smithbk | bksmith@us.ibm.com |
| Kostas Christidis | kchristidis | kchristidis | kostas | kostas@gmail.com |
| Manish Sethi | manish-sethi | manish-sethi | manish-sethi | manish.sethi@gmail.com |
| Sheehan Anderson | sheehan | srderson | sheehan | sranderson@gmail.com |
| Srinivasan Muralidharan | muralisr | muralisrini | muralisr | muralisr@us.ibm.com |
| Tamas Blummer | TamasBlummer | tamasblummer | tamas | tamas@digitalasset.com |
| Yacov Manevich | yacovm | yacovm | yacovm | yacovm@il.ibm.com |
Using Jira to understand current work items
This document has been created to give further insight into the work in progress towards the hyperledger/fabric v1 architecture based off the community roadmap. The requirements for the roadmap are being tracked in Jira.
It was determined to organize in sprints to better track and show a prioritized order of items to be implemented based on feedback received. We’ve done this via boards. To see these boards and the priorities click on Boards -> Manage Boards:

Jira boards
Now on the left side of the screen click on All boards:

Jira boards
On this page you will see all the public (and restricted) boards that have been created. If you want to see the items with current sprint focus, click on the boards where the column labeled Visibility is All Users and the column Board type is labeled Scrum. For example the Board Name Consensus:

Jira boards
When you click on Consensus under Board name you will be directed to a page that contains the following columns:

Jira boards
The meanings to these columns are as follows:
- Backlog – list of items slated for the current sprint (sprints are defined in 2 week iterations), but are not currently in progress
- In progress – are items currently being worked by someone in the community.
- In Review – waiting to be reviewed and merged in Gerritt
- Done – merged and complete in the sprint.
If you want to see all items in the backlog for a given feature set click on the stacked rows on the left navigation of the screen:

Jira boards
This shows you items slated for the current sprint at the top, and all items in the backlog at the bottom. Items are listed in priority order.
If there is an item you are interested in working on, want more information or have questions, or if there is an item that you feel needs to be in higher priority, please add comments directly to the Jira item. All feedback and help is very much appreciated.
Setting up the development environment
Overview
Prior to the v1.0.0 release, the development environment utilized Vagrant running an Ubuntu image, which in turn launched Docker containers as a means of ensuring a consistent experience for developers who might be working with varying platforms, such as macOS, Windows, Linux, or whatever. Advances in Docker have enabled native support on the most popular development platforms: macOS and Windows. Hence, we have reworked our build to take full advantage of these advances. While we still maintain a Vagrant based approach that can be used for older versions of macOS and Windows that Docker does not support, we strongly encourage that the non-Vagrant development setup be used.
Note that while the Vagrant-based development setup could not be used in a cloud context, the Docker-based build does support cloud platforms such as AWS, Azure, Google and IBM to name a few. Please follow the instructions for Ubuntu builds, below.
Prerequisites
- Git client
- Go - 1.7 or later (for releases before v1.0, 1.6 or later)
- For macOS, Xcode must be installed
- Docker - 1.12 or later
- Docker Compose - 1.8.1 or later
- Pip
- (macOS) you may need to install gnutar, as macOS comes with bsdtar as the default, but the build uses some gnutar flags. You can use Homebrew to install it as follows:
brew install gnu-tar --with-default-names
- (only if using Vagrant) - Vagrant - 1.7.4 or later
- (only if using Vagrant) - VirtualBox - 5.0 or later
- BIOS Enabled Virtualization - Varies based on hardware
- Note: The BIOS Enabled Virtualization may be within the CPU or Security settings of the BIOS
pip, behave and docker-compose
pip install --upgrade pip
pip install behave nose docker-compose
pip install -I flask==0.10.1 python-dateutil==2.2 pytz==2014.3 pyyaml==3.10 couchdb==1.0 flask-cors==2.0.1 requests==2.4.3 pyOpenSSL==16.2.0 pysha3==1.0b1 grpcio==1.0.4

#PIP packages required for some behave tests
pip install urllib3 ndg-httpsclient pyasn1 ecdsa python-slugify grpcio-tools jinja2 b3j0f.aop six
Steps
Set your GOPATH
Make sure you have properly setup your Host’s GOPATH environment variable. This allows for both building within the Host and the VM.
Note to Windows users
If you are running Windows, before running any git clone commands,
run the following command.
git config --get core.autocrlf
If core.autocrlf is set to true, you must set it to false by
running
git config --global core.autocrlf false
If you continue with core.autocrlf set to true, the
vagrant up command will fail with the error:
./setup.sh: /bin/bash^M: bad interpreter: No such file or directory
Cloning the Fabric project
Since the Fabric project is a Go project, you’ll need to clone the
Fabric repo to your $GOPATH/src directory. If your $GOPATH has multiple
path components, then you will want to use the first one. There’s a
little bit of setup needed:
cd $GOPATH/src
mkdir -p github.com/hyperledger
cd github.com/hyperledger
Recall that we are using Gerrit for source control, which has its
own internal git repositories. Hence, we will need to clone from
Gerrit.
For brevity, the command is as follows:
git clone ssh://LFID@gerrit.hyperledger.org:29418/fabric && scp -p -P 29418 LFID@gerrit.hyperledger.org:hooks/commit-msg fabric/.git/hooks/
Note: Of course, you would want to replace LFID with your own
Linux Foundation ID.
Bootstrapping the VM using Vagrant
If you are planning on using the Vagrant developer environment, the following steps apply. Again, we recommend against its use except for developers that are limited to older versions of macOS and Windows that are not supported by Docker for Mac or Windows.
cd $GOPATH/src/github.com/hyperledger/fabric/devenv
vagrant up
Go get coffee... this will take a few minutes. Once complete, you should
be able to ssh into the Vagrant VM just created.
vagrant ssh
Once inside the VM, you can find the peer project under
$GOPATH/src/github.com/hyperledger/fabric. It is also mounted as
/hyperledger.
Building the fabric
Once you have all the dependencies installed, and have cloned the repository, you can proceed to build and test the fabric.
Notes
NOTE: Any time you change any of the files in your local fabric
directory (under $GOPATH/src/github.com/hyperledger/fabric), the
update will be instantly available within the VM fabric directory.
NOTE: If you intend to run the development environment behind an
HTTP Proxy, you need to configure the guest so that the provisioning
process may complete. You can achieve this via the vagrant-proxyconf
plugin. Install with vagrant plugin install vagrant-proxyconf and
then set the VAGRANT_HTTP_PROXY and VAGRANT_HTTPS_PROXY environment
variables before you execute vagrant up. More details are
available here: https://github.com/tmatilai/vagrant-proxyconf/
NOTE: The first time you run this command it may take quite a while to complete (it could take 30 minutes or more depending on your environment) and at times it may look like it’s not doing anything. As long you don’t get any error messages just leave it alone, it’s all good, it’s just cranking.
NOTE to Windows 10 Users: There is a known problem with vagrant on
Windows 10 (see
mitchellh/vagrant#6754).
If the vagrant up command fails it may be because you do not have
the Microsoft Visual C++ Redistributable package installed. You can
download the missing package at the following address:
http://www.microsoft.com/en-us/download/details.aspx?id=8328
Building the fabric
The following instructions assume that you have already set up your development environment.
To build the Fabric:
cd $GOPATH/src/github.com/hyperledger/fabric
make dist-clean all
Running the unit tests
Use the following sequence to run all unit tests
cd $GOPATH/src/github.com/hyperledger/fabric
make unit-test
To run a subset of tests, set the TEST_PKGS environment variable. Specify a list of packages (separated by space), for example:
export TEST_PKGS="github.com/hyperledger/fabric/core/ledger/..."
make unit-test
To run a specific test use the -run RE flag where RE is a regular
expression that matches the test case name. To run tests with verbose
output use the -v flag. For example, to run the TestGetFoo test
case, change to the directory containing the foo_test.go and
call/excecute
go test -v -run=TestGetFoo
Running Node.js Unit Tests
You must also run the Node.js unit tests to insure that the Node.js client SDK is not broken by your changes. To run the Node.js unit tests, follow the instructions here.
Running Behave BDD Tests
Note: currently, the behave tests must be run from within in the Vagrant environment. See the development environment setup instructions if you have not already set up your Vagrant environment.
Behave tests will setup networks of peers with different security and consensus configurations and verify that transactions run properly. To run these tests
cd $GOPATH/src/github.com/hyperledger/fabric
make behave
Some of the Behave tests run inside Docker containers. If a test fails and you want to have the logs from the Docker containers, run the tests with this option:
cd $GOPATH/src/github.com/hyperledger/fabric/bddtests
behave -D logs=Y
Building outside of Vagrant
It is possible to build the project and run peers outside of Vagrant. Generally speaking, one has to ‘translate’ the vagrant setup file to the platform of your choice.
Building on Z
To make building on Z easier and faster, this script is provided (which is similar to the setup file provided for vagrant). This script has been tested only on RHEL 7.2 and has some assumptions one might want to re-visit (firewall settings, development as root user, etc.). It is however sufficient for development in a personally-assigned VM instance.
To get started, from a freshly installed OS:
sudo su
yum install git
mkdir -p $HOME/git/src/github.com/hyperledger
cd $HOME/git/src/github.com/hyperledger
git clone http://gerrit.hyperledger.org/r/fabric
source fabric/devenv/setupRHELonZ.sh
From this point, you can proceed as described above for the Vagrant development environment.
cd $GOPATH/src/github.com/hyperledger/fabric
make peer unit-test behave
Building on Power Platform
Development and build on Power (ppc64le) systems is done outside of vagrant as outlined here. For ease of setting up the dev environment on Ubuntu, invoke this script as root. This script has been validated on Ubuntu 16.04 and assumes certain things (like, development system has OS repositories in place, firewall setting etc) and in general can be improvised further.
To get started on Power server installed with Ubuntu, first ensure you have properly setup your Host’s GOPATH environment variable. Then, execute the following commands to build the fabric code:
mkdir -p $GOPATH/src/github.com/hyperledger
cd $GOPATH/src/github.com/hyperledger
git clone http://gerrit.hyperledger.org/r/fabric
sudo ./fabric/devenv/setupUbuntuOnPPC64le.sh
cd $GOPATH/src/github.com/hyperledger/fabric
make dist-clean all
Configuration
Configuration utilizes the viper and cobra libraries.
There is a core.yaml file that contains the configuration for the peer process. Many of the configuration settings can be overridden on the command line by setting ENV variables that match the configuration setting, but by prefixing with ‘CORE_’. For example, logging level manipulation through the environment is shown below:
CORE_PEER_LOGGING_LEVEL=CRITICAL peer
Logging
Logging utilizes the go-logging library.
The available log levels in order of increasing verbosity are: CRITICAL | ERROR | WARNING | NOTICE | INFO | DEBUG
See the logging-control document for instructions on tweaking the level of log messages to output when running the various Fabric components.
Requesting a Linux Foundation Account
Contributions to the Fabric code base require a Linux Foundation account. Follow the steps below to create a Linux Foundation account.
Creating a Linux Foundation ID
- Go to the Linux Foundation ID website.
- Select the option
I need to create a Linux Foundation ID. - Fill out the form that appears:
- Open your email account and look for a message with the subject line: “Validate your Linux Foundation ID email”.
- Open the received URL to validate your email address.
- Verify the browser displays the message
You have successfully validated your e-mail address. - Access
Gerritby selectingSign In: - Use your Linux Foundation ID to Sign In:
Configuring Gerrit to Use SSH
Gerrit uses SSH to interact with your Git client. A SSH private key needs to be generated on the development machine with a matching public key on the Gerrit server.
If you already have a SSH key-pair, skip this section.
As an example, we provide the steps to generate the SSH key-pair on a Linux environment. Follow the equivalent steps on your OS.
- Create a key-pair, enter:
ssh-keygen -t rsa -C "John Doe john.doe@example.com"
Note: This will ask you for a password to protect the private key as it generates a unique key. Please keep this password private, and DO NOT enter a blank password.
The generated key-pair is found in: ~/.ssh/id_rsa and
~/.ssh/id_rsa.pub.
- Add the private key in the
id_rsafile in your key ring, e.g.:
ssh-add ~/.ssh/id_rsa
Once the key-pair has been generated, the public key must be added to Gerrit.
Follow these steps to add your public key id_rsa.pub to the Gerrit
account:
- Go to Gerrit.
- Click on your account name in the upper right corner.
- From the pop-up menu, select
Settings. - On the left side menu, click on
SSH Public Keys. - Paste the contents of your public key
~/.ssh/id_rsa.puband clickAdd key.
Note: The id_rsa.pub file can be opened with any text editor.
Ensure that all the contents of the file are selected, copied and pasted
into the Add SSH key window in Gerrit.
Note: The ssh key generation instructions operate on the assumtion
that you are using the default naming. It is possible to generate
multiple ssh Keys and to name the resulting files differently. See the
ssh-keygen documentation
for details on how to do that. Once you have generated non-default keys,
you need to configure ssh to use the correct key for Gerrit. In that
case, you need to create a ~/.ssh/config file modeled after the one
below.
host gerrit.hyperledger.org
 HostName gerrit.hyperledger.org
 IdentityFile ~/.ssh/id_rsa_hyperledger_gerrit
 User <LFID>
where is your Linux Foundation ID and the value of IdentityFile is the name of the public key file you generated.
Warning: Potential Security Risk! Do not copy your private key
~/.ssh/id_rsa Use only the public ~/.ssh/id_rsa.pub.
Checking Out the Source Code
- Ensure that SSH has been set up properly. See
Configuring Gerrit to Use SSHfor details. - Clone the repository with your Linux Foundation ID ():
git clone ssh://<LFID>@gerrit.hyperledger.org:29418/fabric fabric
You have successfully checked out a copy of the source code to your local machine.
Working with Gerrit
Follow these instructions to collaborate on the Hyperledger Fabric Project through the Gerrit review system.
Please be sure that you are subscribed to the mailing list and of course, you can reach out on chat if you need help.
Gerrit assigns the following roles to users:
- Submitters: May submit changes for consideration, review other code changes, and make recommendations for acceptance or rejection by voting +1 or -1, respectively.
- Maintainers: May approve or reject changes based upon feedback from reviewers voting +2 or -2, respectively.
- Builders: (e.g. Jenkins) May use the build automation infrastructure to verify the change.
Maintainers should be familiar with the review process. However, anyone is welcome to (and encouraged!) review changes, and hence may find that document of value.
Git-review
There’s a very useful tool for working with Gerrit called git-review. This command-line tool can automate most of the ensuing sections for you. Of course, reading the information below is also highly recommended so that you understand what’s going on behind the scenes.
Sandbox project
We have created a sandbox project to allow developers to familiarize themselves with Gerrit and our workflows. Please do feel free to use this project to experiment with the commands and tools, below.
Getting deeper into Gerrit
A comprehensive walk-through of Gerrit is beyond the scope of this document. There are plenty of resources available on the Internet. A good summary can be found here. We have also provided a set of Best Practices that you may find helpful.
Working with a local clone of the repository
To work on something, whether a new feature or a bugfix:
Open the Gerrit Projects page
Select the project you wish to work on.
Open a terminal window and clone the project locally using the
Clone with git hookURL. Be sure thatsshis also selected, as this will make authentication much simpler:git clone ssh://LFID@gerrit.hyperledger.org:29418/fabric && scp -p -P 29418 LFID@gerrit.hyperledger.org:hooks/commit-msg fabric/.git/hooks/
Note: if you are cloning the fabric project repository, you will
want to clone it to the $GOPATH/src/github.com/hyperledger directory
so that it will build, and so that you can use it with the Vagrant
development environment.
- Create a descriptively-named branch off of your cloned repository
cd fabric
git checkout -b issue-nnnn
- Commit your code. For an in-depth discussion of creating an effective commit, please read this document on submitting changes.
git commit -s -a
Then input precise and readable commit msg and submit.
- Any code changes that affect documentation should be accompanied by corresponding changes (or additions) to the documentation and tests. This will ensure that if the merged PR is reversed, all traces of the change will be reversed as well.
Submitting a Change
Currently, Gerrit is the only method to submit a change for review.
Note: Please review the guidelines for making and submitting a change.
Use git review
Note: if you prefer, you can use the git-review tool instead of the following. e.g.
Add the following section to .git/config, and replace <USERNAME>
with your gerrit id.
[remote "gerrit"]
    url = ssh://<USERNAME>@gerrit.hyperledger.org:29418/fabric.git
    fetch = +refs/heads/*:refs/remotes/gerrit/*
Then submit your change with git review.
$ cd <your code dir>
$ git review
When you update your patch, you can commit with git commit --amend,
and then repeat the git review command.
Not Use git review
See the directions for building the source code.
When a change is ready for submission, Gerrit requires that the change be pushed to a special branch. The name of this special branch contains a reference to the final branch where the code should reside, once accepted.
For the Hyperledger Fabric Project, the special branch is called
refs/for/master.
To push the current local development branch to the gerrit server, open a terminal window at the root of your cloned repository:
cd <your clone dir>
git push origin HEAD:refs/for/master
If the command executes correctly, the output should look similar to this:
Counting objects: 3, done.
Writing objects: 100% (3/3), 306 bytes | 0 bytes/s, done.
Total 3 (delta 0), reused 0 (delta 0)
remote: Processing changes: new: 1, refs: 1, done
remote:
remote: New Changes:
remote:   https://gerrit.hyperledger.org/r/6 Test commit
remote:
To ssh://LFID@gerrit.hyperledger.org:29418/fabric
* [new branch]      HEAD -> refs/for/master
The gerrit server generates a link where the change can be tracked.
Adding reviewers
Optionally, you can add reviewers to your change.
To specify a list of reviewers via the command line, add
%r=reviewer@project.org to your push command. For example:
git push origin HEAD:refs/for/master%r=rev1@email.com,r=rev2@notemail.com
Alternatively, you can auto-configure GIT to add a set of reviewers if your commits will have the same reviewers all at the time.
To add a list of default reviewers, open the :file:.git/config file
in the project directory and add the following line in the
[ branch “master” ] section:
[branch "master"] #.... push =
HEAD:refs/for/master%r=rev1@email.com,r=rev2@notemail.com`
Make sure to use actual email addresses instead of the
@email.com and @notemail.com addressses. Don’t forget to replace
origin with your git remote name.
Reviewing Using Gerrit
- Add: This button allows the change submitter to manually add names of people who should review a change; start typing a name and the system will auto-complete based on the list of people registered and with access to the system. They will be notified by email that you are requesting their input.
- Abandon: This button is available to the submitter only; it allows a committer to abandon a change and remove it from the merge queue.
- Change-ID: This ID is generated by Gerrit (or system). It becomes useful when the review process determines that your commit(s) have to be amended. You may submit a new version; and if the same Change-ID header (and value) are present, Gerrit will remember it and present it as another version of the same change.
- Status: Currently, the example change is in review status, as indicated by “Needs Verified” in the upper-left corner. The list of Reviewers will all emit their opinion, voting +1 if they agree to the merge, -1 if they disagree. Gerrit users with a Maintainer role can agree to the merge or refuse it by voting +2 or -2 respectively.
Notifications are sent to the email address in your commit message’s Signed-off-by line. Visit your Gerrit dashboard, to check the progress of your requests.
The history tab in Gerrit will show you the in-line comments and the author of the review.
Viewing Pending Changes
Find all pending changes by clicking on the All --> Changes link in
the upper-left corner, or open this
link.
If you collaborate in multiple projects, you may wish to limit searching to the specific branch through the search bar in the upper-right side.
Add the filter project:fabric to limit the visible changes to only those from the Hyperledger Fabric Project.
List all current changes you submitted, or list just those changes in
need of your input by clicking on My --> Changes or open this
link
Submitting a Change to Gerrit
Carefully review the following before submitting a change. These guidelines apply to developers that are new to open source, as well as to experienced open source developers.
Change Requirements
This section contains guidelines for submitting code changes for review. For more information on how to submit a change using Gerrit, please see Gerrit.
Changes are submitted as Git commits. Each commit must contain:
- a short and descriptive subject line that is 72 characters or fewer, followed by a blank line.
- a change description with your logic or reasoning for the changes, followed by a blank line
- a Signed-off-by line, followed by a colon (Signed-off-by:)
- a Change-Id identifier line, followed by a colon (Change-Id:). Gerrit won’t accept patches without this identifier.
A commit with the above details is considered well-formed.
All changes and topics sent to Gerrit must be well-formed.
Informationally, commit messages must include:
- what the change does,
- why you chose that approach, and
- how you know it works – for example, which tests you ran.
Commits must build cleanly when applied in top of each other, thus avoiding breaking bisectability. Each commit must address a single identifiable issue and must be logically self-contained.
For example: One commit fixes whitespace issues, another renames a function and a third one changes the code’s functionality. An example commit file is illustrated below in detail:
A short description of your change with no period at the end

You can add more details here in several paragraphs, but please keep each line
width less than 80 characters. A bug fix should include the issue number.

Fix Issue # 7050.

Change-Id: IF7b6ac513b2eca5f2bab9728ebd8b7e504d3cebe1
Signed-off-by: Your Name <commit-sender@email.address>
Each commit must contain the following line at the bottom of the commit message:
Signed-off-by: Your Name <your@email.address>
The name in the Signed-off-by line and your email must match the change
authorship information. Make sure your :file:.git/config is set up
correctly. Always submit the full set of changes via Gerrit.
When a change is included in the set to enable other changes, but it will not be part of the final set, please let the reviewers know this.
Reviewing a Change
- Click on a link for incoming or outgoing review.
- The details of the change and its current status are loaded:
- Status: Displays the current status of the change. In the example below, the status reads: Needs Verified.
- Reply: Click on this button after reviewing to add a final review message and a score, -1, 0 or +1.
- Patch Sets: If multiple revisions of a patch exist, this button enables navigation among revisions to see the changes. By default, the most recent revision is presented.
- Download: This button brings up another window with multiple options to download or checkout the current changeset. The button on the right copies the line to your clipboard. You can easily paste it into your git interface to work with the patch as you prefer.
Underneath the commit information, the files that have been changed by this patch are displayed.
- Click on a filename to review it. Select the code base to
differentiate against. The default is
Baseand it will generally be what is needed. - The review page presents the changes made to the file. At the top of the review, the presentation shows some general navigation options. Navigate through the patch set using the arrows on the top right corner. It is possible to go to the previous or next file in the set or to return to the main change screen. Click on the yellow sticky pad to add comments to the whole file.
The focus of the page is on the comparison window. The changes made are presented in green on the right versus the base version on the left. Double click to highlight the text within the actual change to provide feedback on a specific section of the code. Press c once the code is highlighted to add comments to that section.
- After adding the comment, it is saved as a Draft.
- Once you have reviewed all files and provided feedback, click the
green up arrow at the top right to return to the main change page.
Click the
Replybutton, write some final comments, and submit your score for the patch set. ClickPostto submit the review of each reviewed file, as well as your final comment and score. Gerrit sends an email to the change-submitter and all listed reviewers. Finally, it logs the review for future reference. All individual comments are saved as Draft until thePostbutton is clicked.
Gerrit Recommended Practices
This document presents some best practices to help you use Gerrit more effectively. The intent is to show how content can be submitted easily. Use the recommended practices to reduce your troubleshooting time and improve participation in the community.
Browsing the Git Tree
Visit
Gerrit
then select Projects --> List --> SELECT-PROJECT --> Branches.
Select the branch that interests you, click on gitweb located on the
right-hand side. Now, gitweb loads your selection on the Git web
interface and redirects appropriately.
Watching a Project
Visit
Gerrit,
then select Settings, located on the top right corner. Select
Watched Projects and then add any projects that interest you.
Commit Messages
Gerrit follows the Git commit message format. Ensure the headers are at the bottom and don’t contain blank lines between one another. The following example shows the format and content expected in a commit message:
Brief (no more than 50 chars) one line description.
Elaborate summary of the changes made referencing why (motivation), what was changed and how it was tested. Note also any changes to documentation made to remain consistent with the code changes, wrapping text at 72 chars/line.
The Gerrit server provides a precommit hook to autogenerate the Change-Id which is one time use.
Recommended reading: How to Write a Git Commit Message
Avoid Pushing Untested Work to a Gerrit Server
To avoid pushing untested work to Gerrit.
Check your work at least three times before pushing your change to Gerrit. Be mindful of what information you are publishing.
Keeping Track of Changes
- Set Gerrit to send you emails:
- Gerrit will add you to the email distribution list for a change if a developer adds you as a reviewer, or if you comment on a specific Patch Set.
- Opening a change in Gerrit’s review interface is a quick way to follow that change.
- Watch projects in the Gerrit projects section at
Gerrit, select at least New Changes, New Patch Sets, All Comments and Submitted Changes.
Always track the projects you are working on; also see the feedback/comments mailing list to learn and help others ramp up.
Topic branches
Topic branches are temporary branches that you push to commit a set of logically-grouped dependent commits:
To push changes from REMOTE/master tree to Gerrit for being reviewed
as a topic in TopicName use the following command as an example:
$ git push REMOTE HEAD:refs/for/master/TopicName
The topic will show up in the review :abbr:UI and in the
Open Changes List. Topic branches will disappear from the master
tree when its content is merged.
Creating a Cover Letter for a Topic
You may decide whether or not you’d like the cover letter to appear in the history.
- To make a cover letter that appears in the history, use this command:
git commit --allow-empty
Edit the commit message, this message then becomes the cover letter. The command used doesn’t change any files in the source tree.
- To make a cover letter that doesn’t appear in the history follow these steps:
- Put the empty commit at the end of your commits list so it can be ignoredwithout having to rebase.
Now add your commits
git commit ...
git commit ...
git commit ...
- Finally, push the commits to a topic branch. The following command is an example:
git push REMOTE HEAD:refs/for/master/TopicName
If you already have commits but you want to set a cover letter, create an empty commit for the cover letter and move the commit so it becomes the last commit on the list. Use the following command as an example:
git rebase -i HEAD~#Commits
Be careful to uncomment the commit before moving it. #Commits is the
sum of the commits plus your new cover letter.
Finding Available Topics
$ ssh -p 29418 gerrit.hyperledger.org gerrit query \ status:open project:fabric branch:master \
| grep topic: | sort -u
- gerrit.hyperledger.org Is the current URL where the project is hosted.
- status Indicates the topic’s current status: open , merged, abandoned, draft, merge conflict.
- project Refers to the current name of the project, in this case fabric.
- branch The topic is searched at this branch.
- topic The name of an specific topic, leave it blank to include them all.
- sort Sorts the found topics, in this case by update (-u).
Downloading or Checking Out a Change
In the review UI, on the top right corner, the Download link provides a list of commands and hyperlinks to checkout or download diffs or files.
We recommend the use of the git review plugin. The steps to install git review are beyond the scope of this document. Refer to the git review documentation for the installation process.
To check out a specific change using Git, the following command usually works:
git review -d CHANGEID
If you don’t have Git-review installed, the following commands will do the same thing:
git fetch REMOTE refs/changes/NN/CHANGEIDNN/VERSION \ && git checkout FETCH_HEAD
For example, for the 4th version of change 2464, NN is the first two digits (24):
git fetch REMOTE refs/changes/24/2464/4 \ && git checkout FETCH_HEAD
Using Draft Branches
You can use draft branches to add specific reviewers before you
publishing your change. The Draft Branches are pushed to
refs/drafts/master/TopicName
The next command ensures a local branch is created:
git checkout -b BRANCHNAME
The next command pushes your change to the drafts branch under TopicName:
git push REMOTE HEAD:refs/drafts/master/TopicName
Using Sandbox Branches
You can create your own branches to develop features. The branches are
pushed to the refs/sandbox/USERNAME/BRANCHNAME location.
These commands ensure the branch is created in Gerrit’s server.
git checkout -b sandbox/USERNAME/BRANCHNAME
git push --set-upstream REMOTE HEAD:refs/heads/sandbox/USERNAME/BRANCHNAME
Usually, the process to create content is:
- develop the code,
- break the information into small commits,
- submit changes,
- apply feedback,
- rebase.
The next command pushes forcibly without review:
git push REMOTE sandbox/USERNAME/BRANCHNAME
You can also push forcibly with review:
git push REMOTE HEAD:ref/for/sandbox/USERNAME/BRANCHNAME
Updating the Version of a Change
During the review process, you might be asked to update your change. It is possible to submit multiple versions of the same change. Each version of the change is called a patch set.
Always maintain the Change-Id that was assigned. For example, there is a list of commits, c0...c7, which were submitted as a topic branch:
git log REMOTE/master..master

c0
...
c7

git push REMOTE HEAD:refs/for/master/SOMETOPIC
After you get reviewers’ feedback, there are changes in c3 and c4 that must be fixed. If the fix requires rebasing, rebasing changes the commit Ids, see the rebasing section for more information. However, you must keep the same Change-Id and push the changes again:
git push REMOTE HEAD:refs/for/master/SOMETOPIC
This new push creates a patches revision, your local history is then
cleared. However you can still access the history of your changes in
Gerrit on the review UI section, for each change.
It is also permitted to add more commits when pushing new versions.
Rebasing
Rebasing is usually the last step before pushing changes to Gerrit; this allows you to make the necessary Change-Ids. The Change-Ids must be kept the same.
- squash: mixes two or more commits into a single one.
- reword: changes the commit message.
- edit: changes the commit content.
- reorder: allows you to interchange the order of the commits.
- rebase: stacks the commits on top of the master.
Rebasing During a Pull
Before pushing a rebase to your master, ensure that the history has a consecutive order.
For example, your REMOTE/master has the list of commits from a0
to a4; Then, your changes c0...c7 are on top of a4; thus:
git log --oneline REMOTE/master..master

a0
a1
a2
a3
a4
c0
c1
...
c7
If REMOTE/master receives commits a5, a6 and a7. Pull
with a rebase as follows:
git pull --rebase REMOTE master
This pulls a5-a7 and re-apply c0-c7 on top of them:
$ git log --oneline REMOTE/master..master
a0
...
a7
c0
c1
...
c7
Getting Better Logs from Git
Use these commands to change the configuration of Git in order to produce better logs:
git config log.abbrevCommit true
The command above sets the log to abbreviate the commits’ hash.
git config log.abbrev 5
The command above sets the abbreviation length to the last 5 characters of the hash.
git config format.pretty oneline
The command above avoids the insertion of an unnecessary line before the Author line.
To make these configuration changes specifically for the current Git
user, you must add the path option --global to config as
follows:
Testing
Unit test
See building the fabric for unit testing instructions.
See Unit test coverage reports
To see coverage for a package and all sub-packages, execute the test with the -cover switch:
go test ./... -cover
To see exactly which lines are not covered for a package, generate an html report with source code annotated by coverage:
go test -coverprofile=coverage.out
go tool cover -html=coverage.out -o coverage.html
System test
[WIP] ...coming soon
This topic is intended to contain recommended test scenarios, as well as current performance numbers against a variety of configurations.
Coding guidelines
Coding Golang
We code in Go™ and strictly follow the best practices and will not accept any deviations. You must run the following tools against your Go code and fix all errors and warnings: - golint - go vet - goimports
Generating gRPC code
If you modify any .proto files, run the following command to
generate/update the respective .pb.go files.
cd $GOPATH/src/github.com/hyperledger/fabric
make protos
Adding or updating Go packages
The Hyperledger Fabric Project uses Go 1.6 vendoring for package
management. This means that all required packages reside in the
vendor folder within the fabric project. Go will use packages in
this folder instead of the GOPATH when the go install or
go build commands are executed. To manage the packages in the
vendor folder, we use
Govendor, which is installed
in the Vagrant environment. The following commands can be used for
package management:
# Add external packages.
govendor add +external

# Add a specific package.
govendor add github.com/kardianos/osext

# Update vendor packages.
govendor update +vendor

# Revert back to normal GOPATH packages.
govendor remove +vendor

# List package.
govendor list
Needs Review
Glossary
Terminology is important, so that all Fabric users and developers agree on what we mean by each specific term. What is chaincode, for example. So we’ll point you there, whenever you want to reassure yourself. Of course, feel free to read the entire thing in one sitting if you like, it’s pretty enlightening!
Anchor Peer
A peer node on a channel that all other peers can discover and communicate with. Each Member on a channel has an anchor peer (or multiple anchor peers to prevent single point of failure), allowing for peers belonging to different Members to discover all existing peers on a channel.
Block
An ordered set of transactions that is cryptographically linked to the preceding block(s) on a channel.
Chain
The ledger’s chain is a transaction log structured as hash-linked blocks of transactions. Peers receive blocks of transactions from the ordering service, mark the block’s transactions as valid or invalid based on endorsement policies and concurrency violations, and append the block to the hash chain on the peer’s file system.
Chaincode
Chaincode is software, running on a ledger, to encode assets and the transaction instructions (business logic) for modifying the assets.
Channel
A channel is a private blockchain overlay on a Fabric network, allowing for data isolation and confidentiality. A channel-specific ledger is shared across the peers in the channel, and transacting parties must be properly authenticated to a channel in order to interact with it. Channels are defined by a Configuration-Block.
Commitment
Each Peer on a channel validates ordered blocks of transactions and then commits (writes/appends) the blocks to its replica of the channel Ledger. Peers also mark each transaction in each block as valid or invalid.
Concurrency Control Version Check
Concurrency Control Version Check is a method of keeping state in sync across peers on a channel. Peers execute transactions in parallel, and before commitment to the ledger, peers check that the data read at execution time has not changed. If the data read for the transaction has changed between execution time and commitment time, then a Concurrency Control Version Check violation has occurred, and the transaction is marked as invalid on the ledger and values are not updated in the state database.
Configuration Block
Contains the configuration data defining members and policies for a system chain (ordering service) or channel. Any configuration modifications to a channel or overall network (e.g. a member leaving or joining) will result in a new configuration block being appended to the appropriate chain. This block will contain the contents of the genesis block, plus the delta.
Consensus
A broader term overarching the entire transactional flow, which serves to generate an agreement on the order and to confirm the correctness of the set of transactions constituting a block.
Current State
The current state of the ledger represents the latest values for all keys ever included in its chain transaction log. Peers commit the latest values to ledger current state for each valid transaction included in a processed block. Since current state represents all latest key values known to the channel, it is sometimes referred to as World State. Chaincode executes transaction proposals against current state data.
Dynamic Membership
Fabric supports the addition/removal of members, peers, and ordering service nodes, without compromising the operationality of the overall network. Dynamic membership is critical when business relationships adjust and entities need to be added/removed for various reasons.
Endorsement
Refers to the process where specific peer nodes execute a transaction and return
a YES/NO response to the client application that generated the transaction proposal.
Chaincode applications have corresponding endorsement policies, in which the endorsing
peers are specified.
Endorsement policy
Defines the peer nodes on a channel that must execute transactions attached to a specific chaincode application, and the required combination of responses (endorsements). A policy could require that a transaction be endorsed by a minimum number of endorsing peers, a minimum percentage of endorsing peers, or by all endorsing peers that are assigned to a specific chaincode application. Policies can be curated based on the application and the desired level of resilience against misbehavior (deliberate or not) by the endorsing peers. A distinct endorsement policy for install and instantiate transactions is also required.
Fabric-ca
Fabric-ca is the default Certificate Authority component, which issues PKI-based certificates to network member organizations and their users. The CA issues one root certificate (rootCert) to each member, one enrollment certificate (eCert) to each authorized user, and a number of transaction certificates (tCerts) for each eCert.
Genesis Block
The configuration block that initializes a blockchain network or channel, and also serves as the first block on a chain.
Gossip Protocol
The gossip data dissemination protocol performs three functions: 1) manages peer discovery and channel membership; 2) disseminates ledger data across all peers on the channel; 3) syncs ledger state across all peers on the channel. Refer to the Gossip topic for more details.
Initialize
A method to initialize a chaincode application.
Install
The process of placing a chaincode on a peer’s file system.
Instantiate
The process of starting a chaincode container.
Invoke
Used to call chaincode functions. Invocations are captured as transaction proposals, which then pass through a modular flow of endorsement, ordering, validation, committal. The structure of invoke is a function and an array of arguments.
Leading Peer
Each Member can own multiple peers on each channel that it subscribes to. One of these peers is serves as the leading peer for the channel, in order to communicate with the network ordering service on behalf of the member. The ordering service “delivers” blocks to the leading peer(s) on a channel, who then distribute them to other peers within the same member cluster.
Ledger
A ledger is a channel’s chain and current state data which is maintained by each peer on the channel.
Member
A legally separate entity that owns a unique root certificate for the network. Network components such as peer nodes and application clients will be linked to a member.
Membership Service Provider
The Membership Service Provider (MSP) refers to an abstract component of the system that provides credentials to clients, and peers for them to participate in a Hyperledger Fabric network. Clients use these credentials to authenticate their transactions, and peers use these credentials to authenticate transaction processing results (endorsements). While strongly connected to the transaction processing components of the systems, this interface aims to have membership services components defined, in such a way that alternate implementations of this can be smoothly plugged in without modifying the core of transaction processing components of the system.
Membership Services
Membership Services authenticates, authorizes, and manages identities on a permissioned blockchain network. The membership services code that runs in peers and orderers both authenticates and authorizes blockchain operations. It is a PKI-based implementation of the Membership Services Provider (MSP) abstraction.
The fabric-ca component is an implementation of membership services to manage
identities. In particular, it handles the issuance and revocation of enrollment
certificates and transaction certificates.
An enrollment certificate is a long-term identity credential; a transaction certificate is a short-term identity credential which is both anonymous and un-linkable.
Ordering Service
A defined collective of nodes that orders transactions into a block. The ordering service exists independent of the peer processes and orders transactions on a first-come-first-serve basis for all channel’s on the network. The ordering service is designed to support pluggable implementations beyond the out-of-the-box SOLO and Kafka varieties. The ordering service is a common binding for the overall network; it contains the cryptographic identity material tied to each Member.
Peer
A network entity that maintains a ledger and runs chaincode containers in order to perform read/write operations to the ledger. Peers are owned and maintained by members.
Policy
There are policies for endorsement, validation, block committal, chaincode management and network/channel management.
Proposal
A request for endorsement that is aimed at specific peers on a channel. Each proposal is either an instantiate or an invoke (read/write) request.
Query
A query requests the value of a key(s) against the current state.
Software Development Kit (SDK)
The Hyperledger Fabric client SDK provides a structured environment of libraries for developers to write and test chaincode applications. The SDK is fully configurable and extensible through a standard interface. Components, including cryptographic algorithms for signatures, logging frameworks and state stores, are easily swapped in and out of the SDK. The SDK API uses protocol buffers over gRPC for transaction processing, membership services, node traversal and event handling applications to communicate across the fabric. The SDK comes in multiple flavors - Node.js, Java. and Python.
State Database
Current state data is stored in a state database for efficient reads and queries from chaincode. These databases include levelDB and couchDB.
System Chain
Contains a configuration block defining the network at a system level. The system chain lives within the ordering service, and similar to a channel, has an initial configuration containing information such as: MSP information, policies, and configuration details. Any change to the overall network (e.g. a new org joining or a new ordering node being added) will result in a new configuration block being added to the system chain.
The system chain can be thought of as the common binding for a channel or group of channels. For instance, a collection of financial institutions may form a consortium (represented through the system chain), and then proceed to create channels relative to their aligned and varying business agendas.
Transaction
An invoke or instantiate operation. Invokes are requests to read/write data from the ledger. Instantiate is a request to start a chaincode container on a peer.
Release Notes
v1.0.0-beta June 8, 2017
Bug fixes, documentation and test coverage improvements, UX improvements based on user feedback and changes to address a variety of static scan findings (unused code, static security scanning, spelling, linting and more).
Upgraded to latest version (a precursor to 1.4.0) of gRPC-go and implemented keep-alive feature for improved resiliency.
Added a new tool configtxlator to enable users to translate the contents of a channel configuration transaction into a human readable form.
Known Vulnerabilities
none
Resolved Vulnerabilities
none
Known Issues & Workarounds
BCCSP content in the configtx.yaml has been removed. This change will cause a panic when running configtxgen tool with a configtx.yaml file that includes the removed BCCSP content.
Java Chaincode support has been disabled until post 1.0.0 as it is not yet fully mature. It may be re-enabled for experimentation by cloning the hyperledger/fabric repository, reversing this commit and building your own fork.
The second alpha release of the v1.0.0 Hyperledger Fabric project. The code is now feature complete. From now until the v1.0.0 release, the community is focused on documentation improvements, testing, hardening, bug fixing and tooling. We will be releasing successive release candidates periodically as the release firms up.
v1.0.0-alpha March 16, 2017
The first alpha release of the v1.0.0 Hyperledger Fabric project. The code is being made available to developers to begin exploring the v1.0 architecture.
v0.6-preview September 16, 2016
A developer preview release of the Hyperledger Fabric intended to exercise the release logistics and stabilize a set of capabilities for developers to try out. This will be the last release under the original architecture. All subsequent releases will deliver on the v1.0 architecture.
v0.5-developer-preview June 17, 2016
A developer preview release of the Hyperledger Fabric intended to exercise the release logistics and stabilize a set of capabilities for developers to try out.
Key features:
Permissioned blockchain with immediate finality Chaincode (aka smart contract) execution environments Docker container (user chaincode) In-process with peer (system chaincode) Pluggable consensus with PBFT, NOOPS (development mode), SIEVE (prototype) Event framework supports pre-defined and custom events Client SDK (Node.js), basic REST APIs and CLIs Known Key Bugs and work in progress
- 1895 - Client SDK interfaces may crash if wrong parameter specified
- 1901 - Slow response after a few hours of stress testing
- 1911 - Missing peer event listener on the client SDK
- 889 - The attributes in the TCert are not encrypted. This work is still on-going
Still Have Questions?
We try to maintain a comprehensive set of documentation for various audiences. However, we realize that often there are questions that remain unanswered. For any technical questions relating to the Hyperledger Fabric project not answered in this documentation, please use StackOverflow. If you need help finding things, please don’t hesitate to send a note to the mailing list, or ask on RocketChat (an alternative to Slack).
Status
This project is an Active Hyperledger project. For more information on the history of this project see the Fabric wiki page. Information on what Active entails can be found in the Hyperledger Project Lifecycle document.
License
The Hyperledger Project uses the Apache License Version 2.0 software license.